Sunday, March 30, 2014

Easter Flower Arrangments

It's getting closer to spring (thank goodness!) and that means Easter is right around the corner.  I normally don't decorate for Easter, but since it is Roman's first Easter I thought I would this year.  I love fresh flowers, but with a cat in the house they usually don't last long.  Even if I can keep the cat away from them they only last a week, at the most, and they can be very expensive. 

So the other night I let John put Roman to bed and I snuck off to visit my third love, the dollar store!  Easter had thrown up all over that place and it was glorious!  I had so many ideas running through my head that I filled and emptied my basket a few times trying to decide what I wanted to make.  They had their spring artificial flowers out and they actually didn't look horribly fake (sometimes it's hit and miss).  So I picked up 15 stems of 5 different types of flowers.  I thought I was going to have to use the regular, not so pretty, plastic flower pots but then I spotted the tin planters. So I picked up two with two different pictures on them.  I completely forgot to look for floral foam so I picked that up at Michael's later on.  Total cost for 2 arrangements.......$30!

 
Supplies
2 flower pots
2 pieces of floral foam roughly the same size as your pots
Artificial flowers - My pots were 12x6" and I used 15 stems of flowers with a few pieces left over.
 

First you need to trim your foam to fit into your pot.  I pressed the bottom of my pot into the floral foam to make a template to cut.  The best tool I've found for cutting floral foam is a bread knife.  I highly recommend cutting this foam on some newspaper so you have less mess to clean up.  Once the foam is cut set it into your pot.


Using wire snips I cut the individual stems off the main stem of the flower.  This allows you to place the flowers exactly where you want them, and spread them out, rather than having each type of flower in one large cluster.  If you don't have wire snips, I've also used an old pair of dog nail clippers.  Probably not something Martha Stewart would tell you to do, but hey, it works!


Now the fun part, arranging the flowers!  One at a time, poke the stem into the floral foam.  I plan on sitting my arrangements against a wall, so I put the tallest flowers at the back of the pot.  If the stems are longer than you like you can trim the bottoms.  If you want the stems to be a little taller, don't push them as far into the floral foam.


Continue adding floweres until the pot is completely full and it has a shape you are happy with.  The great thing about the floral foam is that it allows you to experiment and change your design as you go.  If you don't like the way something looks you can move it or replace it with another flower.  I also like to stick some flowers into the foam on an angle.  This way you can camouflage the stems and any open spots there may be.  It also makes it look a little more realistic because the flowers aren't all perfectly vertical.


Once I had my flowers arranged I added some sparkly eggs and berries just to give the arrangements a little punch.  Plus who doesn't love sparkles!?  Once Easter is over you can remove the eggs if you wish and you have beautiful arrangements that will take you right through the spring season.  I don't normally make my arrangements identicle, but if you like that look you can make them match.

I love using dollar store flowers because they are so inexpensive.  Flowers from Michael's can cost as much as $12 for one flower, and a pre-made arrangement of this size could cost as much as $50!  To me, that is way too much for a seasonal flower arrangement.  Now I know that sometimes the dollar store flowers look extremely fake, and sometimes like plastic.  I suggest checking out different dollar store chains (Dollarama, Dollar Tree, etc.) as some have a better selection of artificial flowers than others.

These arrangements definitely make my house feel a little more like spring.  Maybe if I put them outside they'll help melt the 3 feet of snow in my yard....

Friday, March 28, 2014

White Chocolate Easter Crunch

This crunch has two main problems.  1. It is incredibly addicting and you won't be able to stop eating it.  2. It is so easy to make that after you eat an entire batch, you will make another and eat that one too.  I guess those aren't necessarily bad problems to have, but if you're trying to make this for your kid's Easter basket, or gifts for teachers, it could cause some issues. 

I was inspired to make this delectable crunch by a similar crunch my Mom received at Christmas from a cousin of mine.  It was a gift for Mom, but I think I ended up eating most of it while I was visiting her. She had it out on the counter so it was fair game!!

 
I recommend buying the ingredients for this recipe at a bulk store like Bulk Barn. This way you can buy only what you need and you don't end up with half a box of Shreddies that will go to waste if you don't use it all.
 
White Chocolate Easter Crunch
2 c Shreddies
2 c pretzel sticks
1 1/2 c unsalted peanuts
1 1/2 c candy covered chocolate eggs
3 c white chocolate melts
parchment paper

In a large bowl combine Shreddies, pretzels and peanuts.  Heat chocolate in a double boiler until completely melted.  I know everyone says not to melt chocolate in a pan on direct heat but I don't have a glass bowl that fits on to of my pot, so that's exactly what I did.  If you use this method, keep the heat very low and remove the pot from the heat as soon as the chocolate is melted to prevent it from seizing up.


Pour the melted chocolate over the snack mix.  Stir everything together until the snack mix is well coated with chocolate.  Add candy coated chocolate eggs and stir until they are evenly distributed.

 
Turn the crunch out onto a parchment paper lined baking sheet and flatten into a smooth slab.  Allow the crunch to cool for 20-30 minutes.  Once the chocolate has hardened break it into chunks.  Now you could simply put it in a bowl and devour it, or you could bag it up as a gift! Anyone would be happy to have a bag of this in their Easter basket!


This crunch has everything you could want in a scrumptious snack.  The saltiness of the pretzels and peanuts, the crunch of the Shreddies, and the sweetness of the chocolate, makes this triple threat snack.  The Easter Bunny only wishes his treats were this delicious!  Maybe I should send him the recipe...

This crunch could be customized to fit any occasion just by switching out the candy covered chocolate eggs for another seasonal candy or chocolate.  You could also add sprinkles to really give it a pop of color.

Wednesday, March 26, 2014

Simple White Cake

Believe it or not, some people don't like chocolate cake *gasp*!  I know, this seems like a crime against humanity, but they are still people too!  If I'm throwing a party I try to have something that everyone will enjoy, which usually means multiple flavors of cupcakes.  Plus it gives me the opportunity to experiment!  In this situation, most of the guests were older family members (don't hate me!!) and I thought chocolate and a white cake would be a safe bet.  This recipe was originally posted on Allrecipes.com.

Simple White Cake
1 cup sugar
1/2 cup butter, softened
2 eggs
2t vanilla
1 1/2 cups flour
1 3/4t baking powder
1/2 cup milk

Cream butter and sugar until smooth.
Beat in eggs and vanilla.

Combine flour and baking powder in a small bowl.  Slowly add to the creamed mixture.
Stir in the milk until smooth.


Spoon into muffin cups.  *TIP - to make sure you end up with uniform cupcakes, use a measuring cup to fill the muffin cups.  Not only will they look great but they will also all cook at the same rate if they are the same size.

Bake at 350° for 20-25 minutes, until a toothpick inserted into the centre comes out clean.


Make sure the cupcakes are completely cooled before icing or it will melt and run off the cupcake, which is never a good situation for anyone involved.

This white cake recipe is very simple and quick to whip up.  It is on the denser side, almost like a pound cake, so it would also work extremely well for a cake with multiple layers.  I love white cakes because you can pair them with an interesting or intense frosting flavor and they are delicious.  I decided to pair these cupcakes with a coconut flavored butter cream icing because it is John's favorite.  You could also all food coloring to the cupcake batter and make them whatever color your occasion calls for!

Monday, March 24, 2014

Arranging Fresh Flowers

I love fresh flowers!  Anytime I'm in a flower shop or a grocery store I look at the arrangements with wonder, wishing I could take one home with me.  Sometimes it's really hard to justify $50 for a flower arrangement that is going to last a week, if that is, I managed to keep the cat away from them.

Well I've found a way to turn those cheaper bunches of cut flowers into an arrangement that looks just as good as the $50 arrangement.  This simple trick not only saves you money, but you can create an arrangement with any combination of flowers.  This technique works especially well for flowers with flimsy stems like daisies and tulips.

I originally wanted to make an arrangement of tulips for spring because they were on sale at Sobey's for $2 a bunch!  So Roman and I headed out in the wind to find us some tulips.  Of course when I got there there were only 3 bunches of tulips left and the looked as if Roman had been using them as a teething toy.  Not the look I was going for.  So I decided to use mini gerbera daisies since they were on sale Buy 1 Get 1 Free!


Supplies
Fresh cut flowers (how many you need will depend on the size of your vase)
Vase
Double sided tape


Tape out a grid on the top of your vase.  I started by running a strip of tape horizontally in the middle of my vase.  Then added more strips of tape leaving a space between each strip as wide as the tape itself.  You can leave a larger space if you have flowers with larger stems.  Repeat this process with the tape running vertically.  Taping out this grid is the secret to arranging flowers!  The grid will hold the stems up and allow you to position them just the way you want them.  It also makes your arrangement look fuller without having to buy more flowers. 

I prefer to use double sided tape for two reasons; 1. it's super sticky and holds well on glass, and 2. it's not as wide as regular tape so you have more spaces for flowers.  You want just enough tape hanging over the edge of the vase that it stay in place but is still covered by the flowers once they are in the vase.

To prepare the flowers, remove as many leaves from the flowers as you can.  The flower will use energy to keep the leaves alive.  If you remove the leaves, the flower will use that energy to keep the bloom alive rather than the leaves.  If you like the leaves, just remove the ones that will fall below the water line, as this will keep your water clean. 


Now all you have to do is place your flowers in the holes left in the grid.  You can experiment with how you want your arrangement to look and trim your flower stems accordingly.  *TIP -  cut your flower stems on an angle.  This allows the flower to pull in more water, which makes it last longer.  You can have more than one flower per space and you may not use all the spaces in the grid.


Doesn't this look so much better than tossing the flowers into a vase and having them all flop over the edges?!  There is nothing worse than spending money on fresh flowers only to be disappointed with the way they look in a vase.  The tape grid makes these $20 worth of gerbera daisies look like a $50 arrangement you'd purchase at a florist.

If you need to top up the water in the vase, simply insert a funnel into one of the spaces in the grid.  This way you won't have to completely rearrange your flowers.  The simple addition of a ribbon around the centre of the vase would make this a great gift for someone!

Saturday, March 22, 2014

Pasta with Oil, Lemon and Fresh Tomato

This is a dish that frequently makes an appearance in our house.  Usually saved for the summer, we often break this recipe out when we have little to no groceries left in the fridge and we need to eat.  It's also a great recipe for the nights when John has a meeting after work and I would just rather not cook, but know I shouldn't eat half a box of cookies for supper (you know you've been there too!).

 
Normally this is a "dump it in until it tastes right" recipe, but for the sake of a recipe I've included measurements.

Pasta with Oil, Lemon and Fresh Tomato
1/2 box (225 grams) pasta
1/4 cup extra virgin olive oil
juice of 1 lemon
3 tomatoes, chopped
1/3 cup onion, chopped (optional)
parmesan cheese

Cook pasta as directed on the package.  *My pasta cooking tip* - Hold the pasta vertically with both hands, knuckles facing away from you. Rotate your hands in opposite directions so your knuckles are facing to either side. Set past into the water, release, and the pasta should fan out. This allows the pasta to cook at the same time as it slides into the pot.  Drain and return to the pot.


Add remaining ingredients (excluding cheese) to the pasta.  Toss to coat.
 

Top with parmesan before serving.


In the summer I love to add pea or broccoli shoots from the local farmers market to this dish.  I've even started to see these shoots in grocery stores.  I highly recommend trying them, they are absolutely delicious!  They add a pop of color and a fresh crunch to the pasta.  This is an easy, delicious, and relatively health supper. Especially if the alternative is a box of cookies.

Thursday, March 20, 2014

Roman's meals and snacks for the month

Most people dread grocery shopping, but I'm one of the few that really enjoy it!  The only thing I like more than buying food for John and I is guying food for Roman!  I don't know what it is about buying ingredients to make Roman's food but I just love it!  Maybe it's because everything is new to him and I love seeing his reaction to a new food.  Or maybe it's because I can cook with ingredients that I don't normally eat and he loves them.  Either way, I could literally make purees for him all day every day.
 
I still have a fairly decent supply of proteins in the freezer for Roman, so this time I was just stocking up on fruits and vegetables.  Roman has always loved food and now that he is a little older, he is really enjoying feeding himself. 
 
Avocados are a great snack as they are soft enough to be gummed and they are incredibly nutritious.  We usually have avocado in Roman's hair, clothes, high chair, and all over his face, but he does get a large portion of it in his mouth!  I usually save the avocado snacks for the end of the day when his clothes are headed to the wash and he's headed to the tub.
 
Roman has had sweet potato before but this time I was feeling inspired and decided to spice things up.  I baked the sweet potato to bring out their natural sweetness, then added cinnamon and nutmeg to them.  In my mind I was thinking about recreating a sweet potato casserole, but I've never tasted a sweet potato casserole, so this was just what I thought one would taste like, minus the marshmallows.
 
The papaya was an impulse item that I picked up strictly because it looked interesting.  I've never had papaya but I thought we would give it a try.  I decided to slice up a bit of it for Roman to snack on while John and I ate supper one night.  First things first, who knew papaya smelled so horrible?  That alone made me feel skeptical that Roman would like it.  Turns out I know my boy well.  One lick was all it took for him to decide he was not eating whatever strange matter I had put on his tray.  Normally I would keep introducing a food that Roman doesn't like on his first try, but I don't really blame him this time, so John is going to finish the papaya off.  You win some you lose some I guess.
 
Roman LOVES greens!  Spinach and kale were both huge hits for him, so this time I picked up an organic spinach, kale & chard mix.  I steamed the greens and pureed them with garlic.  Being part of an Italian/German/Ukrainian family, Roman is going to have to learn to like garlic or he probably will never eat again.  Although I seem to remember my Mom and Dad having to basically blend garlic to add to our food as kids because we wouldn't eat it if we saw white "stuff" in it....
 
The peppers will be used in a hummus type recipe I'm going to make for Roman.  I plan on roasting them in the oven, removing the skin and adding them to pureed chick peas with garlic and tomato.  Sounds delicious doesn't it?  I'm sure Roman will think so.  I made plain chick peas for him once before and he LOVED them.  I didn't particularly love the smell cooking the chick peas left in my house for the entire day though.  I guess we all make sacrifices for our kids!
 
The peaches and the yogurt I used to make a delicious baby version of peach cobbler.  I had been craving berry cobbler after I saw it on TV, so Roman was lucky enough to be on the receiving end of my craving.
 
Last, but definitely not least, the Kamut Puffs!  Apparently they don't call it puffed wheat anymore...  Whatever they are called, Roman thinks these are the best thing he has ever tasted!  He loves shoveling handfuls of them into his mouth.  Whether or not they all make it there and stay there is another story.  A lot of people give their little ones the rice puff treats made by Gerber, which is fine, but they are a little on the pricey side.  This big bag of Kamut only cost $5 and it's organic, how can you go wrong?
 
**NOTE: I am not a dietitian or doctor. Always consult a health care professional before changing your infants diet.

Peach Cobbler with Ice Cream

I was watching the Food Network the other day (always a recipe for a HUGE food craving), and they were making berry cobbler.  After salivating through the entire episode, and trying to quench the craving with a cookie or two (didn't work), I managed to put the mouth watering craving behind me.  That was until Roman and I went shopping for some fruits and veggies for him.  I was shocked to see peaches in the grocery store at this time of the year, but excited at the same time.  That's when it hit me.  If I couldn't have berry cobbler, Roman was going to have peach cobbler by golly!  What a lucky kid to be the recipient of my food cravings!!


Obviously I'm not feeding Roman a traditional peach cobbler, although I'm sure he'd love that too. I have however included all the components of the traditional peach cobbler, including the ice cream (a variation of it) in this baby friendly recipe!  This puree makes a flavorful breakfast or dessert for your little one.  Plus, you can feel confident knowing that they are eating nutritious food that isn't loaded with sugar!

Peach Cobble with Ice Cream
1 1/2 large peaches
1/4 cup prepared oatmeal (originally posted on Wholesomebabyfood.com) OR oat baby cereal
1/4 cup Greek yogurt

Mill large flake or steel cut oats in a blender or food processor until they are finely ground.


In a small saucepan, bring 1 cup of water to boil.  Slowly add oats while whisking constantly.  Continue whisking and simmer the oats for 10 minutes.  You can add formula/breast milk to the oats to reach your desired consistency.  Set the oatmeal aside.


To prepare the peaches, wash, peel, and remove the pit.  Cut the peaches into segments and steam for 10 minutes until tender.  When I cook for Roman, I avoid canned fruits and vegetables whenever possible.  Canned foods have added salt, sugar and preservatives.  Frozen peaches are a great option, especially if the fresh ones aren't in such great shape.  Because fruits and vegetables are picked and frozen at peak ripeness, the quality can sometimes be better than fresh.


Once the peaches are steamed, transfer them into a blender and puree to the consistency that works for your baby.  Again, you can add formula/breast milk if needed to reach desired consistency.  Transfer the pureed peaches to a small bowl.

Add cooked oats and Greek yogurt to the peaches and stir to combine.  *TIP - when freezing most purees it is a good idea to make them slightly thicker than you want the end product to be.  If it is still too thick after you defrost it, you can then add milk then to get the texture just right.


I freeze all my purees in regular ice cube trays.  One ice cube is the same as 1 Tablespoon and approximately 1 oz.  I store my ice cubes in small, labeled, sandwich bags.  I then place the small bags inside a large freezer bag and store them as far in the fridge as possible.  I personally like to use my purees within 4-6 weeks just to keep everything fresh.


1 out of 1 babies agree this recipe is positively scrumptious!  Just because they are babies doesn't meal that they shouldn't be able to enjoy delectable meals and interesting combinations.  Meal time shouldn't be something that is dreaded with you little bundle of joy.  That happens later on once they can throw food to the dogs and flat out refuse to eat (just a little peek into the future).

**NOTE: I am not a dietitian or doctor. Always consult a health care professional before changing your infants diet.

Tuesday, March 18, 2014

Grandma's Hash

Everything always tastes better at Grandma's house!  How is it that all Grandma's have a repertoire of the most delicious recipes?  Where did they find the food Bible?  And why is it that when you try to recreate those recipes they never taste the same?  If your Ukrainian it's probably because those pesky Babas like to leave out a few ingredients so that theirs always tastes better.  As for the rest of the Grandmas, unfortunately I don't have an answer to that question, but if you do please share!!!


Thankfully this gem of a recipe is one of the exceptions!  I remember my mom making this when I was little.  It was a favorite then, and it still is now. With only five ingredients that you likely already have on hand, my Grandma's hash recipe is quick, easy, delicious, and inexpensive!  Why not add this recipe to your freezer cooking list, as it's also great frozen and reheated!

Grandma's Hash
1 lb ground beef
1 c uncooked rice (cooked according to package instructions)
1 can crushed tomatoes OR pasta sauce OR tomato soup (with 1/2 can of water if using soup)
1/2 onion, chopped
salt and pepper to taste

Brown beef in a pan with onion until the beef is cooked through and the onion is translucent.


Add rice, crushed tomatoes, salt and pepper to the pan.  Stir to combine.  Transfer beef mixture to a 9x13" baking dish.

Bake at 350° for 30-40 minutes until the top begins to darken.  To freeze, allow the hash to cool, cover with tin foil, label, and freeze.  Reheat in the oven until warmed through.


Obviously I have to be faster with my photos when it comes to one of Grandma's recipes.  But you get the general idea of what the dish should look like when it's finished in the oven!  If you are trying to sneak vegetables into picky eats, you could finley dice some peppers and mix them in as well.  I would suggest using a red pepper in this situation so the color doesn't throw them off.

Sunday, March 16, 2014

Tissue Puffs

For our wedding in 2011, I along with the help of a few lucky people, made 4 large garbage bags full of these tissue puffs that we used to decorate our reception venue.  So I decided I wanted to make them for Roman's baptism.  I knew they were something I could make quickly in the evening after Roman went to bed, and they were very inexpensive because I purchased my supplies at the dollar store (again!).  In one hour I managed to make 8 puffs and they only set me back 20 cents each!

John however was not as excited as I was and he started twitching a bit when he saw me making them.  But don't let John's terror deter you! These are extremely easy to make and will add some pop to your next party, or even add a special touch to a nursery or child's room.


Supplies
Tissue paper
String (you could also use wire)
Scissors

Open up the tissue paper and cut the stack in half lengthwise.  Then cut the long sections in half width wise.  If you want a smaller/larger puff, cut your tissue paper into smaller/larger pieces.  I had 20 sheets of tissue paper in the package, so I separated out 10 sheets to use for each puff.  To make a fuller/thinner puff, use more/less sheets of tissue paper in each puff.

 
Start at one end of the tissue paper and start accordion folding your way to the other side.  For this size of puff you want your folds approximately an inch wide.  If you are making a different size puff you will want to adjust your fold sizes accordingly.


Tie a length of string around the centre of the tissue paper.  Be sure to leave the tails long enough that you have enough string to attach the puff to something.
 
This step is optional.  You can leave the tissue paper the way it is, or you can cut a shape into each end of the tissue paper.  The shape you cut with change the way your puff looks once it is fluffed.  No cuts will give you a rounded wave like look, whereas the pointed tip like I've done, gives you a spikier look.


Gently pull each sheet of tissue paper, one at a time, up and towards the centre.  You want all of the sheets pulled towards the same side.  As you pull more and more sheets it will get harder and harder to get them to the centre, so just pull them as close as you can.  Your puff will begin to take on a round shape as it gets fuller.
 

Tears are bound to happen when working with tissue paper, but don't panic!  If the tissue paper tears, keep separating the sheets as above.  Most of the time the fluffiness of the puff will disguise the tear.  If there is a piece hanging off the puff, carefully tear it off and keep separating the sheets.  Once the puff is completely formed it will be almost impossible to see where the tear was.  When your puff is complete you can scrunch and fluff your puff until it's just right.

 
See, I told you there was no reason to be afraid!  I simply taped these to the wall for Roman's baptism, but they could be tied to chairs, blinds, anything you can think of.  They are surprisingly durable so you could reuse them, or hang them as permanent decor, after your celebration is over! 

Cucumber Cups

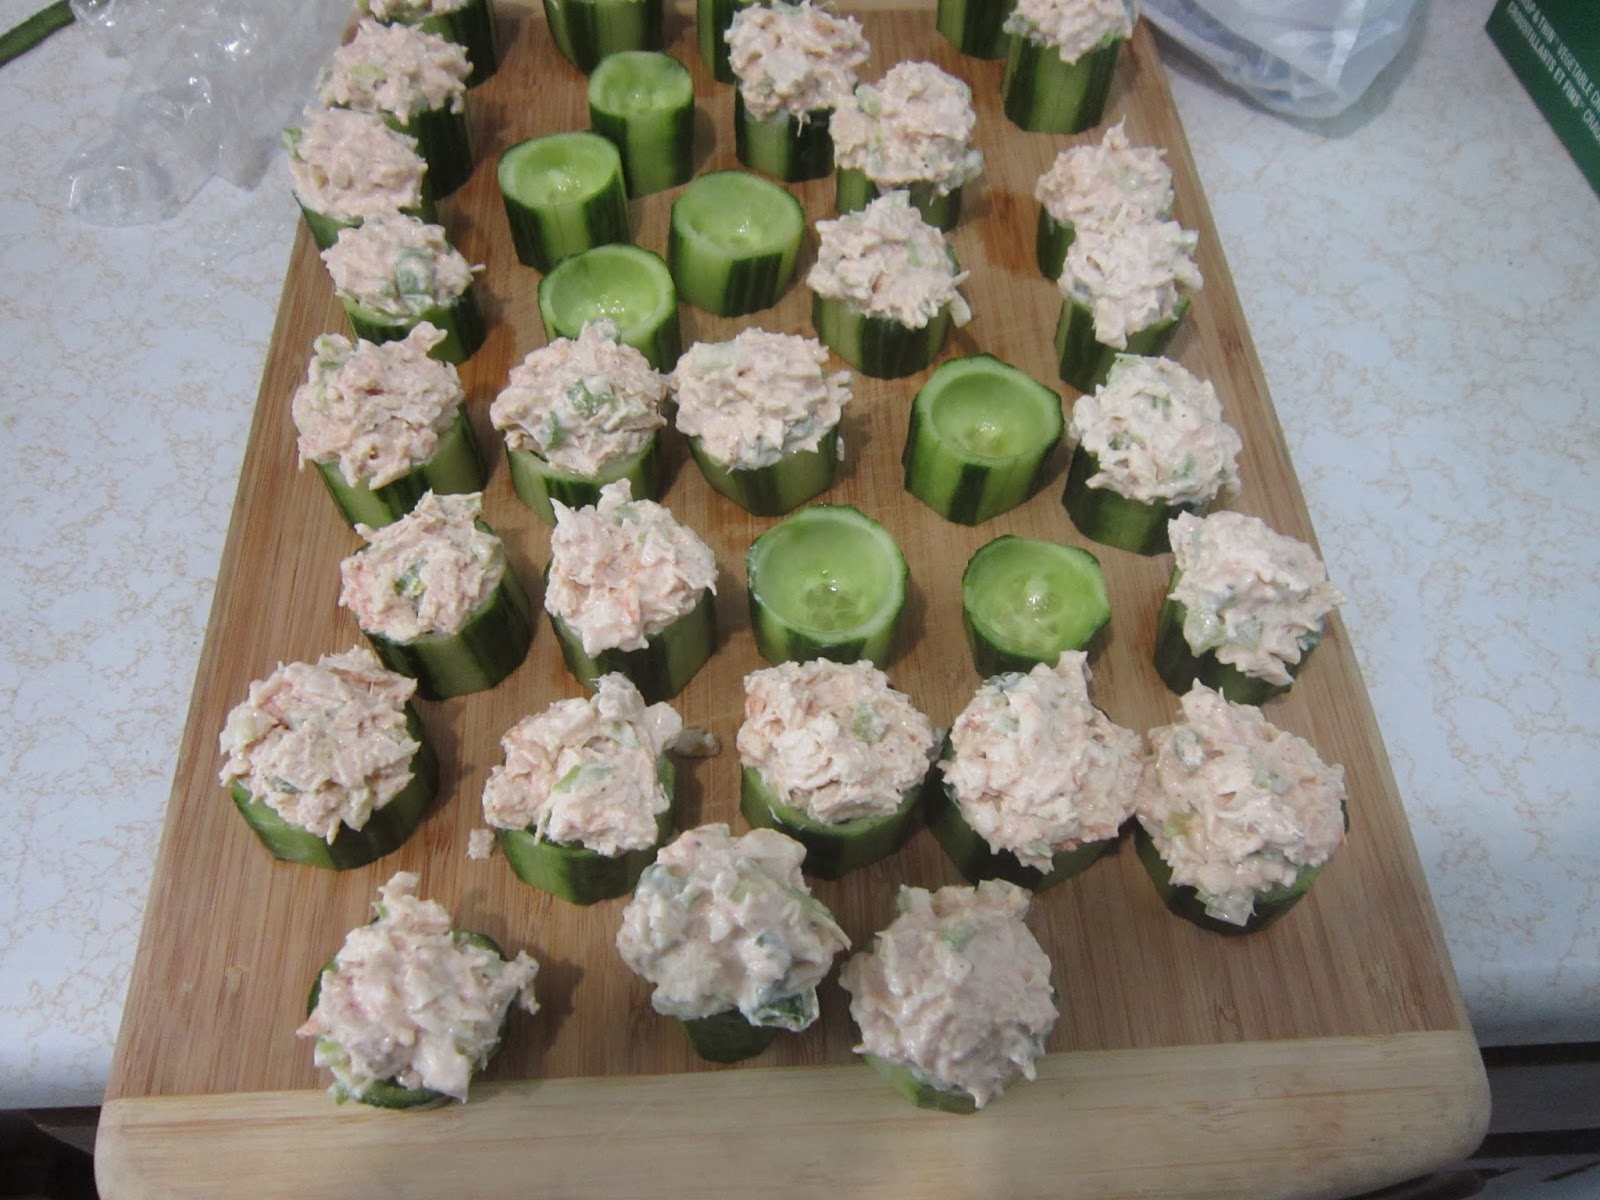
Who doesn't love being able to eat the serving vessel your meal is held in?  Tacos, chili or spinach dip in bread bowls are all huge hits because you can eat the vessel, or at least that's the way I see it.  So why not spice up your regular chicken salad by serving it in a unique way!  What a great way to trick your kids into eating their veggies than these cute cucumber cups! They are quick, easy and inexpensive (isn't everything on this blog?), and will definitely give your guests something to talk about.

They are so easy in fact that John whipped these up while I was doing my hair for Roman's baptism.  By the time I realized that he was making them he was almost completely finished!  Thankfully he saw the camera sitting on the counter and took some pictures for me.  What a great husband I have!
 

First John removed strips of peel from the cucumber to make it visually appealing (get it a-peel-ing, ba dum bump!).  He then cut the cucumber into cup size sections.  The size of the sections will vary depending on the diameter of the cucumber and the size of serving you are looking for.


To hollow out the centre of the cucumber John used a melon baller.  It convieniently fit perfectly into the centre of the cucumber.  You could use the scooped out insides for a salad, to give to your toddler, or just snack on them yourself.  Why waste good food?


Then simply fill the cups with your chicken salad.  As you can see these cucumber cups were filled "man style" and are overflowing with chicken salad. A little messier to eat but just as tasty!  You could also fill them with a crab or salmon salad.  A super cute idea would be to fill the cups with a cold soup and serve as an hor d'evour for a chic event.  Whatever you decide to fill them with, you want to make these cups the day of your event.  Once you cut and hollow out the cucumber they will become soft and squishy if left in the fridge for too long.  A soft and squishy cucumber is never appetizing.

Friday, March 14, 2014

The Perfect Buttercream Icing

A cupcake is nothing without a delicious icing.  At least that's the way I see it.  I'm not a big fan of the icing you can buy in a tub at the grocery store (unless I'm eating it straight up at 9pm), so I prefer to make my own.  Not only is this the most delicious buttercream icing you will ever taste, but its easy to make!

Traditional buttercream is made with shortening and butter.  I personally prefer an all butter buttercream as it doesn't give you the greasy taste that traditional buttercream will.  There are few things I hate more than getting excited to demolish a cupcake only to have the icing taste like fat.  I have never had a complaint about my icing other than sometimes there isn't enough, so I'm very confident that you will have great success with it too!!


Buttercream Icing
1 cup butter, softened
4 cups icing sugar
1 tsp clear vanilla extract
milk or water
gel food coloring

*NOTE - do not cut this recipe in half!  I don't know what the reason is but your icing will not turn out correctly if you try to make a half batch following this recipe.

Cream butter until smooth.
Slowly add icing sugar to butter one cup at a time.  Scraping the bowl after each cup.
Add vanilla extract.  *TIP - if you are making white icing you want to use clear vanilla extract (which is available anywhere cake decorating supplies are sold). The brown vanilla will tint the icing a slight brown color and it won't be pure white. If you are making colored icing, brown vanilla will work just fine. You could also switch out the vanilla extract for coconut, peppermint, or even lemon to compliment the flavour of your cupcake.

At this point the icing will be very thick, but don't panic!


Slowly add milk 1 tablespoon at a time until you have a smooth consistency.  For piping you don't want your icing too thick as it will be difficult to squeeze through your piping bag. However, you want it thick enough that it will hold it's shape when you pipe it.


Last, add the coloring to the icing.  I recommend using a gel food coloring as it will not change the consistency of your icing.  Dip a toothpick into the coloring a run it through the icing.  Mix until the color is evenly distributed throughout the icing.  *TIP - do not double dip your toothpick.  This will deposit icing into the color and cause bacteria to grow in your coloring.


To pipe the cupcakes I used a 10" Wilton piping bag and a 1M tip.  Fill the piping bag 3/4 full with icing.  *TIP - twist the top of the piping bag a few times to prevent icing from oozing out the top while your piping.

Start on the outside edge of the cupcake and pipe around the edge working your way towards the centre. !


This tip and piping technique make your cupcakes look professionally decorated when in truth it is one of the easiest ways to decorate a cupcake.  Your iced cupcakes can be stored on the counter for a few days as long as they are covered. Any longer than that and I would recommend keeping them in the fridge to keep the icing fresh.

Now that you hold the secret to delicious and easy buttercream, go forth and decorate!

Wednesday, March 12, 2014

Leprechaun Hat Cupcake Toppers

Leprechaun's are a huge part of St. Patrick's Day, especially for kids, so you can't have St. Patrick's Day cupcakes without Leprechaun hats!  Well I guess you could, but what fun would that be?  Since I already had the fondant out from the Pot-O-Gold toppers I figured I might as well make these too!  They are a little more tricky but still fairly easy to make, and you could still have your older kids help you assemble them!

I usually bake at least two flavors of cupcakes when I'm having a party, but since I was making these cupcakes "just because", I used the same chocolate cupcake and mint buttercream for both. For that reason I thought having two different toppers would give the cupcakes a bit more variety without having to bake a ton of cupcakes.


Supplies
Fondant - you can make your own or you can purchase pre-made fondant. The amount of fondant
                you need will depend on how many toppers you are making.
Black gel coloring
Yellow gel coloring - I used Daffodil Yellow from Wilton as it was the only yellow I had on hand.
Green gel coloring - I used Leaf Green from Wilton
Edible gold dust
Small paint brush
Rolling pin
Sharp knife
Water

*NOTE - when working with fondant you want to keep the fondant you aren't using at the moment in a air tight container to prevent it from drying out.


To color the fondant, take a ball of fondant and knead it a few times. Dip a toothpick into the coloring and run it through the fondant. Start with a small amount of color and gradually add more. It is much easier to make fondant darker than it is to lighten it. *TIP - use a new toothpick each time you dip into the coloring. If you double dip you may deposit icing into your coloring which will cause it to go bad faster. Knead the color into the fondant until it is evenly distributed. Repeat this process with the green and black coloring. *TIP - always color lighter colors first to reduce the chance of transferring color from once of fondant to the next. Washing your hands in between colors will also help.

Roll a ball of fondant 1 inch in diameter.  Roll the ball into a tear drop shape by applying pressure to one side of the ball while you roll it against a flat surface.  If the tear drop takes on a shape your not happy with, simply roll it back into a ball a try again. 


Stand the tear drop up with the smaller end on the table and press down on the top to form the top of the hat.  If you squish a little too much, lay the hat on its side and roll it against the table to lengthen it. Set aside.  Roll another ball of fondant 1 inch in diameter.  Flatten the ball into a disk 1/8-1/4 inch thick, this will form the base of the hat.  Set aside.


Take a small amount of the black fondant and roll it out as thin as you can while still being able to lift the fondant off of the table.  Using a sharp knife, cut a a strip of fondant 1/8 inch wide.  *TIP - if you let the fondant sit for a minute or two after rolling it won't be as sticky and will cut much easier.  At the same time cut a very small square of black fondant, this will be the centre of the buckle, set aside.  Using the paint brush, apply a small amount of water to the base of the hat and wrap the black strip around.  Trim off the excess black so that the ends meet.  Don't worry about the seam as we are going to cover it with the buckle. Set aside.


Roll out the yellow fondant to about the same thickness as the black fondant.  Cut a square slightly larger than the black square you cut earlier.  Apply a small amount of water to the yellow square and gently press the black square into the centre.  *TIP - if you have craft tweezers they would be helpful to get the black square into place.  I picked the square up with the tip of the knife and it worked well.  Dry the paint brush off and dip it into the edible gold glitter.  Dab the glitter onto the yellow square around the black square.  *TIP - if glitter gets on the black fondant, use a dry paint brush to brush the glitter away.
 
Apply a small amount of water to the bottom of the hat and press it onto the disk.  Ta da!  Your leprechaun hat is complete!  I would suggest letting these hats dry for at least a few hours before you place them on cupcakes because there are so many pieces that are "glued" together.  If you are making these toppers ahead of time, they can be store on a cookie sheet and covered with plastic wrap until you are ready to use them.  The hats will slowly harden but they are still completely edible!   
 
I think if I made these cupcakes again I would have white buttercream icing instead of green as the hat blends in more than I would like.  I attempted to use a green cupcake cup (with adorable shamrocks all over them I might add) but the design basically disappeared when I baked the cupcakes.  Don't you hate when that happens!?  I need to find a solution to that problem!
 
These cupcakes would be a great treat for your kids or for your kids to take to school!  Don't these hats just make you happy?  I know I would love to have a cupcake with a hat on it!  Really I just want a cupcake with anything on it...