Showing posts with label cupcake. Show all posts

Wednesday, October 19, 2016

Bianca's Baptism


The time finally came to have our baby girl baptized! The baptism itself was a small ceremony for just our family. Bianca worse the same gown Roman did when he was baptized. If you haven't read that post, this gown is actually made from my wedding dress. Apparently back in the day it was tradition to use the mom's wedding dress to make the baptism gown for the kids, but I had never heard of it until my dad mentioned it to me. Bianca's headband is one that I made for her to match the flowers I used in the table centre piece for the after party. Is it called an after party?


As soon as the ceremony was over Roman started trying to blow out the "happy birthday candles" from the pews. The Father was nice enough to let Roman blow out the candles, which I'm pretty sure was the highlight of his morning.


I felt a little guilty that Bianca's party wasn't as elaborate, and didn't have as many guests as Roman's did, but I actually like the way it all came together. Who says a small family get together can't be pretty and special! I'm not sure what brought on the peony theme, but once I had my heart set on it I had to make it happen. I picked up some faux peonies, burlap ribbon and pearls from Gale's Wholesale to make the centre piece for the table. I painted one of the many mason jars I have floating around the house pink and wrapped it with the ribbon and then the pearls. I had some pink and white glittered tissue paper and twine on hand, so I decided to make some tissue paper garlands for the window and Bianca's highchair. I think I'm going to hang the longer window garland over Bianca's bed to make her room look a little more girly.


B thought her garland was delicious, but not quite as delicious as her lunch! We had a pretty basic lunch of meat, cheese, buns, pickles and veggies. I realized after we started setting the table that I forgot to run the dishwasher so I didn't have enough plates for everyone. Next problem, rounding up some paper plates. Turns out we did have some on hand. However, the were leftover from Roman's construction party *face palm*. So I thought it would be fun to post a picture of how I staged the table for the pictures and how it actually looked when we sat down to eat.


Of course, no party is complete without cake! Or cupcakes in this case! I knew I wanted to do something super girly and fun for Bianca's cupcakes because I haven't made a girly cake in forever! I'm well versed in the cool boy cakes but I really miss making pretty things. So I decided to give buttercream peonies a shot. I found this video on YouTube to brush up on how to do it, then headed into the basement to find my tools. Then when the kids when down for a nap one day, I sat down with my bowl of buttercream and started piping. The first few were pretty rough and went straight into my mouth, but then I got the hang of it. I also realized that I didn't have to eat the messed up flowers and could just scrap them back into the bowl. I'm super pleased with how they turned out!


Normally I save the first cupcake for the kids' birthday but we decided to make an exception for B. Well, turns out Bianca is my daughter in more way than one. She was slightly confused by the strangely shaped food at first, but after I touched it to her lips, it was game on. She grabbed on to that cupcake and devoured it like a champ. It's proud moments like this that make me tear up a bit *tear*


All in all it was a fantastic day celebrating our amazing little girl. Now just three more months to prepare for her first birthday!

Wednesday, June 22, 2016

Coconut Cake with Coconut Frosting

This isn't just any coconut cake. This is John's absolute favorite cake. I used to make this cake every year for John's birthday but haven't for the last few years, on account of being pregnant, having Roman, and being pregnant. June is also a super busy birthday month for our family (John on the 21st, me on the 26th, and my mom on the 29th), so we usually just have one cake for all of us. But this year is different! This year John is on holidays the week of his birthday and Bianca is a champion napper, so that means that I have time to make the coconut cake!

If you like coconut you are going to love this cake! I don't believe is subtle flavour when it comes to cake. If it's supposed to be a coconut cake I want the coconut flavour to smack you in the face and then kick you in the shin! I came across this recipe many moons ago on AllRecipes.com but have tweaked it a bit to make it absolutely perfect. Of course I couldn't just top the cake with my regular buttercream icing, so I whipped up some coconut buttercream, then topped the cake with shaved coconut. There should be no questioning what flavour this cake it!


Coconut Cake with Coconut Frosting
2 cups sugar
1 cup butter, softened
5 eggs
2 cups flour
1 1/2t baking powder
1/2 cup coconut milk*
2 cup shredded coconut
1t coconut extract**
Coconut Frosting***

* If you've never used coconut milk before it can be a little confusing. When you open the can it looks like the milk is solid, but if you dump it into a bowl and whisk it up if will become more of a cream texture. To thin it out a bit you can add some water, or to keep the coconut theme going, add some coconut water, which is what I did.
**I used Lorann Professional Kitchen Coconut Bakery Emulsion. This extract isn't as artificial tasting as others I have used, so if you can find this one I highly recommend it.
***For the coconut frosting I used my go to buttercream icing recipe but replaced the vanilla with coconut extract and the milk with some of the coconut milk I mixed up for the cake. I made it fairly soft so it was easy to spread over the cake.
I swear that's the last * for this recipe!!

Preheat oven to 350° and grease a 9" round baking pan. I, or should I say Roman, used Wilton's cake release to grease the pan. This stuff is amazing and I've never had a cake stick if I use it.

In a large bowl, or a stand mixer named Martin if you're me, cream together butter and sugar. *TIP - the more creamed the butter and sugar are the smoother your cake will be! Fold in eggs one at a time, allowing each to fully incorporate before adding the next. Add flour, baking powder, coconut extract and 1 cup shredded coconut, making sure to scrape the sides of the bowl to ensure all the flour is mixed in. Pour the mixture into the prepared cake pan and bake at 350° for 1 hour or until a toothpick inserted in the centre comes out clean. Or if you're power goes out while you're outside, which you don't notice until you come back in an hour later, 2 hours!


Let the cake to cool in the pan for a few minutes before turning it out onto a cooling rack, and allow to cool completely. Once cooled, slice the cake in half using a bread knife, or one of those fancy cake slicers if you have one and can find it. Line the outside of the cake plate with strips of parchment paper and set half of the cake on top (you'll see why in a minute). Spread a good amount of the frosting on the cake on the cake plate using a offset spatula, and sandwich the other half on top. Don't be cheap with the frosting, nobody likes a cheap froster! Spread the remainder of the frosting all over the cake. Don't worry about being too perfect with it because once it's covered with shredded coconut you won't be able to see your mistakes. You can press or throw the shredded coconut onto the side of the cake, whichever you prefer, and then sprinkle some on top. You're almost done!


Gently, very gently, slide the pieces of parchment out from under the cake to reveal a perfectly clean cake plate. Best magic trick ever and you look like a frosting wizard!


I made this cake a day early, so I had to wrap the cake in plastic wrap and pop it in the fridge. I was a little concerned that the frosting was going to stick to the plastic, but it didn't and all is well in the world. John, Roman and I all enjoyed the cake today and it was delicious. It's super rich so this cake will feed a ton of people because you really can't eat too much in one sitting. And that's saying something coming from the girl who used to eat pie filling from the can!

Wednesday, March 30, 2016

Peeps Cupcakes

Now I'm well aware that Easter has come and gone but I still want to share these super cute cupcakes with you.  It's never too early to start planning for next year right?


I came across a photo of these cupcakes on Pinterest and I really wanted to give them a shot.  Of course I didn't actually read the post that went along with the photo, I just figured I could make it work.  While the cupcakes did turn out great and tasted amazing (which is really the important part), there are a few things I would do differently the next time I make them.  Hopefully these tips will make your Peeps cupcakes even more successful!

I started out by baking my cupcakes.  You could use any recipe you like but this time I decided to use this recipe for a vanilla cake.  This is probably one of the better vanilla cake recipes I have tried and highly recommend it!  Once the cupcakes were baked and completely cooled I used a knife to cut a hole in the middle of each cupcake.  I found the easiest way to do this was to cut out a cone shape and then widen the hole with a small spoon.  I dropped a few mini M&Ms into the hole along with a mini candy covered chocolate egg.  If I could go back and redo the cupcakes I would have added a lot more M&Ms to the hole.  The few that I had dropped in ended up stuck to the icing and didn't exactly spill out of the cupcake like in the original photo.  My advice to you, fill the hole with as much candy as you can pile in there; it's the obvious solution!


I was going to use buttercream for the frosting but decided to go with a Whipped Cream Frosting since it is a little less sweet.  Heavens knows there is already enough sugar packed into these bad boys.  I piped the frosting around the edge of the cupcake and then worked my way in, completely covering the candy filled hole.  Lastly, each cupcake was topped with a Peep.  I'm personally not a fan of Peeps so I won't be eating mine but I think they are adorable; plus they scream Easter!


The only down side to the Peeps is that you get the exposed marshmallow on the sides where you separate them from each other.  If it really bothers you you could push some colored sugar into the exposed marshmallow to cover it up.  If you are making these cupcakes in advance I would suggest putting the Peeps on at the very last minute.  Not only will it make it easier to transport then, but you'll avoid having the color of your Peep bleed into the color of your frosting. 


Just because Easter is over doesn't mean you can't make these cupcakes.  Actually now is the perfect time to make them!  Why?  Because stores will be blowing the Peeps out now that Easter is over!  Go out and grab some and make some delicious spring cupcakes to share!

Tuesday, April 28, 2015

Choolate Cupcakes from Scratch

The best part of any party is the cake, especially when it comes to a birthday!  So when a friend of mine (and Roman's girlfriend) recently had a birthday I decided I wanted to give her a dozen cupcakes.  Of course they had to be chocolate because who doesn't want chocolate on their "29th & holding" birthday?

I quickly ran into a problem when I realized all my gooey chocolate cupcake recipes required ingredients I didn't have at home.  I didn't have time to run out to the store, so I headed to Pinterest.  After hunting through the recipes I finally decided on this one.  Unfortunately I didn't pin it so I can't even give credit to the baking genius that came up with it!  This scratch made recipe produces a moist, fudgey cupcake that will please every chocolate lover!


Chocolate Cupcakes from Scratch
1/2 cup cocoa powder
3/4 cup flour
1/2t baking soda
3/4t baking powder
1/4t salt
2 eggs
1/2 cup sugar
1/2 cup brown sugar
1/3 cup oil
2t vanilla
1/2 cup buttermilk*

*If you don't have buttermilk simply add 1/2T of vinegar to 1/2 cup milk and let it stand for 5 minutes; until it starts to thicken a bit.

Preheat oven to 350°.  In a large bowl stir together, cocoa powder, flour, baking soda, baking powder and salt.  In a separate bowl beat eggs and mix in sugar, brown sugar, oil and vanilla until well combined.  Stir half of the wet ingredients into the dry then mix in half the buttermilk.  Add the second half of the wet ingredients and then the remaining buttermilk; mixing until just combined.  Fill the muffin tins 1/2 full with batter and bake at 350° for 18-19 minutes.


I topped the cupcakes with my go to buttercream frosting and some silver nonpareils that I found in my baking cupboard.  Roman was very excited to deliver the cupcakes to one of his favorite people in the whole world.  Unfortunately he got a little too excited and smashed one of the cupcakes, or maybe he was just trying to put his own special touch on them?  Also, please don't judge me on the re-purposed delivery box...

Tuesday, September 9, 2014

Oh, and by the way Mom....

How many times have parents around the world heard this phrase after supper or just before bed followed by "I have to take cupcakes to school for Easter tomorrow", "We have a bake sale tomorrow", "I just remembered it's my turn to take snacks to school".  I can only imagine the streak of fear that must run through the parents body.  Luckily Roman is young enough that I haven't encountered this yet, but I'm sure it's only a matter of time.


In preparation for the day that Roman reminds me at 7:00pm that he needs treats for the next day, I decided to test out a cupcake recipe that is super quick, easy, and delicious.  I also didn't want them to look like I just unwrapped a packaged and put them into me Tupperware container, or that I whipped them up in a mass panic.  So much expectation on a tiny cupcake!  I also wanted the ingredients to be easily accessible, whether at a grocery store, corner store, or even 7-11.  Hey, desperate times call for desperate measures!

Here is what you need!
1 chocolate cake mix
1 package instant chocolate pudding powder
1 container premade chocolate frosting


I chose a No Name chocolate cake mix because I knew I was going to alter it, so the quality of the mix isn't that important.  I prepared the cake mix as per the boxes instructions but added 4T of the pudding powder to the cake mix.  This adds some moisture and fudgieness (is that a word?) to the cupcake.  This technique would work for any flavor of cake, vanilla with vanilla pudding or even spice cake with caramel pudding!  Oh my gosh that would be delicious, must add that to my list of things to try!

Now the frosting is a whole other animal.  This frosting doesn't have the most spreadable constancy but it has a fairy good flavor.  I decided to whip some life into it, literally.  I scooped the icing into my mixer and whipped it at high speed for 3-4 minutes.  This loosened the frosting up and gave it a bit of volume, and allowed me to spread the frosting on the cupcakes much easier.  When the frosting set it set with a nice sheen and, again, fudgieness to it.  I think I'm going to call Winston and have them add it to the dictionary!


These cupcakes turned out perfectly!  They are soft, moist, and perfectly chocolaty!  Including cooling time for the cupcakes, they took about 1 hour to make from start to finish.  Totally doable in a weeknight, after supper, panic stricken baking session.

*NOTE: I wanted to share a behind the scenes photo from todays blog post.  I took these photos the morning after I baked them so I had good lighting.  I wanted to have a photo of a bitten cupcake, so unfortunately I had to bite the cupcake.  Problem is I couldn't stop.  I ate the whole thing at 10:00am.  I just wanted everyone to know the pain and suffering that goes into each of these blog posts...

Thursday, July 31, 2014

Roman's First Birthday Party!

The day that my little baby turns one is getting closer and closer (by the time this goes live he will officially be 1!!), so today we celebrated this amazing little man with a spectacular jungle themed birthday party!  I absolutely love planning parties and since this was my first crack at a kids party I was super enthusiastic from the start!  Maybe a little too enthusiastic depending on who you talk to....


I'm quickly becoming known for my over the top decorations and outlandish ideas.  It does take a lot of time to put a party like this together but I love it, and when it's for my little guy, nothing but the best will do!  I had been collecting pieces for this party for months and to be honest I wasn't completely sure what all I had until I opened the boxes up again the day before the party.  I had a feeling we were in for a long decorating session, and to save my marriage (my decorating tends to drive John batty) I enlisted the help of my Mom and Mother-in-law.  It took the four of us a couple of hours but I think the result was well worth the effort!


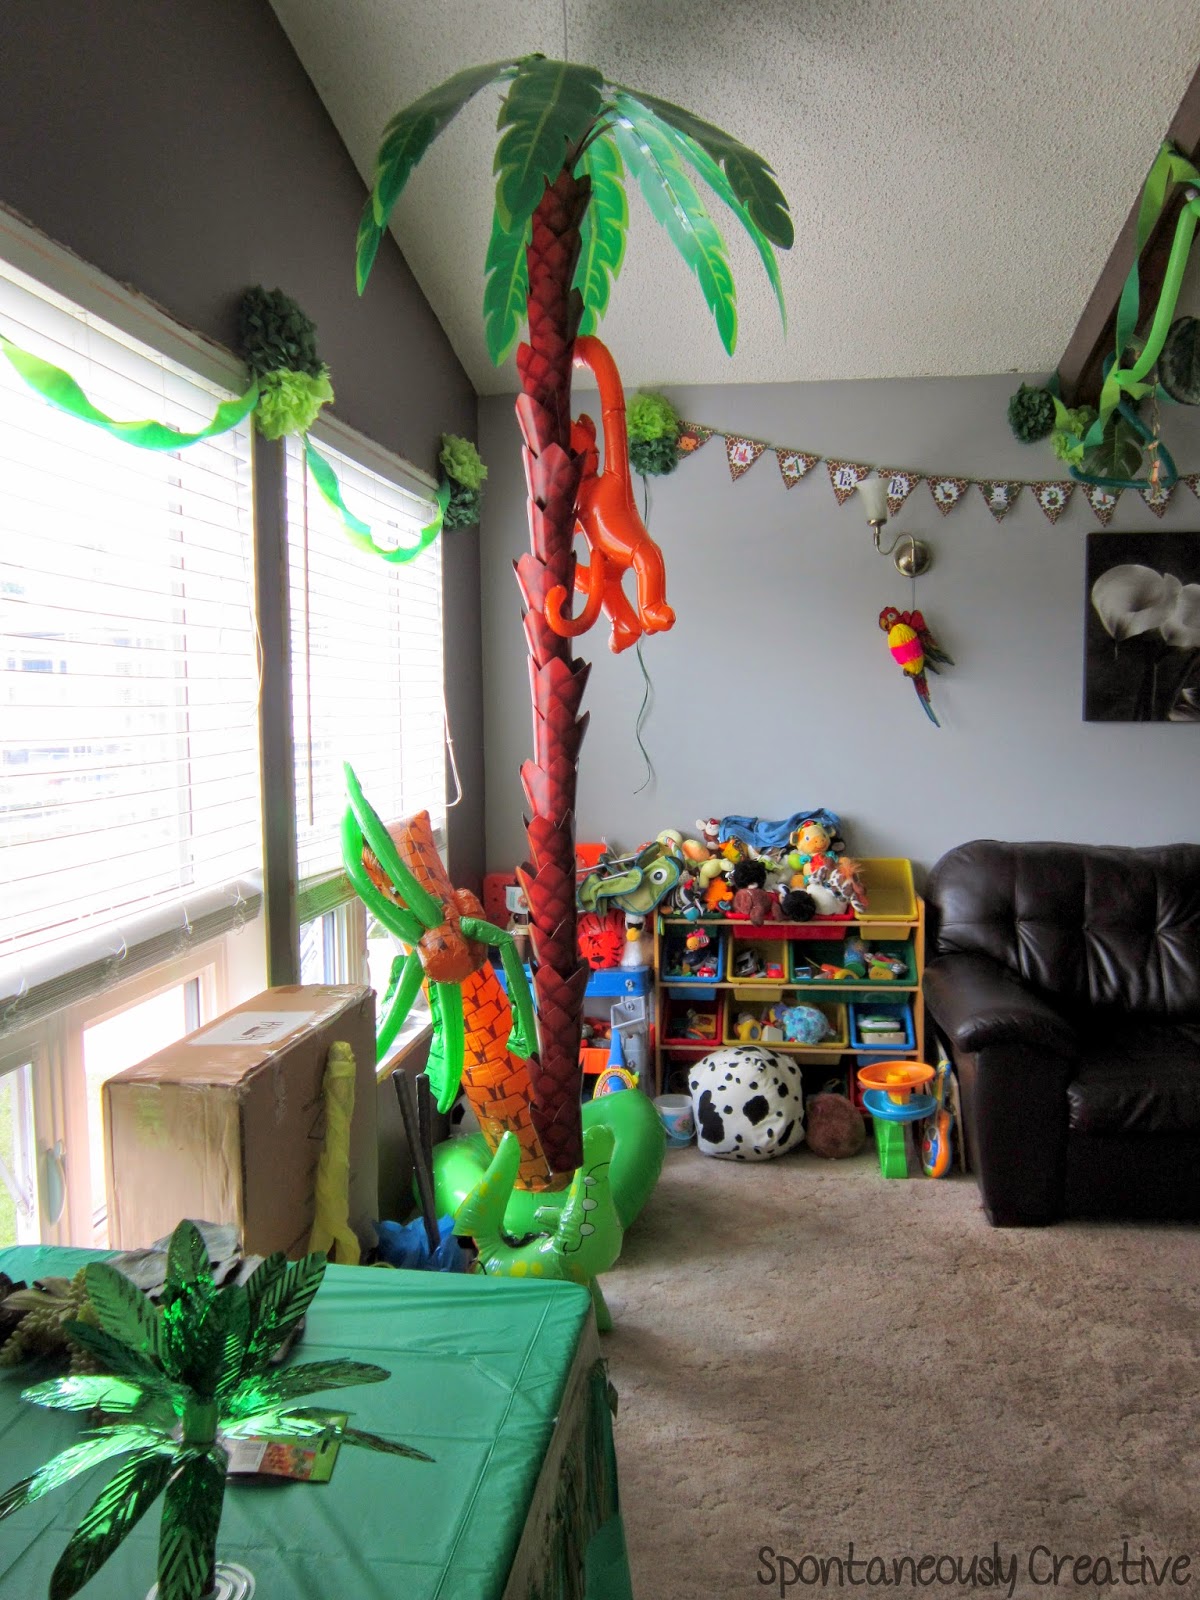
Our living room has these great brown beams that lend themselves extremely well to imitating tree trunks, so I decided to use them to my advantage.  We twisted two different shades of green streamers together and then draped them along the beams.  To make it look more authentic we weren't concerned with them being symmetrical, much to the joy of John and my Mom!  I purchased a few stems of leaves from a local craft store and removed the leaves from the stems.  Then I punched a hole in each leaf and we strung them onto fishing line.  These were then taped to the beams to give us some jungle foliage.  We also used two different shades of twisting balloons to all some fullness to the beams.  John came up with the great idea of curling the darker green balloons and I absolutely love the way they turned out!  The look was completed with some paper monkeys strung on fishing line, tissue puffs around each end of the trunks and last but definitely not least, an inflatable parrot.  Unfortunately my 5 foot monkey had some inflating issues and was pretty much flat by the time the party started.  He was still an interesting addition, even if he was a little two dimensional.


I found this great mural at a local craft store as well and I knew I wanted to incorporate it somehow.  I ended up wrapping it around our entertainment centre (since wall space is at a premium in our house) and using it as a photo backdrop.  It added a little extra jungle pop and also gave us a place to hide some of those last minute clean up items that you always seem to miss!  Along the top of our entertainment centre I staggered shimmer palm trees, honeycomb palm trees, and inflatable beach ball animals.  The animals also doubled as favors for the kids attending the party.  I don't have a photo of them but the kids also took home animal tails that clip to your clothes, they were a huge hit!


To complete the living room décor, I hung an 8 foot cardboard tree palm tree from an exiting hook in the ceiling (I guess it does serve a purpose) and sat an inflatable palm tree in the corner.  As you can tell from the photo the inflatable tree didn't last very long and we ended up having to tie it to the blinds.  If I learnt anything from this party is it that you can never count on the quality of an inflatable.  Good thing I decided to get the cardboard palm tree or we wouldn't have had one for the party! *gasp*

Finally after all many months of painstakingly trying to get Roman to sit still for his monthly photo I was able to share the fruits on my labor.  It's amazing how much Roman changed from one month to the next especially when I'm with him every day and don't necessarily notice the changes.  How did such a tiny dark haired baby turn into a big blond toddler so quickly?!


Now for every one's favorite part, the food!  For birthdays I think it's a fun personal touch to have a menu consisting of the birthday boy's, or girl's, favorite foods.  After all, it is their day!  For Roman's birthday meal I made:

Baboon Burgers
Hyena Hot Dogs
Hungry Hippo Hummus
Viper Veggie Pizza
Elephants Eggs (deviled eggs with avocado mixed into the yolk)
Macaw Mac & Cheese Bites (baked mac & cheese balls)
Fruit Tray (I dropped the ball on this one and didn't have a clever name for it)


Now obviously hot dogs and hamburgers aren't one of Roman's favorite foods, but I didn't think our guests would want tuna sandwiches for lunch.  Roman devoured a lot of food at lunch, but the hands down favorite for him was the hummus.  He got a little messy but I was actually impressed by how clean he was.  I guess it helps when it's all his favorite foods, not much hits the floor that way!


I love these plastic table cloths from the dollar store.  They fit my table perfectly and I can just ball them up at the end of the day and toss it into the trash.  After a long day of partying, who wants to wash a table cloth?  The fringe I picked up at a craft store but you could also use several grass skirts attached together.  Space is always at a premium on a buffet table so I decided to pre-wrap the utensils with the napkins so they would take up less space on the table.  To hold them together I made napkin rings to match the theme the jungle theme.  I also use the same idea to make these super cute water bottle labels.  I thought they were a fun way to dress up the water bottles to make them more appealing rather than just plopping plain water bottles on the table.


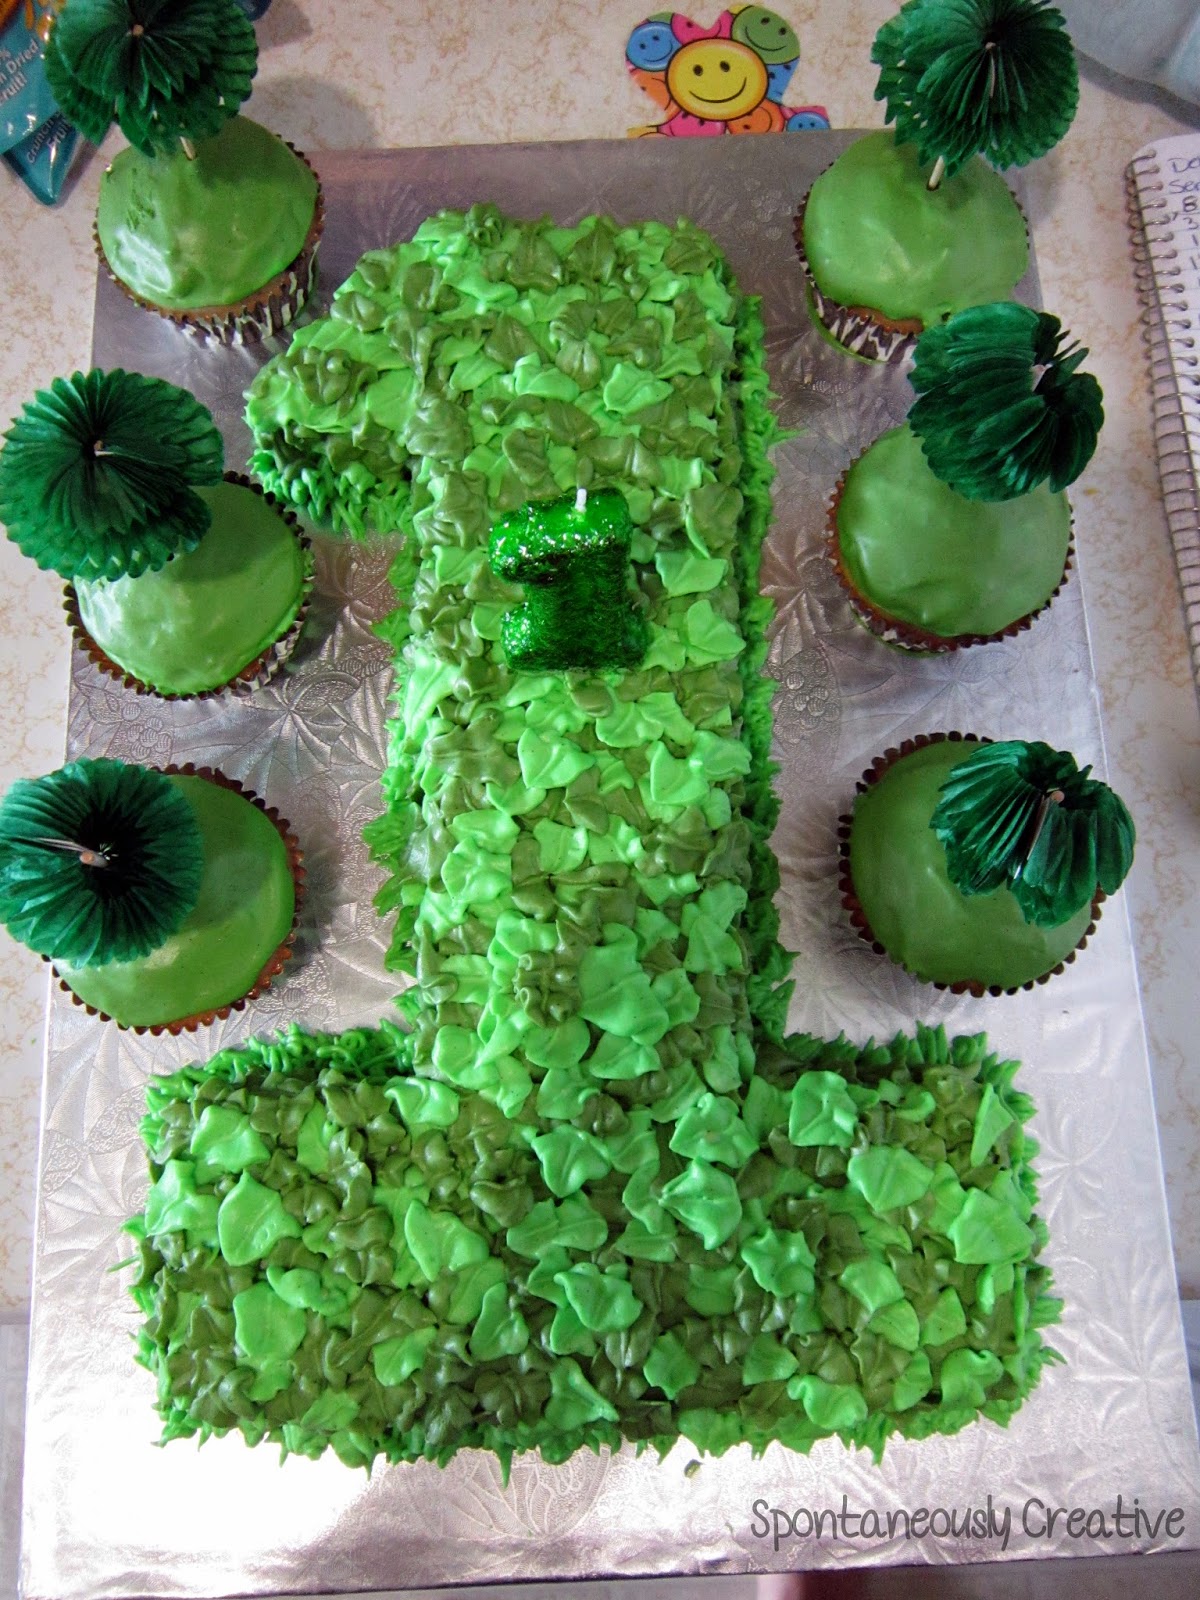
I always look forward to cake at a party, and this one was no different.  I kept with the theme of making Roman's favorite foods and made Roman a lemon blueberry cake with Whipped Cream Frosting.  I took my inspiration from this cake I found on Pinterest.  Now obviously this cake was going to be a large undertaking for one person, so I decided to enlist the help of my Mom.  Between the two of us we managed to pipe this entire cake in no time flat.  We used the #67 Wilton tip for the leaves and the #233 Wilton tip to make the grass around the base of the cake.  We spread a layer of frosting onto the cupcakes and topped them with these adorable palm tree picks I found at PartyCity.


When all was said and done everyone had a great time at Roman's birthday party.  Roman particularly loved playing with all the other kids and running rampant through the house.  The food was gobbled up and much to my surprise I managed to keep the quantity at a normal level this time!  We were very blessed to get to spend this special day with our family and close friends, and had a fantastic time visiting with everyone.  Let the planning for the next party begin!

Wednesday, March 26, 2014

Simple White Cake

Believe it or not, some people don't like chocolate cake *gasp*!  I know, this seems like a crime against humanity, but they are still people too!  If I'm throwing a party I try to have something that everyone will enjoy, which usually means multiple flavors of cupcakes.  Plus it gives me the opportunity to experiment!  In this situation, most of the guests were older family members (don't hate me!!) and I thought chocolate and a white cake would be a safe bet.  This recipe was originally posted on Allrecipes.com.

Simple White Cake
1 cup sugar
1/2 cup butter, softened
2 eggs
2t vanilla
1 1/2 cups flour
1 3/4t baking powder
1/2 cup milk

Cream butter and sugar until smooth.
Beat in eggs and vanilla.

Combine flour and baking powder in a small bowl.  Slowly add to the creamed mixture.
Stir in the milk until smooth.


Spoon into muffin cups.  *TIP - to make sure you end up with uniform cupcakes, use a measuring cup to fill the muffin cups.  Not only will they look great but they will also all cook at the same rate if they are the same size.

Bake at 350° for 20-25 minutes, until a toothpick inserted into the centre comes out clean.


Make sure the cupcakes are completely cooled before icing or it will melt and run off the cupcake, which is never a good situation for anyone involved.

This white cake recipe is very simple and quick to whip up.  It is on the denser side, almost like a pound cake, so it would also work extremely well for a cake with multiple layers.  I love white cakes because you can pair them with an interesting or intense frosting flavor and they are delicious.  I decided to pair these cupcakes with a coconut flavored butter cream icing because it is John's favorite.  You could also all food coloring to the cupcake batter and make them whatever color your occasion calls for!

Wednesday, March 12, 2014

Leprechaun Hat Cupcake Toppers

Leprechaun's are a huge part of St. Patrick's Day, especially for kids, so you can't have St. Patrick's Day cupcakes without Leprechaun hats!  Well I guess you could, but what fun would that be?  Since I already had the fondant out from the Pot-O-Gold toppers I figured I might as well make these too!  They are a little more tricky but still fairly easy to make, and you could still have your older kids help you assemble them!

I usually bake at least two flavors of cupcakes when I'm having a party, but since I was making these cupcakes "just because", I used the same chocolate cupcake and mint buttercream for both. For that reason I thought having two different toppers would give the cupcakes a bit more variety without having to bake a ton of cupcakes.


Supplies
Fondant - you can make your own or you can purchase pre-made fondant. The amount of fondant
                you need will depend on how many toppers you are making.
Black gel coloring
Yellow gel coloring - I used Daffodil Yellow from Wilton as it was the only yellow I had on hand.
Green gel coloring - I used Leaf Green from Wilton
Edible gold dust
Small paint brush
Rolling pin
Sharp knife
Water

*NOTE - when working with fondant you want to keep the fondant you aren't using at the moment in a air tight container to prevent it from drying out.


To color the fondant, take a ball of fondant and knead it a few times. Dip a toothpick into the coloring and run it through the fondant. Start with a small amount of color and gradually add more. It is much easier to make fondant darker than it is to lighten it. *TIP - use a new toothpick each time you dip into the coloring. If you double dip you may deposit icing into your coloring which will cause it to go bad faster. Knead the color into the fondant until it is evenly distributed. Repeat this process with the green and black coloring. *TIP - always color lighter colors first to reduce the chance of transferring color from once of fondant to the next. Washing your hands in between colors will also help.

Roll a ball of fondant 1 inch in diameter.  Roll the ball into a tear drop shape by applying pressure to one side of the ball while you roll it against a flat surface.  If the tear drop takes on a shape your not happy with, simply roll it back into a ball a try again. 


Stand the tear drop up with the smaller end on the table and press down on the top to form the top of the hat.  If you squish a little too much, lay the hat on its side and roll it against the table to lengthen it. Set aside.  Roll another ball of fondant 1 inch in diameter.  Flatten the ball into a disk 1/8-1/4 inch thick, this will form the base of the hat.  Set aside.


Take a small amount of the black fondant and roll it out as thin as you can while still being able to lift the fondant off of the table.  Using a sharp knife, cut a a strip of fondant 1/8 inch wide.  *TIP - if you let the fondant sit for a minute or two after rolling it won't be as sticky and will cut much easier.  At the same time cut a very small square of black fondant, this will be the centre of the buckle, set aside.  Using the paint brush, apply a small amount of water to the base of the hat and wrap the black strip around.  Trim off the excess black so that the ends meet.  Don't worry about the seam as we are going to cover it with the buckle. Set aside.


Roll out the yellow fondant to about the same thickness as the black fondant.  Cut a square slightly larger than the black square you cut earlier.  Apply a small amount of water to the yellow square and gently press the black square into the centre.  *TIP - if you have craft tweezers they would be helpful to get the black square into place.  I picked the square up with the tip of the knife and it worked well.  Dry the paint brush off and dip it into the edible gold glitter.  Dab the glitter onto the yellow square around the black square.  *TIP - if glitter gets on the black fondant, use a dry paint brush to brush the glitter away.
 
Apply a small amount of water to the bottom of the hat and press it onto the disk.  Ta da!  Your leprechaun hat is complete!  I would suggest letting these hats dry for at least a few hours before you place them on cupcakes because there are so many pieces that are "glued" together.  If you are making these toppers ahead of time, they can be store on a cookie sheet and covered with plastic wrap until you are ready to use them.  The hats will slowly harden but they are still completely edible!   
 
I think if I made these cupcakes again I would have white buttercream icing instead of green as the hat blends in more than I would like.  I attempted to use a green cupcake cup (with adorable shamrocks all over them I might add) but the design basically disappeared when I baked the cupcakes.  Don't you hate when that happens!?  I need to find a solution to that problem!
 
These cupcakes would be a great treat for your kids or for your kids to take to school!  Don't these hats just make you happy?  I know I would love to have a cupcake with a hat on it!  Really I just want a cupcake with anything on it... 

Tuesday, March 11, 2014

Pot-O-Gold Cupcake Toppers

St. Patrick's Day isn't often a highly anticipated holiday, unless you enjoy the odd adult beverage.  Kids however love to celebrate even the smallest holidays, and I'm always looking for an excuse to make some cupcakes!  I can't wait until Roman is old enough to take treats to school, but until then John will have to take them to work.  Heaven knows we can't possibly eat all these treats!

When I decided to make a St. Patrick's Day cupcake I knew I wanted to do something recognizable but give it a fun twist.  I love to see the reaction my cupcakes get from people, so I always keep that in mind when deciding on a design.  Why decorate a cupcake if it isn't going to bring a smile to the face of everyone who sees them? 

When you think of St. Patrick's Day, one of the first things you probably think of is a pot-o-gold, no not the scratch n' win ticket, but the wonderful treasure at the end of a rainbow!  What better treasure than a delicious cupcake?  This pot-o-gold cupcake topper is incredibly easy to make.  If you can roll a ball you can make these toppers, which would make this a great project to do with older kids!  The best part is, they are completely edible. 


Supplies
Fondant - you can make your own or you can purchase pre-made fondant.  The amount of fondant
                you need will depend on how many toppers you are making.
Black gel coloring
Yellow gel coloring - I used Daffodil Yellow from Wilton as it was the only yellow I had on hand.
Edible gold glitter
Small paint brush
Water

*NOTE - when working with fondant you want to keep the fondant you aren't using at the moment in a air tight container to prevent it from drying out.


To color the fondant, take a ball of fondant and knead it a few times.  Dip a toothpick into the coloring and run it through the fondant.  Start with a small amount of color and gradually add more.  It is much easier to make fondant darker than it is to lighten it.  *TIP - use a new toothpick each time you dip into the coloring.  If you double dip you may deposit icing into your coloring which will cause it to go bad faster.  Knead the color into the fondant until it is evenly distributed.  Repeat this process with the black coloring.  *TIP - always color lighter colors first to reduce the chance of transferring color from once of fondant to the next.  Washing your hands in between colors will also help. 

Roll a piece of black fondant into a ball 1 inch in diameter.  Press down on the top of the ball to make the base of the pot.  Roll a second ball about the size of a grape, and press down on the top until it flattens into a disk.  To form the feet of the pot, roll 3 small balls about the size of blueberries.  Apply a small amount of water to the top of the pot and press the disk into place.  Flip the pot over, apply a small amount of water to the bottom of the pot and press the feet into place.  Your almost done!


Now to fill the pot with thousands of dollars of gold!!!  Or fondant gold....  Roll several small balls of yellow fondant, 1/8 inch in diameter, and squish them into disks.  Arrange the disks on the top of the pot.  I randomly placed the disks to look like a pile of gold.  Apply a small amount of water to the yellow disks and dry the paint brush off.  Dip the paint brush into the gold glitter and dab it onto the yellow fondant.  If glitter falls onto the black fondant use a dry paint brush to wipe it away.


Now all that is left to do is to pop it on top of your cupcake!  It's just that easy!!  You could also make a great St. Patrick's Day scene on a cake using this topper!  Maybe find a plastic leprechaun, or make one from fondant if your good at molding people (my people always look like wider stick men), and stick him on the cake.  Then pipe a rainbow with this pot of gold at the end and sprinkle shamrock shaped sprinkles over the rest of the cake.  Just an idea...now I want to make that cake!!

If you are making your toppers in advance, which you likely are, you can let them sit out on a cookie sheet until you need them.  I would suggest covering them with plastic wrap just to keep dust from landing on them.  Nobody wants to eat a dusty pot-o-gold!


I decided to make a chocolate cupcake and top it with a mint buttercream icing.  John loves the combination of chocolate and mint, and since I've never made a cupcake with mint icing and the colors work well for St. Patrick's Day, I thought I would give it a shot.  *TIP - If you are using a light colored icing with this topper, I would suggest putting these toppers on last minute because the black color from the pot might bleed into your light icing it sits long enough.