Winter can be tough with little kids indoors. There are only so long they are entertained with their toys before they get bored and need something more. Even with our trips out of the house several times a week, Roman still gets bored. This is by far Roman's favorite homemade dough I've ever made. He thought it looked just like pavement, and spent hours building roads with his construction equipment. When he was done, I scooped it all into a large freezer bag and sealed it up.
Moon Dough
1 cup baking soda
1/4 cup water
Black craft paint
Silver glitter
In a large, easy to wash bowl, mix together the baking soda and water. Add as much or as little paint and glitter as you like. Enjoy!
If you have a light colored or wood table that you don't want colored black I highly recommend putting something down for the kids to play on. I wasn't too concerned about our table and it had a grey hue to it for a few weeks before the color finally wore off. You'll probably want to strip the kids down too, just to be safe.
Some of the most beautiful, delicious, and useful things can be discovered while being spontaneously creative!
Showing posts with label craft. Show all posts
Wednesday, March 8, 2017
Monday, January 2, 2017
Home Preschool - January 2017
A new year means it's time to re-evaluate and adjust things. I noticed, especially during December, that we just didn't have time to get to all the activities that I had planned. December is a bit of an anomaly because we're so busy with parties, blog posts, baking, and all things Christmas, but I think it will be good to scale back the activities a bit. I'm hoping this way I won't feel so overwhelmed and won't try to rush Roman through the activity because it "has to get done".
I'm also well aware that we are likely going to spend a good amount of time playing with all the things the kids get for Christmas, and playing in their new playroom!
The only activity we managed to find time for in December was the laminated ornaments. They turned out really well and I think we'll probably make more next year to hang in the windows as well.
Here is what I have planned for January!!
1st-7th: Magic milk paint
8th-14th: Winter Paintings
15th-21st: Eskimo craft
22nd-31st: Drawing with cars
I know Roman is going to love drawing with his cars, and I'm sure the paintings will go over well. Maybe Bianca will also get in on the drawing with cars since she loves pushing cars around too.
I'm also well aware that we are likely going to spend a good amount of time playing with all the things the kids get for Christmas, and playing in their new playroom!
The only activity we managed to find time for in December was the laminated ornaments. They turned out really well and I think we'll probably make more next year to hang in the windows as well.
Here is what I have planned for January!!
1st-7th: Magic milk paint
8th-14th: Winter Paintings
15th-21st: Eskimo craft
22nd-31st: Drawing with cars
I know Roman is going to love drawing with his cars, and I'm sure the paintings will go over well. Maybe Bianca will also get in on the drawing with cars since she loves pushing cars around too.
Friday, December 16, 2016
3 Easy Christmas Crafts for Kids
Roman has always enjoyed crafting but he seems to go into overdrive during the holidays. I'm not sure if seeing his crafts from past years hanging on the tree makes him want to create more things, or if he just sees me working on different things and he wants in.
Our prime crafting time is first thing in the morning when Bianca has her morning nap. We only have about an hour at the most so I try to pick quick and easy crafts that we can finish in that time. If I can make them with supplies I have on hand or from the dollar store all the better!
Toilet Paper Roll Gingerbread Boy/Girl
Materials
Toilet Paper roll
Craft paper (brown, black & red)
Craft glue
Sequins
Scissors
Pinking scissors
Marker
So maybe this little guy doesn't look exactly the way I would have made him, but Roman really enjoyed creating him. First we cut his head from some scrap booking paper (construction paper would work just fine) and Roman drew him a lovely face. Then we cut his arms and legs from the same paper and folded them accordion style. Then we attached them to the toilet paper roll using craft glue. I cut out some hands and feet from black shoes and Roman glued them on. Using a pinking scissor, I cut a red strip to wrap around the middle of his body. To finish him off we attached the red paper as well as some sequin buttons using the craft glue.
For bedtime on this day we read The Gingerbread Man story for bedtime and Roman thought it was pretty cool that his gingerbread man ad a story written about him!
Laminated Ornaments
Material
Card stock
Tissue paper (any colors you like)
Scissors
Laminator and laminating pouches
Yet another use for this amazing little machine! John was at home the morning we made these and even he enjoyed it!
I printed off these ornament templates on card stock, cut them out, and cut out the centre as well. I placed the template in the middle of a laminating pouch. Then it was time for the fun part! Well, fun for Roman, face-palm moment for John and I; ripping the tissue paper. Once the tissue was sufficiently shredded, we arranged the pieces inside the ornament and ran it through the laminator. A quick trim around the outside and we have some beautiful, sun-catching decorations for the window!
Egg Carton Bell
Materials
Egg carton
Paint
Paintbrush
6" Pipe cleaner
2 bells jingle bells
Ribbon
I separated a single bump out of the carton and Roman gave it a good coat of yellow paint. Once it was dry I poked two tiny holes in the top of the bell. Roman strung the two bells on to the pipe cleaner and slid them into the centre. We fed the ends of the pipe cleaner through the holes from the bottom of the bell, and twisted them together on the other side. To finish it off I tied a bow with the ribbon at the bottom of the look against the top of the bell.
Our prime crafting time is first thing in the morning when Bianca has her morning nap. We only have about an hour at the most so I try to pick quick and easy crafts that we can finish in that time. If I can make them with supplies I have on hand or from the dollar store all the better!
Toilet Paper Roll Gingerbread Boy/Girl
Materials
Toilet Paper roll
Craft paper (brown, black & red)
Craft glue
Sequins
Scissors
Pinking scissors
Marker
So maybe this little guy doesn't look exactly the way I would have made him, but Roman really enjoyed creating him. First we cut his head from some scrap booking paper (construction paper would work just fine) and Roman drew him a lovely face. Then we cut his arms and legs from the same paper and folded them accordion style. Then we attached them to the toilet paper roll using craft glue. I cut out some hands and feet from black shoes and Roman glued them on. Using a pinking scissor, I cut a red strip to wrap around the middle of his body. To finish him off we attached the red paper as well as some sequin buttons using the craft glue.
For bedtime on this day we read The Gingerbread Man story for bedtime and Roman thought it was pretty cool that his gingerbread man ad a story written about him!
Laminated Ornaments
Material
Card stock
Tissue paper (any colors you like)
Scissors
Laminator and laminating pouches
Yet another use for this amazing little machine! John was at home the morning we made these and even he enjoyed it!
I printed off these ornament templates on card stock, cut them out, and cut out the centre as well. I placed the template in the middle of a laminating pouch. Then it was time for the fun part! Well, fun for Roman, face-palm moment for John and I; ripping the tissue paper. Once the tissue was sufficiently shredded, we arranged the pieces inside the ornament and ran it through the laminator. A quick trim around the outside and we have some beautiful, sun-catching decorations for the window!
Egg Carton Bell
Materials
Egg carton
Paint
Paintbrush
6" Pipe cleaner
2 bells jingle bells
Ribbon
I separated a single bump out of the carton and Roman gave it a good coat of yellow paint. Once it was dry I poked two tiny holes in the top of the bell. Roman strung the two bells on to the pipe cleaner and slid them into the centre. We fed the ends of the pipe cleaner through the holes from the bottom of the bell, and twisted them together on the other side. To finish it off I tied a bow with the ribbon at the bottom of the look against the top of the bell.
Wednesday, December 7, 2016
Marshmallow Christmas Tree
When it comes to Christmas decorations I have a bit of an affinity for trees. I have quite the collection going on top of our entertainment stand where we have our Christmas village that my mom sewed for us. I've purchased a couple cute ones but I like the idea of making my own. Mostly because I like inexpensive Christmas decorations and partly because I like having decorations that not everyone has in their homes. A few years ago I made a set of foam trees. With being extremely pregnant last year (and exhausted) I took a hiatus from the trees, but Roman and I are back at it this year!
Roman loves making crafts and usually requests to do it while Bianca is taking her morning nap. You'd think by now I could prepare for this kind of thing but I haven't. I have these grand plans of having everything prepped and ready to go for a craft each week but it just doesn't happen. I remembered this marshmallow ornament I had made in grade 1 or 2. I was sure I had all the supplies, but alas, I did not. In this moment, the idea of this tree was born!
Materials
Styrofoam tree form
Mini marshmallows
Sequins
Craft glue
Run a line of glue around the base of the tree form and press on each marshmallow. Alternatively you can put the glue directly on to each marshmallow. I found that running the line of glue worked better when working with a 3 year old. You'll want to stagger the rows as you continue up the tree, just to make sure you cover all, or as much as possible, of the tree form.
We let our completed tree sit for a couple hours for the glue to completely dry before we started attaching the sequins. I dabbed a small amount of craft glue onto each marshmallow and Roman stuck a sequin on top of the glue. With Roman in charge of sequins some and right side up and some aren't, and sometimes there was ever 2-4 stuck together on top of the marshmallow. We also went for a random color pattern. Not that there is really an option when you're working with kids.
In the original ornament I made when I was little we used pins, beads and sequins to hold the marshmallows to a Styrofoam ball. If you're working with older kids or doing this on your own (you lucky devil), you could use the same method on the tree and it would be that much more secure. If you have that odd ball marshmallow that just won't stick, try a bit of hot glue. I gave it a go, and other than melting a small portion of one side of the marshmallow, it did the trick.
I'd love to see how your tree or ornament turns out! Post a picture in the comments of your creation!!
Roman loves making crafts and usually requests to do it while Bianca is taking her morning nap. You'd think by now I could prepare for this kind of thing but I haven't. I have these grand plans of having everything prepped and ready to go for a craft each week but it just doesn't happen. I remembered this marshmallow ornament I had made in grade 1 or 2. I was sure I had all the supplies, but alas, I did not. In this moment, the idea of this tree was born!
Materials
Styrofoam tree form
Mini marshmallows
Sequins
Craft glue
Run a line of glue around the base of the tree form and press on each marshmallow. Alternatively you can put the glue directly on to each marshmallow. I found that running the line of glue worked better when working with a 3 year old. You'll want to stagger the rows as you continue up the tree, just to make sure you cover all, or as much as possible, of the tree form.
We let our completed tree sit for a couple hours for the glue to completely dry before we started attaching the sequins. I dabbed a small amount of craft glue onto each marshmallow and Roman stuck a sequin on top of the glue. With Roman in charge of sequins some and right side up and some aren't, and sometimes there was ever 2-4 stuck together on top of the marshmallow. We also went for a random color pattern. Not that there is really an option when you're working with kids.
In the original ornament I made when I was little we used pins, beads and sequins to hold the marshmallows to a Styrofoam ball. If you're working with older kids or doing this on your own (you lucky devil), you could use the same method on the tree and it would be that much more secure. If you have that odd ball marshmallow that just won't stick, try a bit of hot glue. I gave it a go, and other than melting a small portion of one side of the marshmallow, it did the trick.
I'd love to see how your tree or ornament turns out! Post a picture in the comments of your creation!!
Wednesday, November 2, 2016
Home Preschool - November 2016
I don't know how it's possible, but I think October went by faster than summer did. I swear I just finished writing the October post and now I'm working on the November post. I'm so not ready for this! So not ready in fact that as I'm looking at the things to include it occurs to me that I have done zero prep for this month. None. Nadda. I really need to get my butt in gear! First, an update on how October's activities went!
I have to be honest and tell you that we didn't get to all the activities I had planned. Between all the activities Roman and Bianca do during the week, getting ready for Halloween, and starting to plan for Christmas and Christmas presents, we just didn't have the time. There were also days that Roman just wasn't interested in the activities, or wanted to continue on with an activity from the week before. A prime example of this was the moon dough. I swear Roman played with this stuff at least once a day for a week, and my poor white (now grey-ish) table can attest to that. The only advice I have for this dough is to only add a tiny amount of paint. The instructions say to add paint to the baking soda and then water. I wasn't sure how much to add so I gave it 3 big squirts. Bad idea. Roman was black, the table was/is black, and even the toys he used in it are stained black. Food coloring definitely would have made things worse so I am glad I used the paint. Overall a very successful activity that I highly recommend you try.
If you're looking for a quick activity to burn a few minutes, Roman really enjoyed the Apple Tree ABC. I printed out a few trees; upper case letters, lower case letter, and numbers. Roman loves stickers so this was right up his alley. Roman had a hard time a first when there were so many letters to choose from, but once he eliminated a few he really started to have fun. If I did this again I maybe wouldn't do then entire alphabet but choose a handful of letters and just repeat them.
We also made the pop up ghost craft, which Roman LOVED, and we started the Eyeball Topiary but didn't quite get it finished. The styrofoam balls I picked up from Dollarama didn't take the paint very well and will require a few coats to get them covered well. Roman quacking grew tired of painting the same balls several times, so we abandoned the project and I'll finish it up eventually. For now, it will sit in the "half finished" pile in my craft room.
So now for November! I'm a little overwhelmed just looking at my list of things that I planned on doing and thinking of when/how I'm going to get these things done. I think it's important to be flexible with your home preschool plan. In my case it isn't necessarily "preschool" more just a list of preschool type activities to entertain Roman on the days that we don't have other activities going. I think I get myself into a bind sometimes when I think to myself that these things "need" to get done. The reality is they don't and they are supposed to be fun!
1st-5th: Chicken dramatic play, Grow your own geodes
6th-12th: Cupcake liner poppy craft, Animal track painting
13th-19th: Muddy pigs, Ocean clip cards
20th-26th: Pumpkin spice latte playdough, Matching color wheel
27th-30th: Felt button chain busy bag
There are so many fun things planned! It's fun to look at these plans and see what's coming up. Because I planned it so long ago it's like a surprise even to me every month! I think Roman will love muddy pigs and I'm particularly excited for the pumpkin spice late playdough!
I have to be honest and tell you that we didn't get to all the activities I had planned. Between all the activities Roman and Bianca do during the week, getting ready for Halloween, and starting to plan for Christmas and Christmas presents, we just didn't have the time. There were also days that Roman just wasn't interested in the activities, or wanted to continue on with an activity from the week before. A prime example of this was the moon dough. I swear Roman played with this stuff at least once a day for a week, and my poor white (now grey-ish) table can attest to that. The only advice I have for this dough is to only add a tiny amount of paint. The instructions say to add paint to the baking soda and then water. I wasn't sure how much to add so I gave it 3 big squirts. Bad idea. Roman was black, the table was/is black, and even the toys he used in it are stained black. Food coloring definitely would have made things worse so I am glad I used the paint. Overall a very successful activity that I highly recommend you try.
If you're looking for a quick activity to burn a few minutes, Roman really enjoyed the Apple Tree ABC. I printed out a few trees; upper case letters, lower case letter, and numbers. Roman loves stickers so this was right up his alley. Roman had a hard time a first when there were so many letters to choose from, but once he eliminated a few he really started to have fun. If I did this again I maybe wouldn't do then entire alphabet but choose a handful of letters and just repeat them.
We also made the pop up ghost craft, which Roman LOVED, and we started the Eyeball Topiary but didn't quite get it finished. The styrofoam balls I picked up from Dollarama didn't take the paint very well and will require a few coats to get them covered well. Roman quacking grew tired of painting the same balls several times, so we abandoned the project and I'll finish it up eventually. For now, it will sit in the "half finished" pile in my craft room.
So now for November! I'm a little overwhelmed just looking at my list of things that I planned on doing and thinking of when/how I'm going to get these things done. I think it's important to be flexible with your home preschool plan. In my case it isn't necessarily "preschool" more just a list of preschool type activities to entertain Roman on the days that we don't have other activities going. I think I get myself into a bind sometimes when I think to myself that these things "need" to get done. The reality is they don't and they are supposed to be fun!
1st-5th: Chicken dramatic play, Grow your own geodes
6th-12th: Cupcake liner poppy craft, Animal track painting
13th-19th: Muddy pigs, Ocean clip cards
20th-26th: Pumpkin spice latte playdough, Matching color wheel
27th-30th: Felt button chain busy bag
There are so many fun things planned! It's fun to look at these plans and see what's coming up. Because I planned it so long ago it's like a surprise even to me every month! I think Roman will love muddy pigs and I'm particularly excited for the pumpkin spice late playdough!
Wednesday, October 26, 2016
3 Easy Halloween Crafts for Kids
If you're reading this post, it's very likely that it's the week before Halloween and you are scrambling to find a fun craft for the kids to make. Don't worry, we've all been there. Just this morning Roman sent me into panic mode when he asked to make a craft. You would think with my October preschool plan that I would have my ducks in a row. Well....not so much. So we ventured down to the basement and into the craft room to see what we could come up with.
All of these crafts can be made with things you likely already have in your house, or can be picked up with a quick trip down the craft isle at the dollar store!
Pop-up Ghost
Roman has wanted nothing to do with ghosts this entire pre-Halloween season. Not in a book, decorations, or on TV. He'll tolerate an inflatable ghost decoration but that's about it. I wasn't sure how he'd take to this ghost but I thought the fact that he was making the ghost would make it a little more acceptable.
I cut the ghost out of a scrap piece of card stock and let Roman glue on some googly eyes and draw on a mouth with a marker. Roman has always loved pink so I wasn't surprised when that was his marker of choice. Then we glued the ghost onto a popsicle stick. I cut up some black tissue paper and Roman glued it onto a paper cup with white glue. Cut a slit in the bottom of the paper cup and stick the popsicle stick into it so that the ghost is in the cup.
Paper Plate Spider Web
All you need for this craft is a paper or Styrofoam plate, ribbon and a couple pipe cleaners. Start by punching several holes around the outside of the plate; the more holes the more spider web you'll have. String the ribbon through the holes making sure to criss-cross the ribbon to make a spider web. Knot the ribbon on both ends to keep it from coming undone.
To make the spider, cut five 2" lengths of black pipe cleaner. Stack 4 of the pope cleaners together and wrap the remaining pipe cleaner around the centre of the bunch. Spread out the legs o the spider and bend them at the ends to make the feet. Slip the spider between the web and the plate.
Styrofoam Ball Spider
This was by far Roman's favorite craft. Probably because it involved getting messy. We started by painting a Styrofoam ball black with regular craft paint, then let it sit to dry a bit. I cut four pipe cleaners in half to make the 8 legs, then folded them in half. Roman stuck in each of the legs and then attached googly eyes with a glue gun.
If you wanted to hang the spider you could use a tack to attach some fishing line to the top of the spider and then hang him from the ceiling.
I have to say I'm pretty impressed with what we managed to whip together during the hour that Bianca was napping! Roman had a blast "ROARING" around the house today with his spider (because that's obviously what a spider says), and was so excited to show John when he got home for lunch. I have a strange feeling we could end up with a cluster of spiders in our house by the time Halloween gets here.
All of these crafts can be made with things you likely already have in your house, or can be picked up with a quick trip down the craft isle at the dollar store!
Pop-up Ghost
Roman has wanted nothing to do with ghosts this entire pre-Halloween season. Not in a book, decorations, or on TV. He'll tolerate an inflatable ghost decoration but that's about it. I wasn't sure how he'd take to this ghost but I thought the fact that he was making the ghost would make it a little more acceptable.
I cut the ghost out of a scrap piece of card stock and let Roman glue on some googly eyes and draw on a mouth with a marker. Roman has always loved pink so I wasn't surprised when that was his marker of choice. Then we glued the ghost onto a popsicle stick. I cut up some black tissue paper and Roman glued it onto a paper cup with white glue. Cut a slit in the bottom of the paper cup and stick the popsicle stick into it so that the ghost is in the cup.
Paper Plate Spider Web
All you need for this craft is a paper or Styrofoam plate, ribbon and a couple pipe cleaners. Start by punching several holes around the outside of the plate; the more holes the more spider web you'll have. String the ribbon through the holes making sure to criss-cross the ribbon to make a spider web. Knot the ribbon on both ends to keep it from coming undone.
To make the spider, cut five 2" lengths of black pipe cleaner. Stack 4 of the pope cleaners together and wrap the remaining pipe cleaner around the centre of the bunch. Spread out the legs o the spider and bend them at the ends to make the feet. Slip the spider between the web and the plate.
Styrofoam Ball Spider
This was by far Roman's favorite craft. Probably because it involved getting messy. We started by painting a Styrofoam ball black with regular craft paint, then let it sit to dry a bit. I cut four pipe cleaners in half to make the 8 legs, then folded them in half. Roman stuck in each of the legs and then attached googly eyes with a glue gun.
If you wanted to hang the spider you could use a tack to attach some fishing line to the top of the spider and then hang him from the ceiling.
I have to say I'm pretty impressed with what we managed to whip together during the hour that Bianca was napping! Roman had a blast "ROARING" around the house today with his spider (because that's obviously what a spider says), and was so excited to show John when he got home for lunch. I have a strange feeling we could end up with a cluster of spiders in our house by the time Halloween gets here.
Friday, October 7, 2016
Home Preschool - October 2016
We're are officially into fall, my favorite time of year!!! There isn't anything I don't love about this season; the temperature, the colors, the smells and the holidays. In Canada we celebrate Thanksgiving in the first part of October, which makes October a busy month. I struggled a bit when planning this month's activities because I want to do it all but there just isn't enough time!! There needs to be a solid month between holidays so we have time to do all the things!! Before I get into the plan for October, I want to touch on some of the activities Roman enjoyed the most from September.
By far Roman's favorite activities were the exploding paint bags and the dramatic play: spaghetti shop. The paint bag's didn't actually explode, more like popped and oozed, but Roman didn't mind at all. He jump on top of them to send the paint flying, which he thought was much more fun. The neighbors however probably were not thrilled since we were doing it outside at 8am on a Saturday morning. This is why I give them holiday gifts haha. I couldn't find powder tempera paint so I just squirted some regular craft paint into a sandwich bag of vinegar, added a big scoop of baking soda, seal it, and ran!
The spaghetti shop was a whole other can of worms. Roman LOVED it. In fact the spaghetti is still sitting in the fridge three days later because he keeps pulling it out to play with. I'll probably toss it tonight and if he wants to play again we can cook up some more. That's the great part of this activity; it's SO inexpensive! We haven't tried the activities from the last week of September yet, since it's only the 27th, but I have a feeling Roman is going to love them.
Now for October!
October 1st-8th - Chocolate dipped krispie treat turkey pops, Toilet paper roll turkey &
Apple tree ABC match
October 9th-15th - Halloween eyeball topiary & Moon Dough
October 16th-22nd - Fall pretend play, Baking soda & vinegar reactions & Peek-a-boo ghost
October 23rd-31st - Bubble science with pumpkins, Spider web fine motor activity &
Simple scissor practice
I'm excited for all of these activities, but especially the krispie treats and the eyeball topiary. While I think Roman will enjoy those, I know for a fact he will love the baking soda reactions, moon dough, and bubble science with pumpkins. We were at Superstore the other day and they already have pumpkins out. I've never seen anyone so excited. He wanted a treat (as I feel all kids do), but this time he requested his treat be a pumpkin so he can cook it and eat it. Yup, he's my child!
By far Roman's favorite activities were the exploding paint bags and the dramatic play: spaghetti shop. The paint bag's didn't actually explode, more like popped and oozed, but Roman didn't mind at all. He jump on top of them to send the paint flying, which he thought was much more fun. The neighbors however probably were not thrilled since we were doing it outside at 8am on a Saturday morning. This is why I give them holiday gifts haha. I couldn't find powder tempera paint so I just squirted some regular craft paint into a sandwich bag of vinegar, added a big scoop of baking soda, seal it, and ran!
The spaghetti shop was a whole other can of worms. Roman LOVED it. In fact the spaghetti is still sitting in the fridge three days later because he keeps pulling it out to play with. I'll probably toss it tonight and if he wants to play again we can cook up some more. That's the great part of this activity; it's SO inexpensive! We haven't tried the activities from the last week of September yet, since it's only the 27th, but I have a feeling Roman is going to love them.
Now for October!
October 1st-8th - Chocolate dipped krispie treat turkey pops, Toilet paper roll turkey &
Apple tree ABC match
October 9th-15th - Halloween eyeball topiary & Moon Dough
October 16th-22nd - Fall pretend play, Baking soda & vinegar reactions & Peek-a-boo ghost
October 23rd-31st - Bubble science with pumpkins, Spider web fine motor activity &
Simple scissor practice
I'm excited for all of these activities, but especially the krispie treats and the eyeball topiary. While I think Roman will enjoy those, I know for a fact he will love the baking soda reactions, moon dough, and bubble science with pumpkins. We were at Superstore the other day and they already have pumpkins out. I've never seen anyone so excited. He wanted a treat (as I feel all kids do), but this time he requested his treat be a pumpkin so he can cook it and eat it. Yup, he's my child!
Monday, October 3, 2016
Baby Food Jar Turkeys
I love Thanksgiving and all the food that comes with it, but it's often a holiday that has been overlooked as far as decorating and crafts in past years. Well, overlooked no longer! I was bound and determined to make some Thanksgiving crafts this year. How is that working out for me? Well, so far this is the only craft we've done and Thanksgiving is a week away. Oie, best laid plans right? In my defence I am getting ready for Thanksgiving and Bianca's upcoming baptism, while looking after two kids and running this blog. Don't make excuses, make a schedule! At least, that's what I tell myself....
I came across a picture of these cute little turkeys on Pinterest, and I knew I had a few baby food jars in the basement I'd been saving, so it was a perfect fit. It was also super quick and easy to do. In fact, we whipped these bad boys up in under an hour! Also, can we talk about why the plural version of turkey is turkeys and not turkies? Why do you taunt us English language, why!!!!!!!!
Baby Food Jar Turkeys
baby food jar
modge podge
foam paint brush
glitter (brown/orange/red/yellow)
googly eyes
construction paper (brown/orange/red/yellow)
hot glue/white glue
Apply a thin layer of modge podge to the inside of the baby food jar, making sure to cover the entire surface or you'll end up with a splotchy turkey. Pour a good amount of glitter into the jar and tightly seal the lid. Shake the jar so the glitter evenly covers the entire surface. Roman loved this part the most. If you have excess glitter inside the jar, you can pour it onto a creased piece of paper and pour it back into your glitter container.
For the turkey's tail feathers (shake your tail feather!), John traced Roman's hand onto three different colors of construction paper. You can have as many or as few handprints for your turkey's tail, but I think three is the minimum you'd want. Next, we cut them out and hot glued them onto the back of the turkey. **TIP- most jars will have a spot where glue from the label is stuck to the jar. Use this as the back of the jar as the handprints will cover it up. Lastly I cut out a beak and a gobble and hot glued them, along with the googly eyes, onto the front of the turkey. You could use white glue to attach the elements, but I don't have the patience to wait for it to dry.
Let the turkey sit with the lid of the jar off to allow the modge podge to completely dry, otherwise your turkey will forever have a white-cast, as though he applied a little too much sunscreen. If you aren't a fan of the color of your baby food jar's lid, you could totally give it a quick coat of paint to make it brown or red. I had planed on doing that, but the green didn't bother me as much as I thought it would.
These little turkeys are definitely a Pinterest win! I would have loved to make one turkey with Bianca's handprints, but let's be real, getting her to sit that long with her hand flat would be nearly impossible; maybe next year. I think these will be decorations that we look forward to setting out each year and watching how the size of the hands change over time. Not to mention that fact that we finally have Thanksgiving decorations! Mom win!
I came across a picture of these cute little turkeys on Pinterest, and I knew I had a few baby food jars in the basement I'd been saving, so it was a perfect fit. It was also super quick and easy to do. In fact, we whipped these bad boys up in under an hour! Also, can we talk about why the plural version of turkey is turkeys and not turkies? Why do you taunt us English language, why!!!!!!!!
Baby Food Jar Turkeys
baby food jar
modge podge
foam paint brush
glitter (brown/orange/red/yellow)
googly eyes
construction paper (brown/orange/red/yellow)
hot glue/white glue
Apply a thin layer of modge podge to the inside of the baby food jar, making sure to cover the entire surface or you'll end up with a splotchy turkey. Pour a good amount of glitter into the jar and tightly seal the lid. Shake the jar so the glitter evenly covers the entire surface. Roman loved this part the most. If you have excess glitter inside the jar, you can pour it onto a creased piece of paper and pour it back into your glitter container.
For the turkey's tail feathers (shake your tail feather!), John traced Roman's hand onto three different colors of construction paper. You can have as many or as few handprints for your turkey's tail, but I think three is the minimum you'd want. Next, we cut them out and hot glued them onto the back of the turkey. **TIP- most jars will have a spot where glue from the label is stuck to the jar. Use this as the back of the jar as the handprints will cover it up. Lastly I cut out a beak and a gobble and hot glued them, along with the googly eyes, onto the front of the turkey. You could use white glue to attach the elements, but I don't have the patience to wait for it to dry.
Let the turkey sit with the lid of the jar off to allow the modge podge to completely dry, otherwise your turkey will forever have a white-cast, as though he applied a little too much sunscreen. If you aren't a fan of the color of your baby food jar's lid, you could totally give it a quick coat of paint to make it brown or red. I had planed on doing that, but the green didn't bother me as much as I thought it would.
Thursday, May 28, 2015
Plan With Me - June 2015
It's hard to believe that I'm already planning the month of June! Why can't the winter months blow by this fast? June is a busy month for our family since most of the birthdays for our family are in this month, and John, Roman and I are taking our first trip to Toronto to visit John's family since Roman was born. Yes this means Roman's first time on a plane; please pray for us.
The color scheme in my planner for the month of June is teal, and it just so happens that I have a ton of washi that coordinates with it. Obviously I couldn't resist adding a plane sticker for our trip, and I decided to mark the birthdays with some interesting washi as well.
I have been not so patiently waiting for an opportunity to use these cool sea creature stickers that I found at Dollar Tree. A little scrapbook paper and some washi tape and this page is done!
I've also been dying to use the fabric tape I found at Michael's awhile ago. Both the flower pattern and polka dot tape are both fabric tape. Like I said, we have a lot of birthday's in June so you'll probably notice a lot of cupcake stickers on the weekly views, marking the different special days!
This is by far my favorite week of June. No, not because it's my birthday week, but because the entire page came together so well. The little birds and butterflies are super adorable and it makes them even cuter that they came in a sticker book for only a few dollars!
I couldn't resist make only truly summer inspired page. If neon washi doesn't scream summer then I don't know what does! I'm not sure what I'm going to do with the blank page on the right (maybe use it as extra note space) but I'm sure I'll find a use for it once I get into June.
Hopefully you enjoyed this post and be sure to share a photo of your favorite spread for the month of June from your planner!
The color scheme in my planner for the month of June is teal, and it just so happens that I have a ton of washi that coordinates with it. Obviously I couldn't resist adding a plane sticker for our trip, and I decided to mark the birthdays with some interesting washi as well.
I have been not so patiently waiting for an opportunity to use these cool sea creature stickers that I found at Dollar Tree. A little scrapbook paper and some washi tape and this page is done!
I've also been dying to use the fabric tape I found at Michael's awhile ago. Both the flower pattern and polka dot tape are both fabric tape. Like I said, we have a lot of birthday's in June so you'll probably notice a lot of cupcake stickers on the weekly views, marking the different special days!
This is by far my favorite week of June. No, not because it's my birthday week, but because the entire page came together so well. The little birds and butterflies are super adorable and it makes them even cuter that they came in a sticker book for only a few dollars!
I couldn't resist make only truly summer inspired page. If neon washi doesn't scream summer then I don't know what does! I'm not sure what I'm going to do with the blank page on the right (maybe use it as extra note space) but I'm sure I'll find a use for it once I get into June.
Hopefully you enjoyed this post and be sure to share a photo of your favorite spread for the month of June from your planner!
Thursday, May 21, 2015
Quilt Show Love
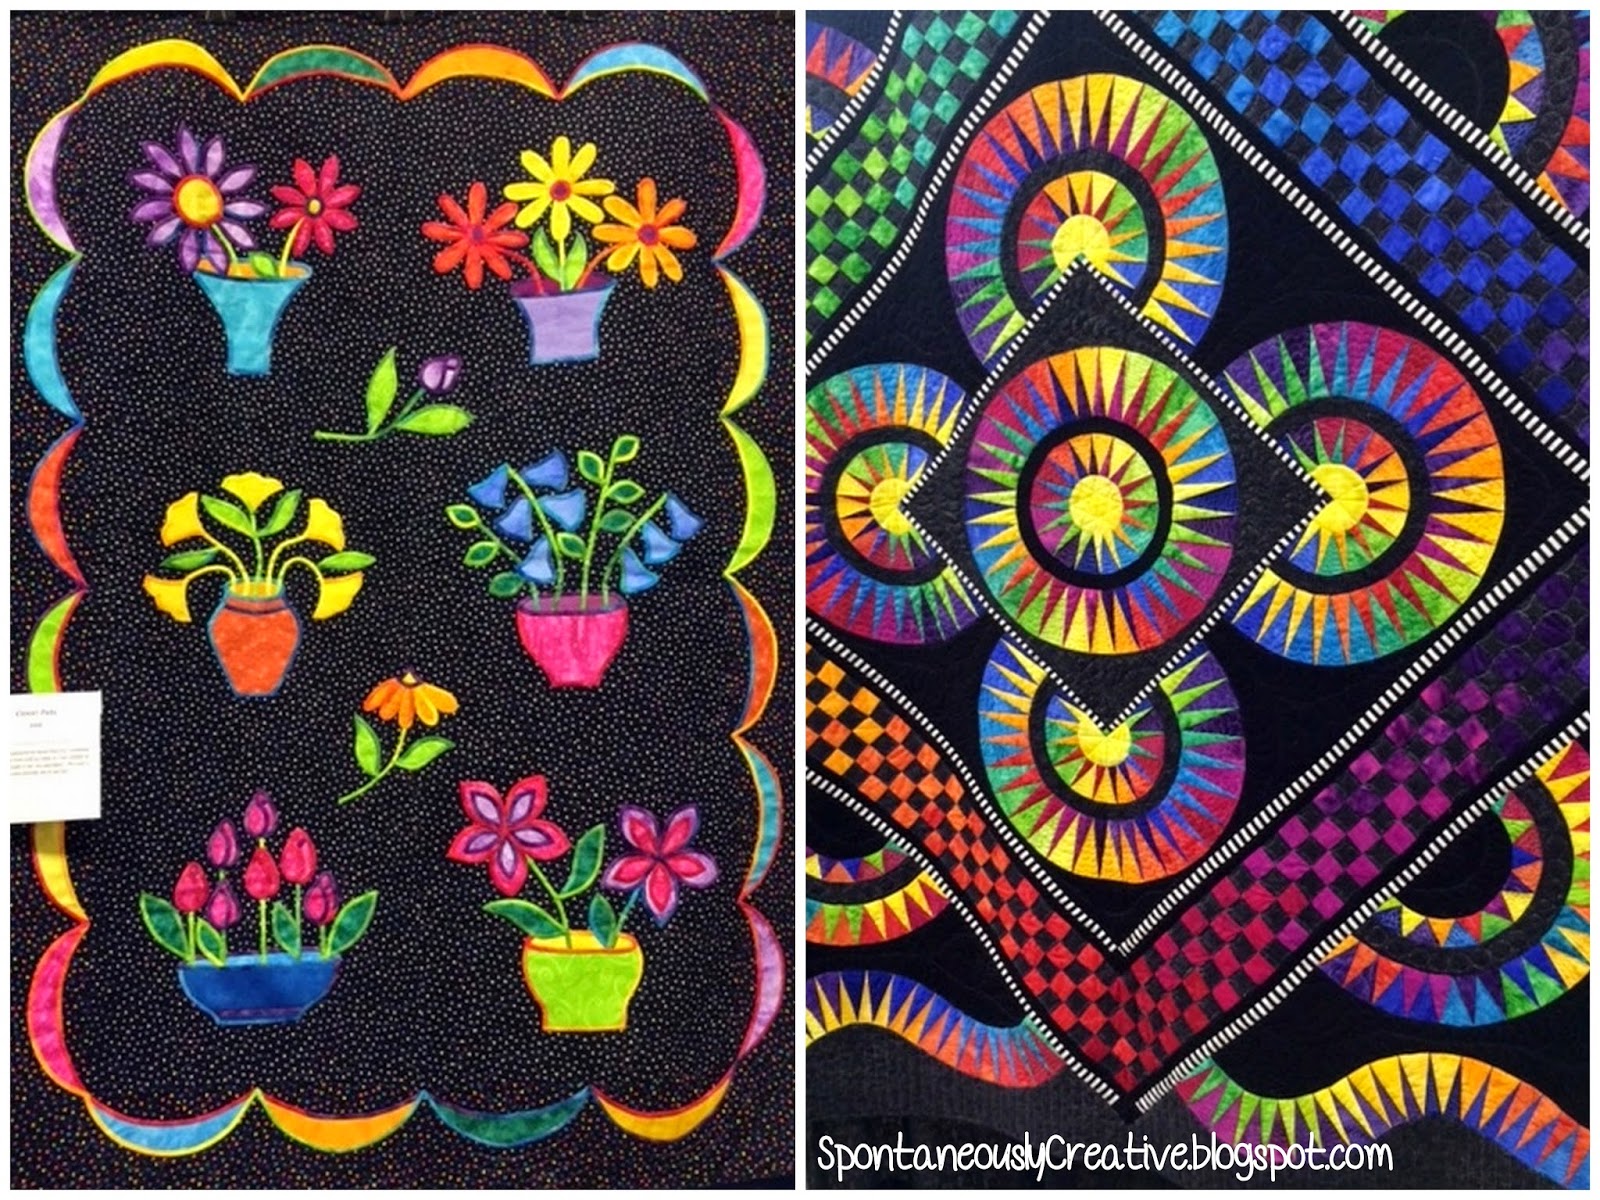
Now I don't consider myself a quilter but I do enjoy going to the odd quilt show with my Mom and my Aunts. Sure the quilting ladies can be a little (or a lot) crazy but sometimes it's fun to see what kind of quilts and wall hangings those crazy quilters come up with. There won't be a whole lot of substance to this post other than pictures because I really just wanted to share some of the cool pieces I saw on our trip to the quilt show here in Moose Jaw!
These wall hangings really stood out to me, but mostly the beach scene in the top left corner. That picture is made by sewing many, many, MANY strips of yarn onto a piece of fabric. Now that has to take some serious patience. I wish I could borrow some of that patience when Roman is having one of his of days...
Funny story; I actually have a kit in my craft room to make the animal quilt in the top left photo. I bought it when I was pregnant with Roman with the intention of making it for him before he was born. HA! That clearly happened. Maybe he'll still like animals when he's 12?
Now I know what you might be thinking, Kendra that quilt is kinda ugly, and I would completely agree. But I have a feeling when you find out that is one giant piece of satin and the design is completely hand stitched into the fabric your opinion of the shiny silver quilt might change. Can you imagine have the foresight and patience to make such a work of art?
What better way to end off this random post than with a cupcake tree! I don't know who the woman is that came up with this divine creation, but her and I are clearly soul mates that should meet over a dozen or so cupcakes. If I could buy a tree that produced cupcakes I would be quite happy to rake leaves every fall!
Well I hope you enjoyed this short, sweet, and random post! Comment below which of these quilts/wall hangings are your favorite!!
These wall hangings really stood out to me, but mostly the beach scene in the top left corner. That picture is made by sewing many, many, MANY strips of yarn onto a piece of fabric. Now that has to take some serious patience. I wish I could borrow some of that patience when Roman is having one of his of days...
Funny story; I actually have a kit in my craft room to make the animal quilt in the top left photo. I bought it when I was pregnant with Roman with the intention of making it for him before he was born. HA! That clearly happened. Maybe he'll still like animals when he's 12?
Now I know what you might be thinking, Kendra that quilt is kinda ugly, and I would completely agree. But I have a feeling when you find out that is one giant piece of satin and the design is completely hand stitched into the fabric your opinion of the shiny silver quilt might change. Can you imagine have the foresight and patience to make such a work of art?
What better way to end off this random post than with a cupcake tree! I don't know who the woman is that came up with this divine creation, but her and I are clearly soul mates that should meet over a dozen or so cupcakes. If I could buy a tree that produced cupcakes I would be quite happy to rake leaves every fall!
Well I hope you enjoyed this short, sweet, and random post! Comment below which of these quilts/wall hangings are your favorite!!
Thursday, April 30, 2015
Plan With Me - May 2015
April showers bring May flowers and they are all over my planner for May! The more I decorate my planner pages the more I get into the grove and get a feel for how I like to decorate them. In April I was just kind of throwing things together and hoping that it turned out well. I also didn't have the massive collection of stickers and washi tape that I have now amassed. Between the supplies I picked up in Bismarck and the things I picked up at Michael's recently (if you want to see a post on that let me know!), I now have what I feel is a decent collection of things to make some well coordinated pages.
Each month in the Plum Paper Planner is color coordinated, so to keep things looking harmonious I try to work with that color pallet for the monthly view. I really wanted to use this super fun gold washi tape I found at Dollar Tree so I decided to go with a purple and gold theme this month. I also inserted this journaling card into the monthly view so I can add little notes or "To Do" items for the month that don't necessarily have to be done on a specific day. Or maybe it'll just sit there empty and look pretty, who knows.
"Shine bright like a diamond!". This is what happens when you decorate your planner while listening to the radio. I'm pretty happy with the way this page turned out and was excited to get to use a cute cupcake and party hat sticker for Mother's Day. I probably could have been a little more creative with the lettering but it serves it's purpose.
Each month in the Plum Paper Planner is color coordinated, so to keep things looking harmonious I try to work with that color pallet for the monthly view. I really wanted to use this super fun gold washi tape I found at Dollar Tree so I decided to go with a purple and gold theme this month. I also inserted this journaling card into the monthly view so I can add little notes or "To Do" items for the month that don't necessarily have to be done on a specific day. Or maybe it'll just sit there empty and look pretty, who knows.
This week is honestly my least favorite week in May as far as decorating goes. I was still experimenting when I decorated this page and I think it shows. I love all the elements individually, but it didn't quite turn out the way I wanted it too. Oh well, live and learn!
"Shine bright like a diamond!". This is what happens when you decorate your planner while listening to the radio. I'm pretty happy with the way this page turned out and was excited to get to use a cute cupcake and party hat sticker for Mother's Day. I probably could have been a little more creative with the lettering but it serves it's purpose.
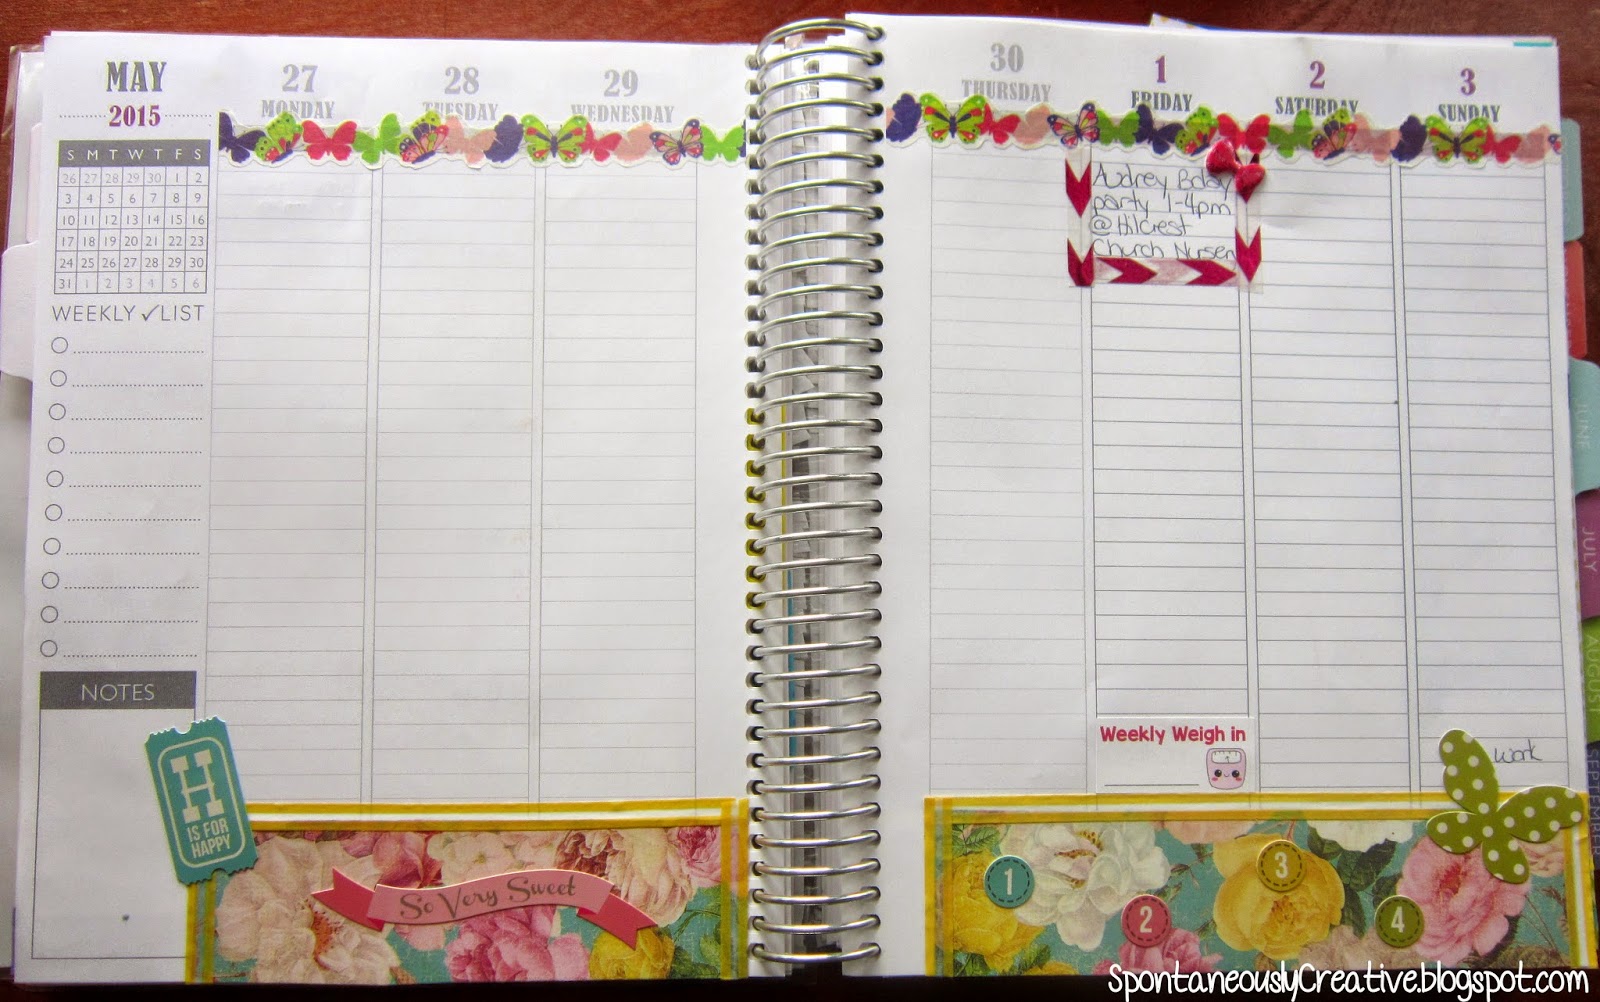
This is where it starts to get interesting! Hello color!! Most of the supplies from this page came from a recent shopping trip to Michael's. I went a little hog wild because all the stickers were 60% off! How could I not really?! I decorated this page on a bright sunny day which transferred o the page. It's amazing how the weather can affect you without you even noticing. I also ordered some stickers from Sweet Kawaii Design which is where the money stack sticker and "Weekly Weigh In" stickers came from. This was the first time I didn't use scrap book paper at the bottom of the page and I'm quite happy with the way it turned out. Layering on washi allows me to customize the look and it doesn't add as much thickness to the pages.
For this week I was inspired by some hydrangea stickers I came across in my craft room. It also happens to go well with the purple theme of the planner for this month. Hydrangeas are one of my favorite, if not my favorite, flower so it was fun to be able to incorporate them into this weekly spread.
This last spread was completely inspired by the alligator washi tape I picked up at Dollar Tree. Before I knew it these pages had exploded into a tropical oasis. The stickers are also from Dollar Tree and while the foam stickers do add some bulk to the planner itself, I think it's worth it because they are so much fun! The pink checklist on the bottom left on the page is what I'm now using to keep track of my monthly cleaning tasks like cleaning the vacuum filter and other large cleaning jobs that only happen once a month.
So that is what my planner looks like for the month of May. June is a blue color scheme and I'm super excited about it because I already have a few pages planned out in my mind. I can't wait! Happy planning!!
Thursday, April 23, 2015
Gift Bag Tag
This is going to be a super short post but I wanted to share it because birthday season is coming up for our family. In our family all the birthdays happen within the summer months. John, my Mom and I are all within the same week, Roman and my Dad share a birthday, and then my brother is in the following month.
Roman was recently invited to his first birthday party and I was looking for an interesting way to wrap the gift. I knew from experience at Roman's first birthday that one year olds prefer to pull tissue paper out of a bag as opposed to unwrapping paper from an object. I had originally planned on making a card to include in the bag but instead I came up with this idea!
I found some gift tags amongst the pile of scrapbooking supplies in my craft room and thought it would be fun to make a gift tag for the bag. Then it hit me; why make a tag and a card when the tag could be the card?! I covered the front of the tag with scrapbook paper and ran a line of washi tape around the outside edge. I found some letter and lizard stickers in my collection so I used those to finish off the front of the tag. I outlined the back of the tag with more washi, added a message and a turtle sticker to finish it off.
Shortly after I made this tag Roman received his second birthday invitation so I whipped up another tag for the birthday girl. This one was super fun for me because I don't get to make too many girly things these days. Actually it took a little more thinking to come up with something girly since I seem to default to boy things. I followed pretty much the same process to make this tag as the first, but used foam stickers to adhere the letters to the card so they are slightly raised.
I think this is a super unique way to package a gift and it is more durable than a card, which is great for milestone birthdays like a kids first! If you decide to make your own tag/card post a picture in the comments so I can see what you created!
Roman was recently invited to his first birthday party and I was looking for an interesting way to wrap the gift. I knew from experience at Roman's first birthday that one year olds prefer to pull tissue paper out of a bag as opposed to unwrapping paper from an object. I had originally planned on making a card to include in the bag but instead I came up with this idea!
I found some gift tags amongst the pile of scrapbooking supplies in my craft room and thought it would be fun to make a gift tag for the bag. Then it hit me; why make a tag and a card when the tag could be the card?! I covered the front of the tag with scrapbook paper and ran a line of washi tape around the outside edge. I found some letter and lizard stickers in my collection so I used those to finish off the front of the tag. I outlined the back of the tag with more washi, added a message and a turtle sticker to finish it off.
Shortly after I made this tag Roman received his second birthday invitation so I whipped up another tag for the birthday girl. This one was super fun for me because I don't get to make too many girly things these days. Actually it took a little more thinking to come up with something girly since I seem to default to boy things. I followed pretty much the same process to make this tag as the first, but used foam stickers to adhere the letters to the card so they are slightly raised.
I think this is a super unique way to package a gift and it is more durable than a card, which is great for milestone birthdays like a kids first! If you decide to make your own tag/card post a picture in the comments so I can see what you created!
Thursday, April 16, 2015
Bismarck Planner Supplies Haul
When we decided to take a trip down to Bismarck, ND one of the first things on my "to find" list was planner supplies! Granted I can buy this type of thing at home but I always see such cute supplies on blog/YouTube hauls that I really want to try and get my hands on some of them. Plus the prices in the States can't be beat! Without further ado, here is what I found!
The first item on my list was a laminating machine. This one is by Scotch and I picked it up at Wal Mart. The reason I wanted to get this in Bismarck is because it's only $20 there, where as it's $40 at home. Even with the not so great exchange rate right now it was still a great deal to buy it down south. I picked up 100 laminating pouches to go with it but didn't include them in the photos because they aren't very exciting. I've used this to laminate the cover of my planner along with the dashboard and even my museum membership! I have a feeling this machine will get a lot of use over time and it's super handy to have around the house.
While we were at Hobby Lobby I picked up a couple packages of scrapbook paper to use in my planner. This will be great for making note cards or I can glue strips onto the pages themselves as decoration. I also found a cute pack of letters so I snapped them up.
I love these little packages of sticky notes that I picked up from the Dollar-Spot section in Target. I tried looking for these in Target at home (before they closed) but never had any luck finding them in our store; so I was stoked when I found them there!
I also found these pretty pens and pencils at Target. I was a little bummed that some of the pencils didn't have any lead in them, but considering they were $0.50 each I guess it isn't that big of a deal. The pens I really like; they write great and are very comfortable to write with.
One of my new favorite stores is Joann Fabrics & Crafts. I've been there before with my Mom but never paid much attention to what they had in the store. This time I found all these adorable page flags, post it notes and washi tape. I didn't have any thin washi in my collection so I picked up a good variety. Plus at $0.50 a roll how can you go wrong!? Oh, and another interesting development, Joann ships to Canada!!!
I wanted to find some Project Life type cards to use as note cards in my planner but they are so darn expensive at Michael's. These cards I found at Hobby Lobby and because they were the store brand they were less expensive, plus they were on sale! I honestly think we picked the perfect weekend to go to Hobby Lobby because everything I touched seemed to be on sale 50% off!
I almost forgot about this amazing tool! This is a 1/8 hole punch that I use to punch holes in anything I want to add into my planner. I looked at a similar punch at Michael's before we went to Bismarck and it was $21. I found this at Hobby Lobby for $5! I probably should have a bought a few but it feels pretty sturdy and I think it will last me a long time.
The only downside to finding all this great stuff in Bismarck is that I can't run out and grab more! Which John would probably say is a good thing. I hear Target gets more sticky notes, pens and pencils with every season, so if you have the chance definitely hit up the Dollar-Spot and grab a few packages! If you want to see how I've put some of these great supplies to use, check out my Plan With Me Post for April!
Tuesday, April 7, 2015
Plan With Me - April 2015
As you can probably guess from the title of this post, I am still obsessed with my planner. Actually it has probably gotten worse since our trip to Bismarck because I picked up a ton of great stuff there! I really need to take a break from this planning business and write up a post of all the awesome planner stuff I picked up in the States!
Until then I thought it would be fun to share how I have decorated my planner for the upcoming month. Of course I'm always adding to the pages so they aren't fully complete, but you'll get the general idea of where I was going with the pages. Enjoy!
I almost forgo! I always made this super cute dashboard for my planner from a gift bag that I found at Target. I cut the sides out of the bag, sent it through the laminator, and they attached a few of my favorite sticky notes. This way I always have sticky notes on hand if I need to jot something down quick, and they aren't floating around in my purse!
Subscribe to:
Posts (Atom)