Showing posts with label Christmas. Show all posts

Wednesday, January 4, 2017

Christmas with the Giulianos!

Merry Christmas everyone! This year was a special Christmas because it was Bianca's first! She isn't quite old enough to understand what's actually going on yet, but Roman make up for that. He was SO excited about everything Christmas. As soon as Halloween was over he wanted to know how much longer until it was Christmas. He's our son!


This year John didn't have to work Christmas Eve, so we started the festivities a little earlier than usual. The kids woke up bright and early, as usual, and Roman was so excited to open his gifts. He quickly shredded through his and proceeded to help Bianca with hers. I think we could have just wrapped empty boxes for him to open and he would have been just as exited. Until he saw the anyway. We bought Roman a Playmobil street sweeper and he thought it was the coolest thing eve, and immediately tried to tear into the box. Bianca got a V-tec unicorn and she was less than impressed, which is par for the course with a 1 year old.


We also bought them some Learning Resources dishes and food. These products are great quality. The playgroup we attend has this food and it's almost indestructible, which is awesome! These gifts lead them to the last surprise for them on Christmas Eve, their very own playroom! John and I have planned to turn this room in our basement into a playroom since we bought the house. We thought this would be the perfect time to finish a renovation and gift it to the kids. It took a few long nights, and a few cuss words, but it turned out amazing! I also bought a used entertainment stand and turned it into a kitchen for the kids. If you want to see the whole playroom process, click here! Roman went crazy when he saw the playroom! He was totally shocked! I know the kids are going to get a ton of use out of this space.


Once all the presents were open it was time for breakfast! After seeing an old blog post I shared on Facebook, John decided to make a special Eggs Benedict breakfast for us! It was sooooo good! The entire process was much easier for John too because both kids were occupied with their new toys.


After our bellies were full, maybe a little over-full, we all suited up to hit the grocery store. Crazy right? It actually wasn't too bag because we were there pretty early. For as long as John and I have been together we have always had a seafood feast on Christmas Eve. The feast usually consists of shrimp, lobster, sometimes scallops, rice and veggies. This year we decided to make it a little more fun for Roman and we bought a couple live lobsters. We made sure to explain to him that they were not pets and that we were in fact going to eat them. He is after-all my child, and I know he will make a pet of almost anything. We spent the rest of the morning playing with toys and doing all the fun things you want to do on Christmas.


After the kids had a much needed nap, it was time to start preparing for the feast! This has always been John's baby, so I sat back and kept the kids busy while he filled the house the smell of delicious seafood. We're pretty lucky in that our kids will pretty much eat everything. Roman loved digging the meat out of the lobster's shell and was even more excited to dip everything on his plate in the melted butter. Bianca couldn't get the lobster into her mouth fast enough and enjoyed every bite!


 After our bellies were full yet again (are you seeing a pattern here?) we loaded everyone into the car to go looking at Christmas lights. If you're in Saskatchewan (not sure if other area's have something similar), I highly recommend checking out www.sparkletour.ca. You can add your house to the tour and see where all the other lighted houses are in your neighbourhood! This is by far the best invention ever!

Why can't kids always go to bed as easily as they do on Christmas Eve? John and I were thankful that they went down so easy because we had a lot, I mean Santa, Santa had a LOT of work to do. While Santa was busy inflating and wrapping some last minute gifts, Mrs. Claus was filling the stockings.

Nothing is better than being a parent on Christmas morning! I love seeing how excited Roman gets (and soon to be Bianca I'm sure) when he wakes up. The first Roman did was check to make sure that Santa and the reindeer had eaten the snacks he left out for them. Once he was satisfied that he had done his part to fuel Santa and his team, he made a dash for the tree. He was extremely excited that Santa had brought him the Scoop toy he had asked for, and Bianca received a toy purse. But no gifts were a match for the farm hoppers. These things will be enjoyed for years to come.

 
Once the presents were opened, and the paper cleared away, I headed into the kitchen to get the turkey into the oven. I seasoned it with some salt, pepper and thyme, and tossed a halved orange into the cavity. Normally I would have used a lemon but I didn't have one on hand.
 
A few hours later, Grandma, Grandpa and Uncle Selby arrived. The kids were both excited to have new people to play with and share their toys with. Uncle Selby won the "most annoying toy ever" award this year, when he gave Roman a whistling tube. If you're a child of the 80s/90s you'll remember these rather pointless toys. Turns out it the most amazing thing to a 3 year old. Selby would whirl it in the air as fast as he could and Roman would attempt to match the pitch of the whistle with his scream. I'm sure you can feel my enthusiasm for this thing oozing through my words. Insert eye roll here.


Time for more food! I really did mean to take a photo of the food beautifully arranged on the table, but I forgot. So instead you get a photo of all the leftovers. We had turkey, mashed potatoes, stuffing, gravy and roasted vegetables (brussel sprouts, beets, onion and squash).
 
 
For dessert, I made a vanilla cake in the bundt pan and covered it with a layer of buttercream. Then I covered the whole cake with buttercream flowers, pinecones and leaves. I'm not sure how many people I thought were coming over for Christmas because I made waaay too much cake. I didn't even know that was possible...
 
Christmas is by far my favorite time of year. Spending an entire day with family and not having to worry about getting other things done is the perfect way to spend a day.
 
Thank you for supporting my blog of the past year and I hope you enjoy 2017! Happy New Year!


Wednesday, December 28, 2016

Apple Crumble Pie

Can't decide between Apple crumble and apple pie? Now you don't have to!


Apple Crumble Pie
1 - 9" pie crust (I used my Grandma's pie crust)
5 cups peeled, sliced & cored granny smith apples (about 4 apples)
1/2 cup sugar
3/4t ground cinnamon
1/3 cup sugar
3/4 cup flour
6T cold butter

Preheat oven to 350°. In a small bowl, mix together 1/2 cup sugar and cinnamon.


Arrange a layer of apple slices in the bottom of the pie crust, then sprinkle with some of the cinnamon sugar mixture. Continue layering apples and sugar until all the apples and sugar are in the pie crust. The apples will be stacked higher than the edge of the crust.


In another bowl mix together1/3 cup sugar and flour. Cut in the butter using a pastry blender or your hands, which is what I prefer to do. Pile the crumble topping on top of the apples. Your pie will look like a mountain but it will all bake down in the oven. Bake at 350° for 30-40 minutes until the apples are soft and the crumble and crust is golden brown.


I'm well aware of the madness that ensues when you attempt to cook Christmas dinner. So why not make your life a little easier and bake this pie right now! Cover it with foil and toss it in the freezer. To serve, thaw the pie and reheat it in the oven and serve it with vanilla ice cream!

Friday, December 16, 2016

3 Easy Christmas Crafts for Kids

Roman has always enjoyed crafting but he seems to go into overdrive during the holidays. I'm not sure if seeing his crafts from past years hanging on the tree makes him want to create more things, or if he just sees me working on different things and he wants in.

Our prime crafting time is first thing in the morning when Bianca has her morning nap. We only have about an hour at the most so I try to pick quick and easy crafts that we can finish in that time. If I can make them with supplies I have on hand or from the dollar store all the better!

Toilet Paper Roll Gingerbread Boy/Girl
Materials
Toilet Paper roll
Craft paper (brown, black & red)
Craft glue
Sequins
Scissors
Pinking scissors
Marker

So maybe this little guy doesn't look exactly the way I would have made him, but Roman really enjoyed creating him. First we cut his head from some scrap booking paper (construction paper would work just fine) and Roman drew him a lovely face. Then we cut his arms and legs from the same paper and folded them accordion style. Then we attached them to the toilet paper roll using craft glue. I cut out some hands and feet from black shoes and Roman glued them on. Using a pinking scissor, I cut a red strip to wrap around the middle of his body. To finish him off we attached the red paper as well as some sequin buttons using the craft glue.

For bedtime on this day we read The Gingerbread Man story for bedtime and Roman thought it was pretty cool that his gingerbread man ad a story written about him!

Laminated Ornaments
Material
Card stock
Tissue paper (any colors you like)
Scissors
Laminator and laminating pouches

Yet another use for this amazing little machine! John was at home the morning we made these and even he enjoyed it!

I printed off these ornament templates on card stock, cut them out, and cut out the centre as well. I placed the template in the middle of a laminating pouch. Then it was time for the fun part! Well, fun for Roman, face-palm moment for John and I; ripping the tissue paper. Once the tissue was sufficiently shredded, we arranged the pieces inside the ornament and ran it through the laminator. A quick trim around the outside and we have some beautiful, sun-catching decorations for the window!

Egg Carton Bell
Materials
Egg carton
Paint
Paintbrush
6" Pipe cleaner
2 bells jingle bells
Ribbon

I separated a single bump out of the carton and Roman gave it a good coat of yellow paint. Once it was dry I poked two tiny holes in the top of the bell. Roman strung the two bells on to the pipe cleaner and slid them into the centre. We fed the ends of the pipe cleaner through the holes from the bottom of the bell, and twisted them together  on the other side. To finish it off I tied a bow with the ribbon at the bottom of the look against the top of the bell.

Wednesday, December 14, 2016

Double Chocolate Banana Bread

I love banana bread, but if I can add chocolate to something I will. The original plan was to turn this into a red velvet banana bread by adding red food coloring. But despite adding almost a teaspoon of gel coloring it didn't change the color of the loaf at all. Luckily this loaf is so delicious it doesn't even matter. This would make a great addition to your sweet trays over the holidays. It has banana in it, it's basically a fruit really.

Double Chocolate Banana Bread
1 cup all purpose flour
1/2 cup cocoa powder
1t baking soda
1/4t salt
2 over-ripe bananas, mashed
3/4 cup apple sauce
3/4 cup brown sugar
1 egg
1t vanilla
1 cup chocolate chips
Holiday sprinkles (optional)

Preheat oven to 350. Grease a loaf pan OR line it with parchment paper. *TIP - if you wet parchment paper it becomes extremely pliable. Hold it under running water for a few seconds then ring it out like you would a towel. You can then lay it right into you pan and your loaf is guaranteed not to stick!

 In a bowl sir together flour, cocoa, baking soda and salt. In a large bowl combine bananas, apple sauce, brown sugar, egg and vanilla. Gradually add the dry ingredients to the wet and mix until well combined. Fold in chocolate chips.

 
Pour batter into prepared pan and top with holiday sprinkles. Bake for 60 minutes, or until a cake tester inserted into the middle comes out clean.


I would recommend letting the loaf cool before you cut into it, as the chocolate chips with still be warm and liquidy for awhile. If you, like my kids and I, don't care then cut into it as soon as you can touch it. I had great plans for a beautiful photo of the loaf, partially sliced and laying on a cake stand. As you can see, that didn't happen. Instead I got a photo of a mutilated loaf sitting on the ziplock bag it was being store in. You know it's a winner if you don't even have time to get a photo of it!

Original post

Monday, December 12, 2016

M&M Cookie Bars

These cookies are everything that I've ever wanted in the perfect cookie; a delicious batter, a slight crust on the outside, gooey on the inside, and TONS of chocolate. I don't know if I would voluntarily make a regular chocolate chip cookie now that I've made these. They're incredibly quick & easy and are a great treat to make with the kids this holiday season!


M&M Cookie Bars
1 cup butter, softened
3/4 cup white sugar
1 cup brown sugar
3 eggs
1 1/2t vanilla
3 cups flour
3/4t baking soda
3/4t salt
1 1/2 cups mini baking M&Ms (I used the entire 275g bag)
1 cup chocolate chips
1/2 cup white chocolate chips

Preheat oven to 350°. Line a 9x13 baking dish with parchment paper. To make the process easier, run the parchment paper under water and ring it out first.

Cream butter, sugar, and brown sugar together. Beat in eggs and vanilla. In a small bowl, combine flour, baking soda and salt. Slowly add the flour mixture to the butter and mix until well combined. Add the M&Ms and chocolate chips, reserving some to sprinkle on top at the end. Do not over-mix at the stage or the M&Ms will be crushed.

Pour the batter into the baking sheet and spread into an even layer. Press on the reserved M&Ms and chocolate chips. Bake at 350° for 35-40 minutes. Allow the bars to cool and then lift them out of the pan using the parchment paper and cut into squares.

If you would like to keep these around for longer than one day, I suggest immediately transferring them to a freezer bag and hiding them in the back of your deep freeze. Just a heads up, 8 seconds is the perfect time for one square in the microwave....

Original post

Wednesday, December 7, 2016

Marshmallow Christmas Tree

When it comes to Christmas decorations I have a bit of an affinity for trees. I have quite the collection going on top of our entertainment stand where we have our Christmas village that my mom sewed for us. I've purchased a couple cute ones but I like the idea of making my own. Mostly because I like inexpensive Christmas decorations and partly because I like having decorations that not everyone has in their homes. A few years ago I made a set of foam trees. With being extremely pregnant last year (and exhausted) I took a hiatus from the trees, but Roman and I are back at it this year!
Roman loves making crafts and usually requests to do it while Bianca is taking her morning nap. You'd think by now I could prepare for this kind of thing but I haven't. I have these grand plans of having everything prepped and ready to go for a craft each week but it just doesn't happen. I remembered this marshmallow ornament I had made in grade 1 or 2. I was sure I had all the supplies, but alas, I did not. In this moment, the idea of this tree was born!

Materials
Styrofoam tree form
Mini marshmallows
Sequins
Craft glue

Run a line of glue around the base of the tree form and press on each marshmallow. Alternatively you can put the glue directly on to each marshmallow. I found that running the line of glue worked better when working with a 3 year old. You'll want to stagger the rows as you continue up the tree, just to make sure you cover all, or as much as possible, of the tree form.


We let our completed tree sit for a couple hours for the glue to completely dry before we started attaching the sequins. I dabbed a small amount of craft glue onto each marshmallow and Roman stuck a sequin on top of the glue. With Roman in charge of sequins some and right side up and some aren't, and sometimes there was ever 2-4 stuck together on top of the marshmallow. We also went for a random color pattern. Not that there is really an option when you're working with kids.


In the original ornament I made when I was little we used pins, beads and sequins to hold the marshmallows to a Styrofoam ball. If you're working with older kids or doing this on your own (you lucky devil), you could use the same method on the tree and it would be that much more secure. If you have that odd ball marshmallow that just won't stick, try a bit of hot glue. I gave it a go, and other than melting a small portion of one side of the marshmallow, it did the trick.

I'd love to see how your tree or ornament turns out! Post a picture in the comments of your creation!!

Monday, December 5, 2016

Home Preschool - December 2016

As I sat down to write this post I was expecting to have to try to justify why we hadn't done any of the activities I had planned. Turns out we did about half of them! The ones we haven't done are mainly due to lack of prep as I didn't have the materials on hand that the activities required. That being said, we still have time as it's currently only the 21st! As I look ahead to the upcoming activities for November I see that I need to make a trip to Bulk Barn and Dollar Tree; hooray!!

Roman really enjoyed decorating his chickens and constructing their eggs and nests. As excited as he was about them I really thought he would play with them longer than he did. The novelty seemed to wear off after a day, but I think a large part of that is that the coop has to be kept up out of Bianca's reach or she tries to destroy it. Maybe I'll try moving it into his room so he can check on his chickens whenever he likes!

He also loved the animal track painting. As soon as I sat the toys and the paint on the table it was game on! You couldn't really tell the difference between the tracks themselves but he had a blast. The whole purpose of the animal/farm projects this month was to get Roman geared up for Agribition! I know for sure that the Muddy Pigs activity has Roman excited. We made two pigs so that he could take one to Grandma and Grandpa's house for their fridge. I was a little surprised that Roman was willing to paint with his hands because he doesn't usually like to, but I think the oats in the paint made it more gross and appealing. The logic of a 3 year old.


Our ocean turned into woodland creature clip cards because I had those stickers on hand. Roman loves anything with stickers so he enjoyed just making the cards themselves. I decided to laminate them to make them last a little longer. These home laminating machines are so handy. If you don't have one I highly recommend picking one up. They aren't very expensive and I seem to use it more than I ever thought I would!

I'm just going to warn you now; most of the December activities are probably not going to happen. With all things Christmas in full swing I have a feeling we'll be working on more holiday crafts and activities than we will be preschool.

1st-10th: Snow Clay, Laminated Ornaments
11th-17th: Paper Plate Christmas Ornament, Feed The Penguin Game
18th-24th: Christmas!!!
25th-31st: Straw Rockets

Tuesday, January 6, 2015

Christmas with the Giulianos

After all the hype of Christmas I wanted to share our Christmas with you! 


Traditionally most Germans and Italians celebrate Christmas on Christmas Eve, so that is exactly what we do.  John had to work on Christmas Eve but was able to get home early.  As soon as John got home we decided to open presents since Roman isn't exactly the quickest at it and we were worried we'd be there until midnight.  I was impressed that the presents held Roman's attention for as long as they did!  He managed to tear through 3 presents before he was distracted by his Little People Zoo Talker set and decided he was done.  John put the set together for Roman (with some help) and he was quite happy with his new toy.  He even gave it a kiss on the way to bed that night!


In the past we have made a seafood feast for Christmas Eve (lobster, scallops, shrimp and crab) but this year we decided to go a different route.  McDonald's for everyone!  Not exactly a fancy or even Christmasy meal but we thought it would be fun.  Roman inhaled his chicken nuggets and yogurt from his happy meal, while John and I split a holiday share box.  It's been forever and a day since I had a McDonald's chicken nugget and they were delicious!

After the nightly routine of a bath and a few stories, Roman headed off to bed to wait peacefully for Santa to arrive!  The best part of celebrating Christmas on Christmas Eve is you get to open presents on two days!

I was really hoping it would snow overnight so we could have a white Christmas, but that didn't happen.  John and I were up before Roman because we had to get our massive 15 pound turkey in the oven at 6:30am so it would be ready for our Christmas lunch!  The sound of us walking around the house must have woken Roman up because he was up shortly after us.  Strange the sound of Santa and his reindeer on the roof last night didn't wake him?


With the bird in the oven, John and I were more than excited for Roman to open more gifts!  Turns out Roman wasn't all that excited.  He sat beside the presents Santa had left, gave them a good look, then got up to go play with his toys.  Not the reaction we were hoping for but I guess we should have had realistic expectations of a 17 month old.  After some convincing Roman pulled the toys out of his stocking and I ended up opening most of his presents for him.  When he saw that Santa had brought him a Little People Airport he insisted we set it up immediately.  Of course John was happy to oblige. 

After breakfast John and Roman gave the living room a quick clean so it would be ready for the next delivery of gifts.  Grandma, Grandpa, Uncle Selby and Stephanie arrived around 10:00am and much to Roman's surprise Santa had left gifts for him at Grandma's house too!  Actually I think Santa left most of Roman's gifts at Grandma's...apparently Santa has no self control...  Instantly our living room was stuffed with people and presents so we decided to dive into the gifts so we would have some room to move.  Plus I think Grandma was dying to see Roman open his gifts.  Roman started with his stocking, which in hindsight probably wasn't such a good idea.  Right on the top of the stocking Santa had left 2 John Deere tractors and a John Deere lawnmower.  At this point Roman had decided he had received everything he could possibly wish for and completely ignored all the other gifts.  Grandpa laughed that Santa could have saved a lot of money and just bought the tractors.  I guess Santa will have to make a note of that for next year.


With the gifts open and Roman happily playing with his plethora of playmates and new toys, I headed into the kitchen to get the rest of our Christmas lunch going.  While the potatoes boiled on the stove I started on the vegetable dish.  This year I decided to make something different from the regular boiled peas/carrots/corn that we usually have.  I made a vegetable salad of sorts (at least that's that my Dad called it) that included brussel sprouts, red swiss chard, onion and mushrooms with garlic and a splash of balsamic vinegar.  Super delicious and good for you!  Not everyone was a fan though.  Selby wouldn't touch it because "there were strange vegetables in there", silly boy didn't know what he was missing!  We also had stuffing, gravy and delicious soft buns, because it isn't Christmas without those things!  I have to apologise for the lack of dinner table photos.  After rushing to get everything ready, then trying to get food into Roman before he lost his mind, it totally slipped my mind to take a photo.


Even with all the action in the house Roman still went down for his nap at 12:30, which I considered a Christmas miracle!  Once the dishes were done, Mom, Selby, Stephanie and myself sat around the table visiting and comparing music on each other's phones while John and Dad hit the rum.  It isn't a holiday celebration until John and Dad hit the booze!  I personally love it because we always end up with a great story out of it.  A few years back they got into a box of wine and we still talk about that night.  They were pretty tame on the rum, but once they got into the liquor filled chocolates, that's when it got interesting!  After they cracked open the Russian Vodka chocolates (that were apparently contaminated from Chernobyl) new words were invented like enformatted and negadivity.  I don't think they'll live those down for awhile. 


While the guys did what guys do, Mom, Roman and I decorated gingerbread cookies and made Santa hats.  Grandma's always arrange the best projects!  Roman did pretty good decorating but he did try to suck the icing right out of the bottles a few times.  I guess he really is my son!  When it came to the Santa hats he was much more interested in eating cool-whip than anything else not that I can blame him.  What a better ending to Christmas than filling your 17 month old up with icing and cool-whip?!


All in all it was a great Christmas spent with good company and good food, which is all that really matters at Christmas time!

Thursday, December 25, 2014

Italian Meatball Cookies

I promise this will be the last cookie recipe for the year!  I came across this recipe on Allrecipes.com when I was searching for recipes for John and I's first Christmas together.  Now the idea of a meatball cookie might not initially seem like a great idea, but the name comes from the way the cookie looks and now from what is it made of.

This cookie has everything you would want in a holiday cookie!  Cloves, allspice, cinnamon and nutmeg spice this cookie perfectly and make it sing with the flavors of the holidays.  The cocoa and glaze gives this cookie the perfect amount of chocolatelyness, and the walnuts give it just the right amount of crunch.  I might be crazy, but to me that sounds like a whole barrel full of Christmas!


Italian Meatball Cookies (Makes 30 cookies)
1/2 cup butter
1 1/2 cups sugar
3 eggs
2t vanilla
3 cups flour
2/3 cup cocoa powder
1 1/2t baking powder
1 1/2t baking soda
1t salt
1t cloves*
1t allspice
1t cinnamon
1/2t nutmeg
1 cup chopped walnuts
Glaze
2 cups icing sugar
1/3 cup cocoa powder
1/4 cup milk

* If you don't have cloves, like I never seem do, you can omit this and the cookies will still be delicious!

Preheat oven to 350° and line cookie sheets with parchment paper.  Cream together butter and sugar.  Add eggs and vanilla and mix well.  In a separate bowl stir together flour, cocoa, baking powder, baking soda, salt and spices.  Add the flour mixture to the butter mixture, mixing until the flour is completely combined.  Stir in the chopped walnuts by hand.

Form dough into 1 inch balls and place on parchment lined baking sheets.  Bake at 350° for 10 minutes.  Cookies should be fairly firm but still have some give to them.  Do not over bake them. Transfer cookies to a cooling rack and allow to cool slightly before glazing them.


Whisk together icing sugar, cocoa powder and milk until smoother.  Dip the top of the cookies into the glaze and place on the cooled parchment lined baking sheets to set.  If the glaze in the bowl begins to set up before you are done the cookies, whisk in a little more milk to soften it.

 
These cookies freeze extremely well so get them in there fast or I will not be held accountable for what happens if you don't!

Tuesday, December 23, 2014

Hamantashen

If I was only allowed to make one treat at Christmas time, this would be it!  Hamantashen are a Jewish filled cookie that will change your life!  They will brighten your outlook on life and bring peace and harmony to the world around you.  At least they do for me!  If sugar cookies and tarts had a baby this would be the delicious result!

I love to buy my baking supplies at Bulk Barn because I can buy the exact amount I need.  This is especially true when it comes to pie filling!  I usually like to have a few different fillings in my hamantashen and buying my pie filling at Bulk Barn allows me to get several different flavor without having to throw a bunch out.


Hamantashen
1 1/2 cups butter, softened
1 cup sugar
2 eggs
6T orange juice*
1T vanilla
2t baking powder
4 1/2 cups flour
12 oz can pie filling (I used cherry & strawberry rhubarb)

*If you don't have orange juice on hand you can just use water and I promise they will taste just as amazing!

Cream butter and sugar until smooth then beat in eggs one at a time.  Stir in orange juice and vanilla.  In a separate bowl mix together flour and baking powder.  Slowly add the dry ingredients to the wet mixing well between additions.  Cover and refrigerate for at least 2 hours, or overnight.

Allow the dough to warm slightly before rolling.  I like to cut the ball into 1/4s just to make it a little easier to manage.  Roll dough out to a 1/4 inch thickness and cut into 3 inch circles using a cookie cutter or a drinking glass, which is what I use.  If you feel your rounds are a little on the thick side you can squish them out a bit just before you fill them.  Spoon 1t of filling into the centre of each round and pinch the sides to form a triangle.  Place on a parchment lined baking sheet and bake for 8-10 minutes at 375°.  The cookies can also be frozen on the sheets before baking to help them retain their shape while baking. 


I probably should have followed the steps more carefully since most of my cookies flattened out.  This was likely a combination of soft dough and my need to jam as much filling in to the centre as possible.  These cookies freeze extremely well, I just recommend freezing them on a baking sheet first and layering them in a freezer container separating them with parchment paper so they don't stick together. 

Of course I can't make cookies without my quality control supervisor.  Luckily he got bored before the pie filling came out so I didn't have to wrestle it away from him.  A couple pieces of cookie dough and he was satisfied.


If you run out of pie filling might I suggest filling the cookies with Nutella!  I ran into this problem last year and John fell in love with the Nutella version!  I hope you enjoy a recipe that I love so much, and I apologise in advance for the 5lbs you will gain after eating the entire batch yourself!

Originally posted on Allrecipes.com

Thursday, December 18, 2014

Puffed Wheat & Rice Krispie Cake

 It's a two for one blog post!  For me puffed wheat cake and Rice Krispie cake go together like peanut butter & jam (or peanut butter and eggs as Selby just texted me), I can't imagine one without the other.  When I was little Mom always made these two delicious treats at the same time and always around Christmas time.  Granted there isn't anything particularly Christmasy about puffed wheat or Rice Krispies (unless you get the Christmas box), but sometimes it's all about the tradition!


Puffed Wheat Cake
1/4 cup melted butter
1/2 cup corn syrup
1t vanilla
1 cup brown sugar
3T cocoa powder
10 cups puffed wheat

Measure the puffed wheat into a large bowl and butter a 9x13" pan.  Combine all ingredients except puffed wheat in a pot and bring to a boil over medium high heat stirring constantly.  You don't want to boil it too long or your cake will be extremely hard once it sets.  Once the surface of the liquid starts to look bubbly like an Aero bar, remove it from the heat and pour it over the puffed wheat.  Stir the puffed wheat until it is completely covered with the chocolate mixture.  Pour the puffed wheat into the buttered 9x13" pan, pressing it down with a spatula.  Allow to cool, slice, and enjoy!

Rice Krispie Cake
1/2 cup butter
6 cups mini marshmallows
1t vanilla
10-11 cups Rice Krispies

Butter a 9x13" pan.  Melt butter in a large pot.  Add marshmallows and cook, stirring constantly, until marshmallows are almost completely melted.  If you over cook the mixture it will set up hard as a rock, so remove it from the heat when there are a few lumps left and stir in vanilla.  Pour in Rice Krispies and stir until they are completely covered with the marshmallow mixture.  Press Rice Krispies into the buttered 9x13" pan and allow to cool (if you can wait that long).  Slice once cooled.

Unfortunately, or fortunately depending on how you look at it, my cakes didn't last very long.  Most of the Rice Krispie cake was done before I even had it sliced.  Although the puffed wheat cake managed to get cut into squares, I didn't get it into the freezer fast enough and I ended up eating most of it in the first few days.  I realize this stuff is meant to be eaten but maybe not all in a week.....by a single person.....

Thursday, December 11, 2014

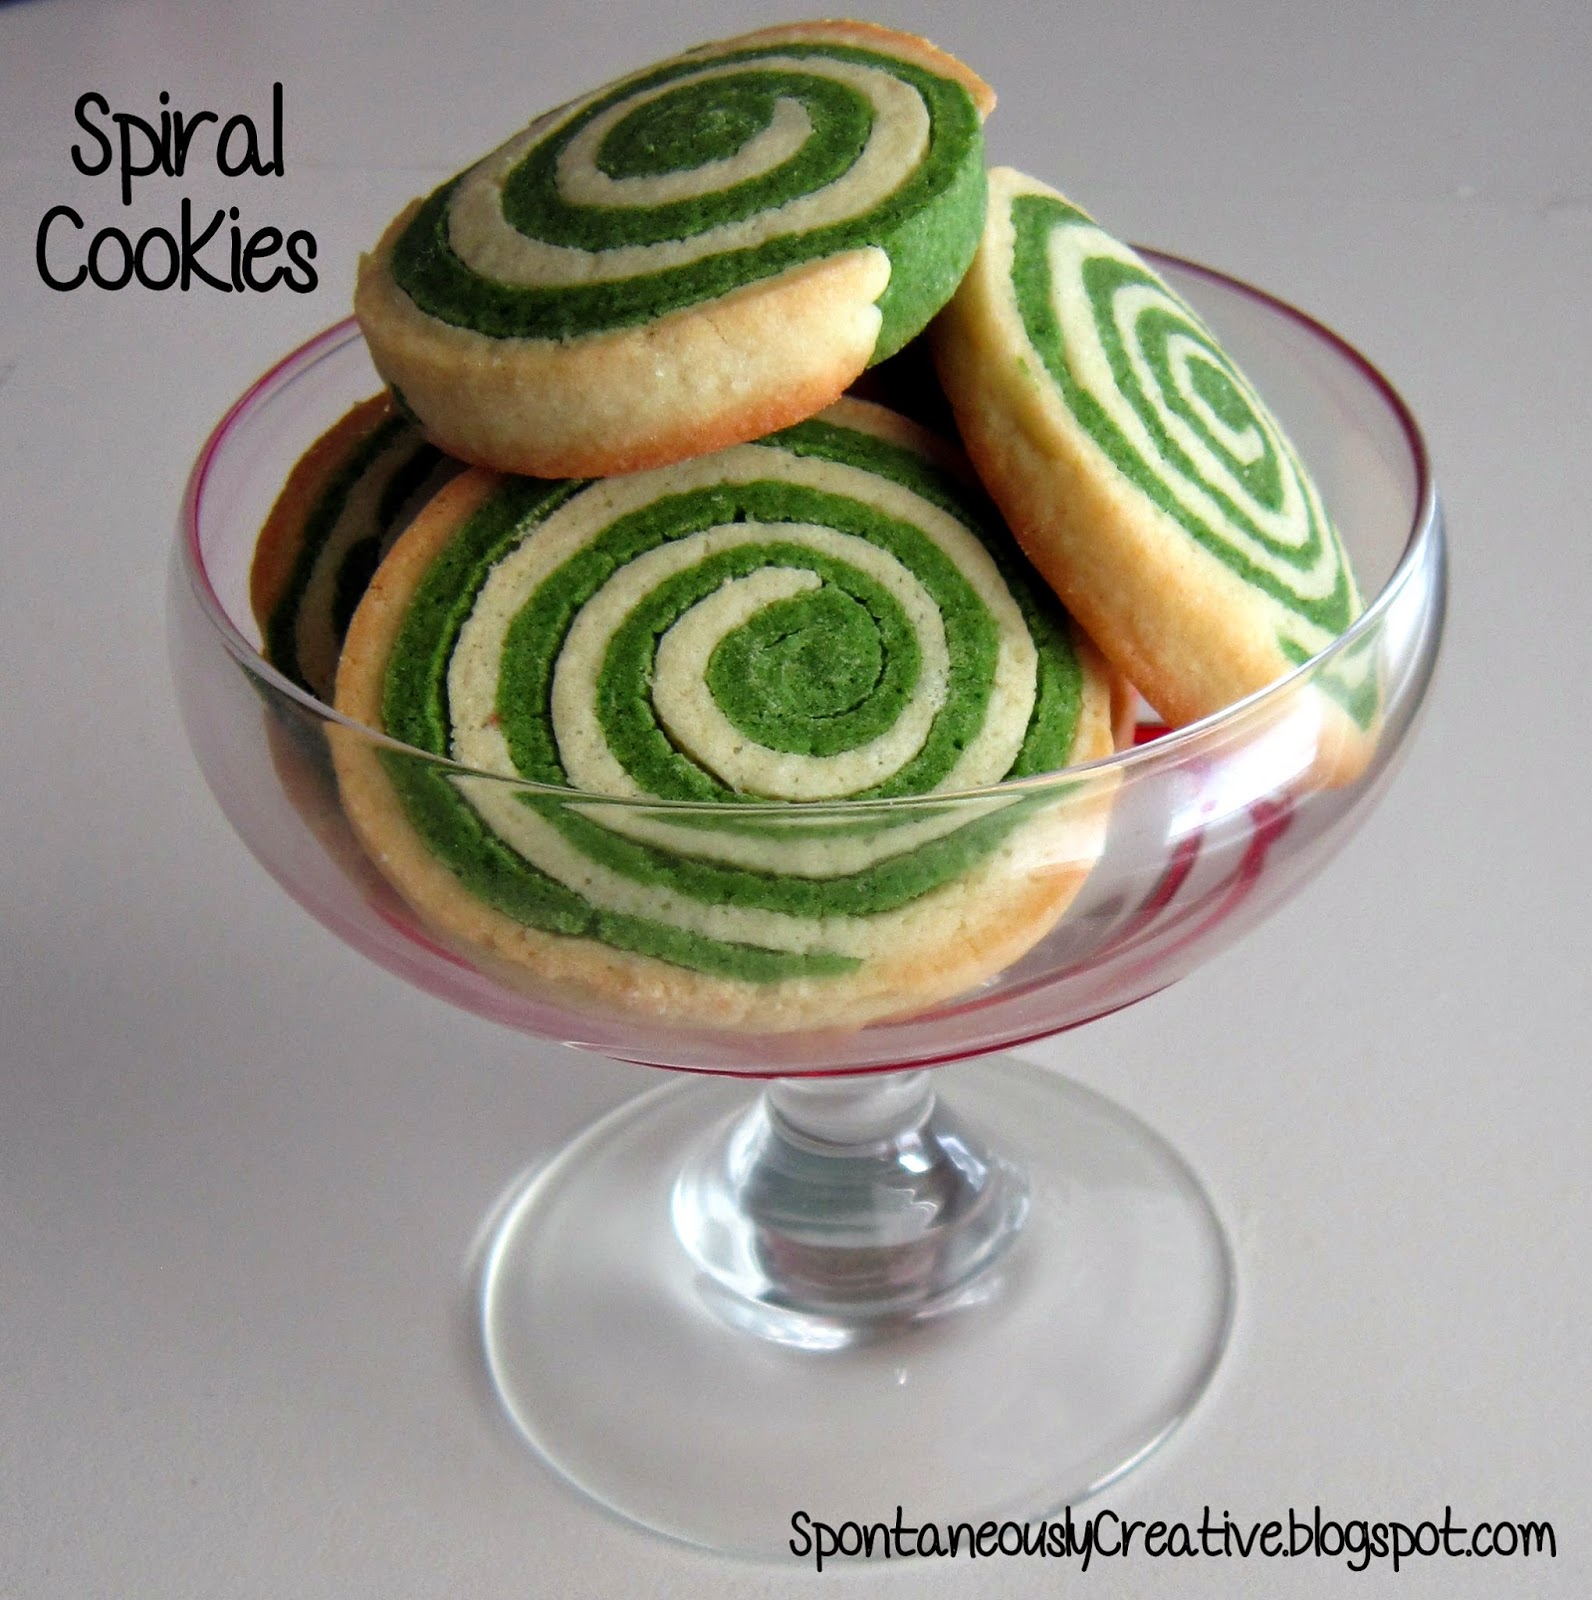
Spiral Cookies

When I was a kid Christmas was the one time of the year that my Mom made sugar cookies.  I loved slathering them in icing and sprinkling them with sprinkles and colored sugar.  The only thing better than decorating the cookies was eating the cookies.  These days I try to keep my cookies to a minimum (just because I try doesn't mean I succeed), but at Christmas time all bets are off and I become a cookie baking machine. 


I came across this recipe on AllRecipes.com a few years back and it is now the only sugar cookie recipe I use.  This recipe gives you a delicious, moist sugar cookie that holds it's shape amazingly well.  This time I've used them to make a sliced cookie but this dough also work extremely well for cookie cutter cookies!

Spiral Cookies (Makes approx. 2 dozen)
1 1/2 cups butter, softened
2 cups sugar
4 eggs
1t vanilla
5 cups flour
2t baking powder
1t salt

Cream together butter and sugar.  Add eggs one at a time mixing well after each addition.  Stir in vanilla.  In a separate bowl mix together flour, baking powder and salt.  Slowly add flour mixture to wet ingredients one cup at a time, being sure to scrape down the bowl half way through.

Divide the dough in half and wrap one half in plastic wrap.  Add some green (or any other color) gel coloring to the other half of the dough and knead until the coloring is evenly distributed throughout the dough.  Wrap the colored dough in plastic wrap and refrigerate all dough for at least one hour.

Remove dough from the fridge and allow to warm up slightly.  On a lightly floured surface, roll out the colored dough 1/4" thick in a square-ish shape.  Carefully set the dough aside and roll out the other half of the dough in the same way.  Layer the colored dough on top of the uncolored dough and gently roll over the dough to squish them together.


Starting at the edge closest to you, roll the dough into a log as tightly as possible.  If the dough isn't super tight, no worries, the spaces will fill in during baking.  Cut the log in half and wrap them in plastic wrap.  Refrigerate the logs for about an hour.  This will prevent the cookies from squishing when you slice them.

Unwrap the logs and slice them into 1" thick cookies.  If you want to jazz them up a but you can roll the cookies in crushed candy canes or sprinkles.  Lay the cookies on a parchment lined baking sheet and bake at 400° for 8 minutes or until they start to lightly brown.


When I was little Selby and I had a friend sleep over at our house and his Mom sent cookies with him.  The cookies were similar to these only they were square.  Ever since that day I have thought about those cookies, and 20 years is a long time!  I seem to remember the colored dough tasting different but I think that was just my little mind playing tricks on me.  I still think that colored dough tastes different (even though it doesn't) but I think it might actually just be the magic of Christmas!

Tuesday, December 9, 2014

Christmas Decorations 2014

John and I love Christmas and we love to decorate!  We put our decorations up right after Remembrance Day and they usually stay up until the middle of January, after Ukrainian Christmas.  Since it is the season of sharing I thought I'd take you for a tour of our decorations, along with the stories that go with them!


Let's start with my favorite, and probably the most important decoration, the tree!  I prefer an artificial tree because you can use it year after year and it doesn't shed needles.  Plus with 2 dogs, a cat and a toddler, I think a real tree might put me over the edge.  We picked up this amazing 9 foot, pre-lit tree from Superstore last year during their boxing week sale.  Would you believe we got this tree for only $14!!  If you are in the market for a tree I highly recommend looking later on in the boxing week sales, and checking out stores like Superstore that don't have to space to store the trees for the rest of the year.


At first I wasn't sold on the pre-lit tree, but now that we have one I love it.  This is the first year that divorce papers didn't need to be drawn up before we got the lights on the tree!  I also love that the lights are strung throughout the tree and not just on the edge of the branches.  I do kinda miss having multicolored lights but I guess you can't have everything.

I love having an eclectic mix of ornaments on a tree.  I've never been the kind of person that had a color scheme for the tree that the ornaments had to match.  Growing up Mom had all kinds of ornaments including ones that Selby and I had made.  Those are the ornaments that I think make a tree unique to the family and interesting.  A few of those ornaments have now made their way onto our tree.  Everyone has a "Baby's First" ornament, and I'm surprised mine hasn't disintegrated by now as old as it is.  The gold ornament was a gift from an aunt and Selby has one very similar to it. 


Roman's "Baby's First" ornament I picked up from a craft sale in town for his first Christmas.  I also made hand and foot impressions that year in salt dough.  It's a little crazy now to compare his hands and feet to these ornaments.  How did he get so big so fast?!  I'm sure it will just be a matter of time before our tree is full of paper snowflakes (like Grandma's) and marshmallow balls (like Mom's) and I really can't wait for that day!


Even the pets have made the tree!  I ordered these ornaments from Etsy over the years as our little fur family has grown.  When I ordered the ornament with Casper on it (our late puppy) I ordered one for each member of our family so we would all have Casper on our tree.  Casper was an amazing dog and he definitely deserves the honor of being placed on the tree.  Actually, Mom has two Casper ornaments!  Unfortunately the lady no longer makes the ornaments or I would have her make one of Roman.  I might have to send her a message and see if I can convince her!


Last year during the boxing week sales, Mom and I hit up a couple stores to find some good deals and I came home with a few things.  I don't normally shop at Pier1 because it can be very expensive, but boxing week is the perfect time to go!  I found a handful of beautiful ornaments for a fraction of the cost.  When I find unique items I like to pick up just one to give the tree some interest.  *TIP - when buying ornaments for a tree you want to buy 1 or in groups of 3.  This will give your tree a nice balance.

I came across these adorable clip on birds at Michael's during that same shopping trip last year.  My Mom made ornaments years and years ago from clothes pins and tiny bears and these birds reminded me of them.  The other day I came across these beautiful pine cones at Superstore when they were setting out the decorations so I just had to pick up three of them.  The rest of the ornaments were from a $25 bundle pack from Costco to help fill in the bare spots since we recently cleared out some of the more tattered/ugly ornaments that made their way onto our tree.


Onto the entertainment centre!  On the very top I have the beginning of what I hope will be a forest some day.  For now if consists of a few foam trees that I made this year and a silver tree I picked up on sale at Canadian Tire years ago.  This thing loses so much litter every year that I'm actually surprised there is any left on it.  I also have my little light up reindeer and penguin on the top shelf.  These guys are from an Avon catalogue years ago, and the only work sporadically, but they are cute none the less!

Now the nut family is actually out all year long but it does remind me of Christmas.  When Selby and I were younger we would play a game at our grandparent's house called hide the thimble.  Basically one of us would hide a thimble in the house and the other would have to find it.  You might think this would be an impossible game but it was actually extremely easy.  Why?  Because we ALWAYS hid the thimble on the walnut's hat!  We played this game all year round but something about my grandparent's makes me think of Christmas.


These three amigos used to live on the air conditioning unit in our apartment and would often get their butts frozen to the unit.  I bet they think they are flying high now!  The sparkle balls I made last year when I had all the time in the world because Roman napped three times a day and couldn't crawl.  Man those were the days!


Funny story about these angels.  I actually bought these angels two years apart at a craft sale in Regina.  I must have really liked the angel because I bought the same one twice.  What are the chances of that?  I wish I could remember the name of the booth at the sale to share with you because they always had amazing things there.  I actually picked up this moose there as well.


The elf and moose standing beside the TV were part of a boxing week bundle that we picked up at Canadian Tire years ago when John was working there.  Most or the bundle was ugly (that's where most of the ornaments that got tossed came from) but these two were worth the cost of the bundles.  We used to stand them up next to the Christmas tree but that just isn't going to work anymore with Roman running around.  Luckily he hasn't touched them once yet!


Lastly we have Pingoo and his Associates.  I'm pretty sure John is the one who named these bad boys that we found at Sears, if I remember correctly.  They light up and change colors but like most things in this house the batteries are dead and I never remember to buy more.  You would think with so many toys that take batteries we would have some somewhere.  Maybe I should ask for some for Christmas...

Hanging over each of our front windows is a giant piece of candy.  This was another project I completed last year while Roman was immobile.  They are super easy and inexpensive to make and I think they look great.  I bought a disk of Styrofoam and traced the pattern on a candy piece onto the disk.  Then I painted it, wrapped it in cellophane, twisted the ends and tied it up with some ribbon.  Viola, instant giant candies!  You could even make smaller versions for your tree!  We also have window clings on the front windows but they are a little hard to take photos of so you'll just have to trust me on that one.

The last of the indoor decorations are in the hallway.  Here I decided to flank our Christmas card holder with Roman's snowflake paintings.  The card holder was another project from last year (man alive I got a lot accomplished last year!) and it was super easy.  I found the board with Santa on it at Dollarama.  I painted it and hot glued three strips of ribbon onto the back.  At Michael's I fond some mini clothes pins that I use to pin the cards to the ribbon.


Out into the cold we go to check out the outdoor decorations!  Our display is significantly large than it was last year but we are nowhere near done growing.  We want to be the Griswolds of Moose Jaw!  John and I picked up the bow on the gate from Canadian Tire to hang from our balcony when we lived in our apartment.  We didn't really have a great place for it here so the gate is where it got stuck.  The tree silhouette was a boxing week find at Wal Mart last year.  It has a stand that allows it to sit anywhere but John didn't think it would stand up to our crazy Saskatchewan winds so we wired it to the fence to make sure we weren't retrieving it out of the neighbors yard every other day.


I actually found these cute little devils at a garage sale!  The snowman had never been taken out of the box and the penguin was only used inside.  At $5 for the pair, how do you go wrong?  The only downside is that because they are on the smaller side they tend to get stuck in the snow when the wind packs it on top of them.  Not a big deal though.  I just wanted out there and dig him out.  Roman usually gets a kick out of it.  We had the carousel last year and I was excited to see it again this year.  Unfortunately it stopped working half way through the winter last year.  I'm sure there is some way to fix it, I just haven't put that much effort into it yet.


You are seeing clearly.  We have a Christmas tree in our front yard!  This is actually the tree we used to have in our house, and the tree my Mom had for years before that.  This time we strung it with outdoor lights and zip tied the lights and ornaments to the tree.  John roped it down on two sides and it doesn't move an inch in the wind.  A house down the street from us had a tree in their yard last year so I can't take the credit for this idea.  What a great way to re-purpose an old tree!


I purchased the white wreath at a wholesale craft store last year and used twist ties to attach the ornaments and bow to it.  This year the bow broke, it was from Dollarama and I'm impressed it lasted one winter, so John just zip tied it on while he was hanging it.  The candy canes also came from the wholesale crafts store.  To stick them into the ground, John ground down some 12" spikes, heated them in the oven, and stuck them into the bottom of the candy canes.  Once the spikes were in the candy canes he just pushed them into the ground.  Not only do they tie the driveway into the rest of the yard but they make navigating the driveway in deep snow a piece of cake!


So that's the tour!  I hope you enjoyed seeing our Christmas decorations and maybe it will inspire your own display!  This is the time of year to spread kindness and cheer and restore our faith in humanity (at least it is for me).  John, Roman and myself would like to wish everyone a Merry Christmas, Happy Hanukkah, Happy Kwanzaa, Happy whatever you celebrate!