Don't worry I'll still be documenting anything that will make an interesting an interesting post. There will likely still be the odd post here and there, but I hope to be back to my regular posting schedule in a few weeks!
Monday, June 1, 2015
Time for a break
This probably isn't the post you were expecting from me today. I realize I'm right in the middle of a series and summer is usually full of fun posts, but right now things in our house are so busy that I just need some time to catch up to everything!
Thursday, May 28, 2015
Plan With Me - June 2015
It's hard to believe that I'm already planning the month of June! Why can't the winter months blow by this fast? June is a busy month for our family since most of the birthdays for our family are in this month, and John, Roman and I are taking our first trip to Toronto to visit John's family since Roman was born. Yes this means Roman's first time on a plane; please pray for us.

The color scheme in my planner for the month of June is teal, and it just so happens that I have a ton of washi that coordinates with it. Obviously I couldn't resist adding a plane sticker for our trip, and I decided to mark the birthdays with some interesting washi as well.

I have been not so patiently waiting for an opportunity to use these cool sea creature stickers that I found at Dollar Tree. A little scrapbook paper and some washi tape and this page is done!

I've also been dying to use the fabric tape I found at Michael's awhile ago. Both the flower pattern and polka dot tape are both fabric tape. Like I said, we have a lot of birthday's in June so you'll probably notice a lot of cupcake stickers on the weekly views, marking the different special days!


This is by far my favorite week of June. No, not because it's my birthday week, but because the entire page came together so well. The little birds and butterflies are super adorable and it makes them even cuter that they came in a sticker book for only a few dollars!

I couldn't resist make only truly summer inspired page. If neon washi doesn't scream summer then I don't know what does! I'm not sure what I'm going to do with the blank page on the right (maybe use it as extra note space) but I'm sure I'll find a use for it once I get into June.
Hopefully you enjoyed this post and be sure to share a photo of your favorite spread for the month of June from your planner!
Tuesday, May 26, 2015
Raspberry Cheesecake Bites
Even though cheesecake is a classic dessert I have never actually made it myself. In our family Selby as always been the cheesecake master so I've never really had the opportunity to make it. Well that changes today! I came across this recipe and thought it was a great way to make cheesecake fun. Plus, who doesn't want a delicious frozen treat at the end of a fantastic backyard BBQ meal?!
The best part of all is these scrumptious morsels can be made days in advance since they can be stored in the freezer. This makes these bad boys perfect for large parties because it's one less thing you have to prepare the day of!

Raspberry Cheesecake Bites (Makes ~15 bites)
1 1/3 cup raspberries (frozen or fresh)
8 oz. cream cheese, softened
2T sugar
1t lemon zest
1 cup cool whip
1/2 cup graham cracker crumbs (about 8 crackers crushed up)
Whip together cream cheese, sugar and lemon zest with a mixer. Add raspberries and stir allowing the berries to break up and combine with the cream cheese. Add the cool whip and stir until combined. Place the bowl in the freezer for about 2 hours for the mixture to set up.

Place graham crumbs in a small bowl. Using a small ice cream scoop (mine was about 2" in diameter) scoop out a ball of the cream cheese mixture. Roll the ball in the graham crumbs until completely coated, then place on a parchment lined baking sheet. Pop the tray back into the freezer for the bites to set up. Once they are frozen, allow them to thaw for 5 minutes before serving, or store them in the freezer in an airtight container.

Thursday, May 21, 2015
Quilt Show Love
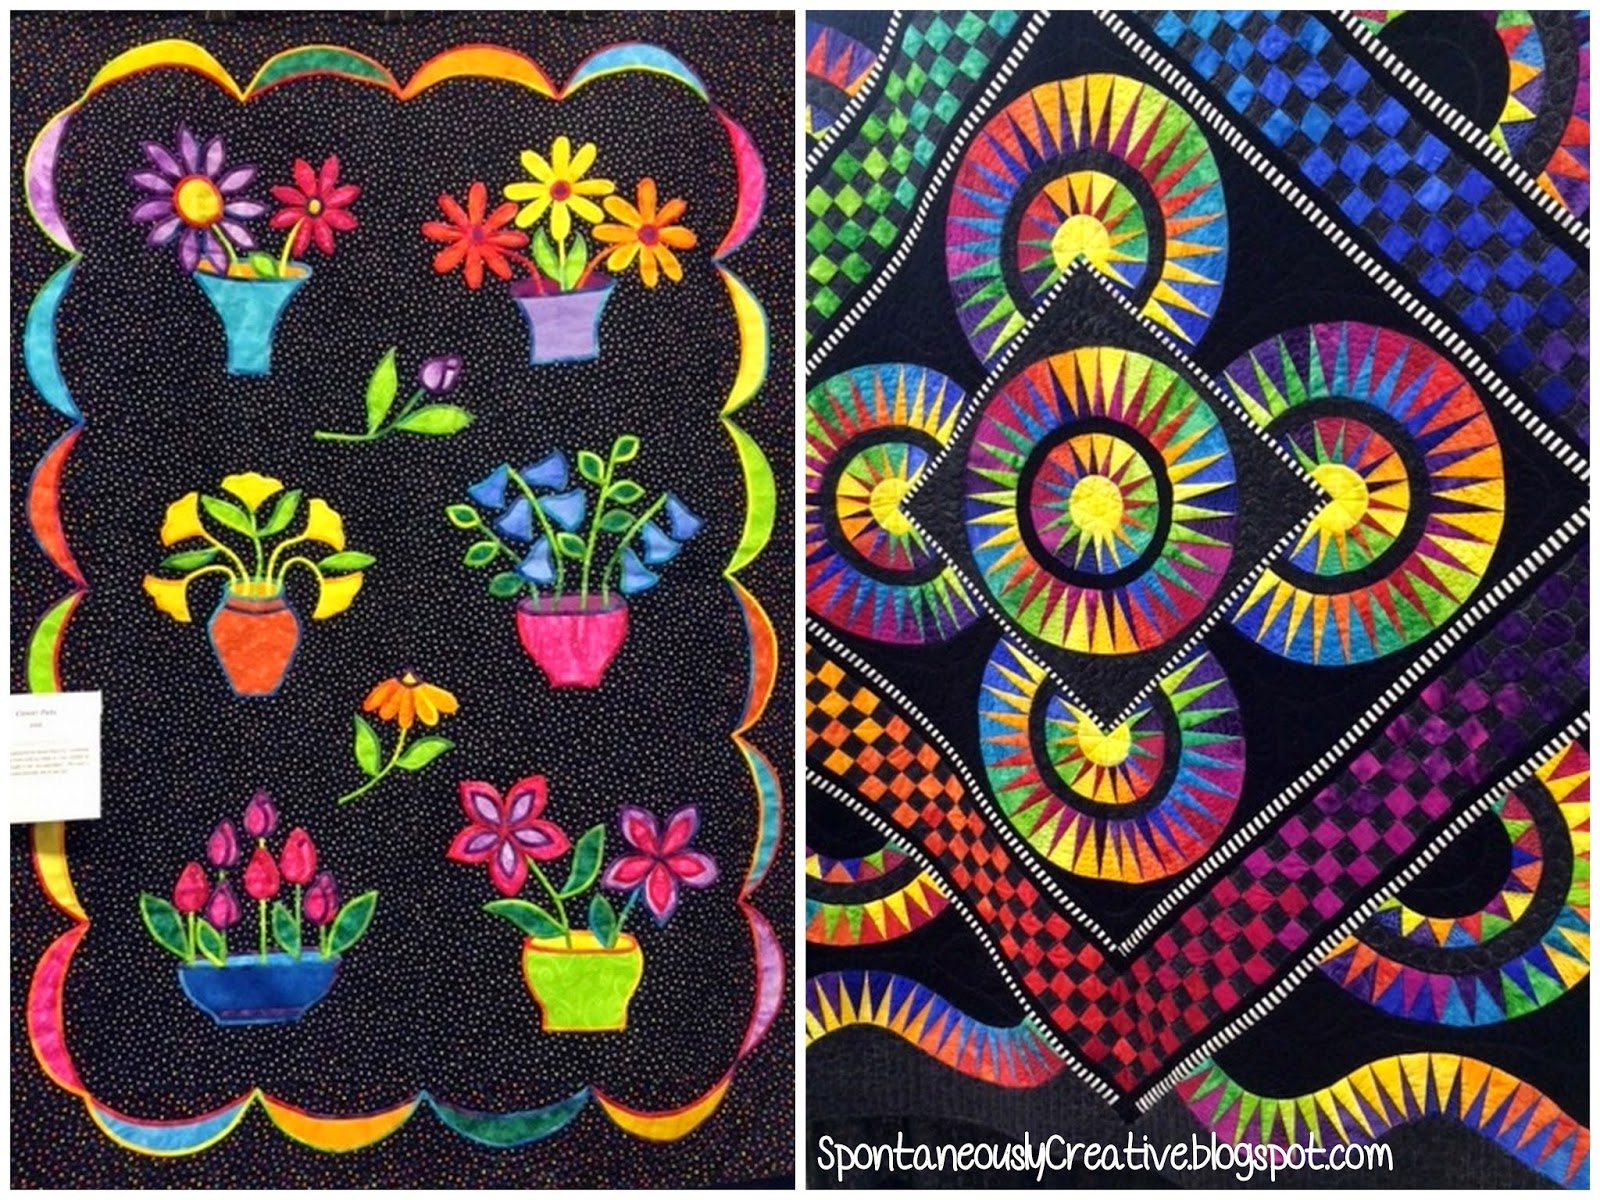
Now I don't consider myself a quilter but I do enjoy going to the odd quilt show with my Mom and my Aunts. Sure the quilting ladies can be a little (or a lot) crazy but sometimes it's fun to see what kind of quilts and wall hangings those crazy quilters come up with. There won't be a whole lot of substance to this post other than pictures because I really just wanted to share some of the cool pieces I saw on our trip to the quilt show here in Moose Jaw!

These wall hangings really stood out to me, but mostly the beach scene in the top left corner. That picture is made by sewing many, many, MANY strips of yarn onto a piece of fabric. Now that has to take some serious patience. I wish I could borrow some of that patience when Roman is having one of his of days...


Funny story; I actually have a kit in my craft room to make the animal quilt in the top left photo. I bought it when I was pregnant with Roman with the intention of making it for him before he was born. HA! That clearly happened. Maybe he'll still like animals when he's 12?

Now I know what you might be thinking, Kendra that quilt is kinda ugly, and I would completely agree. But I have a feeling when you find out that is one giant piece of satin and the design is completely hand stitched into the fabric your opinion of the shiny silver quilt might change. Can you imagine have the foresight and patience to make such a work of art?

What better way to end off this random post than with a cupcake tree! I don't know who the woman is that came up with this divine creation, but her and I are clearly soul mates that should meet over a dozen or so cupcakes. If I could buy a tree that produced cupcakes I would be quite happy to rake leaves every fall!
Well I hope you enjoyed this short, sweet, and random post! Comment below which of these quilts/wall hangings are your favorite!!
Tuesday, May 19, 2015
Cherry Pie Pops
This is the second recipe in my Spring Baking series! I love pie but it isn't exactly the most travel friendly dessert, and you normally need utensils to eat which doesn't make it picnic friendly. So why not put the pie on a stick!? I can't think of any food that isn't better when served on a stick, so when I came across this idea on Pinterest I knew I wanted to give it a try!

Cherry Pie Pops (Makes 8)
1 recipe pie crust, or you could buy frozen pie crust
1/2 cup cherry pie filling (about 1/3 of a 19 oz. can)
8 Lollipop sticks
1 egg, beaten with a splash of water
sugar for dusting
Roll out pie crust to 1/4" thick and use a cookie cutter or drinking glass to cut 3" circles from the dough. Lay a dough circle on a parchment lined baking sheet and press a lollipop stick into the dough, making sure that the top of the stick is past the centre of the dough circle. Add 1/2t of pie filling to the dough; I of course squeezed a little more in and put three cherries and a bit of syrup in each pop. Take a second round of dough and dab a bit of water around the edge, place it on top of the pie filling and press the two rounds together along the edge. For this I used a fork just like I would when I make a regular pie.

Brush the top of the pop with the egg wash and sprinkle with sugar. At the last minute I decided to cut a small design into the top of my pops to make them look more like little pies. Bake at 425° for 15 minutes. Allow the pops to cool for a few minutes before removing them from the baking sheet. Transfer to a wire rack and allow them to cool completely.

I was a little sceptical that the stick was actually going to stay in the pie, but surprisingly they all did! Once they cool completely they are actually pretty sturdy on the stick and even stood up to Roman waving them around before he ate them. These pies are the perfect serving size, especially if you are on a weight loss journey, because they give you the delicious taste of pie and all the buttery flaky crust but also keeps you from eating the entire pie. I know I can't be the only one that sits down with a pie and a fork with the intention of having one piece and the next thing you know the entire pie is gone.
Click here to see a full list of al the recipes included in my Spring Baking Series!
Thursday, May 14, 2015
Mother's Day 2015
I love Mother's Day! Even before I was a Mom I loved Mother's Day because it is yet another day of the year that our family gets together to visit and eat great food! It's really like a mini Thanksgiving!
This year everyone came over to our house and we went out to the Cornerstone Inn for brunch. I really meant to take pictures of the food (which is always amazing!) but I was clearly too busy stuffing my face and keeping the food moving towards Roman to remember to pull my camera out. The spread was amazing; hashbrowns, eggs, bacon, the best breakfast sausages I've ever eaten, wafflers with homemade whipped cream, veggies, roast beef, ginger chicken, roast pork, pasta, fruit and of course dessert! I know this is horribly unfair to speak of such amazing food and not have any photos of it to share. Believe me, I get the need for food porn and I totally dropped the ball this time. I promise next time I will overload with photos!
After we were all pleasantly packed with food, we headed over to Keon Garden Centre to check out the flowers! It's still a bit early to plant anything outside but it has become a bit of a tradition to hit up the greenhouses on Mother's Day. Roman was quite excited when he spotted the giant piles of landscaping rocks. I'm sure he would have loved to spend the entire day in the rocks but we had different plans!

 I realised a bit too late that we had forgotten the stroller at home, but we got lucky and Keon had carts that had a spot for a kid. He had a blast riding around in the cart for the most part and when he finally started to get squirrely, John took him over to the sandbox that they have for kids to play in. Clearly these people know how to take your money! Mom ended up with a cat tail looking plant and a few other shade plants, and I went home with two pots for the planters in our driveway.

By this time Roman was really ready for a nap. The fun of hanging out with everyone had worn off and he was getting cranky! We dropped off John, Roman and my Dad at our house for naps and beer (clearly that part isn't for Roman), and Mom and I headed off to Windmill Greenhouse. We didn't find much there so we stopped by Peavy Mart to check out what their greenhouse had. Unfortunately we didn't find any more plants that we just had to have, so e stopped by 7-11 and picked up some pop for Mom and a Slurpee for me!
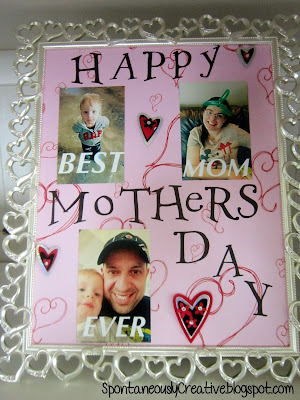
This is basically the end of Mother's Day. We spent the rest of the day hanging out a enjoying our last day of rest before John headed back to work the next day. Oh, and I almost forgot! Look at this amazing gift that John made me for Mother's Day! I didn't know he had a crafty bone in his body but apparently I've been missing out! I think I'll have to put him to work on a few of the projects I have going right now! I hope you all had a great Mother's Day!
This year everyone came over to our house and we went out to the Cornerstone Inn for brunch. I really meant to take pictures of the food (which is always amazing!) but I was clearly too busy stuffing my face and keeping the food moving towards Roman to remember to pull my camera out. The spread was amazing; hashbrowns, eggs, bacon, the best breakfast sausages I've ever eaten, wafflers with homemade whipped cream, veggies, roast beef, ginger chicken, roast pork, pasta, fruit and of course dessert! I know this is horribly unfair to speak of such amazing food and not have any photos of it to share. Believe me, I get the need for food porn and I totally dropped the ball this time. I promise next time I will overload with photos!
After we were all pleasantly packed with food, we headed over to Keon Garden Centre to check out the flowers! It's still a bit early to plant anything outside but it has become a bit of a tradition to hit up the greenhouses on Mother's Day. Roman was quite excited when he spotted the giant piles of landscaping rocks. I'm sure he would have loved to spend the entire day in the rocks but we had different plans!


By this time Roman was really ready for a nap. The fun of hanging out with everyone had worn off and he was getting cranky! We dropped off John, Roman and my Dad at our house for naps and beer (clearly that part isn't for Roman), and Mom and I headed off to Windmill Greenhouse. We didn't find much there so we stopped by Peavy Mart to check out what their greenhouse had. Unfortunately we didn't find any more plants that we just had to have, so e stopped by 7-11 and picked up some pop for Mom and a Slurpee for me!

This is basically the end of Mother's Day. We spent the rest of the day hanging out a enjoying our last day of rest before John headed back to work the next day. Oh, and I almost forgot! Look at this amazing gift that John made me for Mother's Day! I didn't know he had a crafty bone in his body but apparently I've been missing out! I think I'll have to put him to work on a few of the projects I have going right now! I hope you all had a great Mother's Day!
Tuesday, May 12, 2015
Raspberry Lemonade Bars
Welcome to the first recipe in my Spring Baking Series! I was inspired to create this series by a recent advertisement on the Food Network for their spring baking contest. All the recipes I will be featuring in this series are perfect for picnics, potlucks, BBQs and birthdays. They can all be easily portioned and transported to wherever your spring and summer events take you! Or if you're like me you can just gorge on them in the convenience of your own home! There will be a new recipe every Tuesday for the next 9 weeks! To see a complete list of the recipes I'll be making following this link!
As soon as I came across this recipe I knew I had to make it! Lemonade is the definition of spring and summer, so why not add some raspberry and turn it into a delicious dessert? This would be the perfect ending to a summer meal because it is bright, tart, with just a little sweetness; but not too much. The crust is very similar to a shortbread cookie and it literally melts in your mouth. If you love lemonade you need to try these bars!

Raspberry Lemonade Bars
Crust
1/2 cup butter, softened
1/4 cup sugar (if you want it less tart add more sugar)
1t vanilla
pinch salt
Filling
2 cups (heaping) frozen raspberries, thawed
3/4 cup sugar
2/3 cup lemon juice (approx. 3 lemons)
2T lemon zest (approx. 2 lemons)
3 egg whites
1 egg
2/3 cup flour
pinch salt
Line 8x8 baking dish with parchment paper. To make for an easier fit, run the parchment paper under water and shake off before putting it into the pan. This will make the parchment more pliable and make it stay in the dish.

To make the crust, cream the butter, sugar and vanilla. Add flour and mix until just incorporated. Press into the parchment lined pan and bake at 400° for 20-25 minutes.

Mix together raspberries, sugar, egg, egg whites, lemon juice & zest, flour and salt. *NOTE: If you don't want to have raspberry seeds in your finished dessert you can press the berries through a fine sieve before mixing them with the other ingredients. I actually enjoy the seeds so I kept them. Plus it was once less step Roman had to wait through before he could mix it all together. Pour the filling into the rust and bake at 400° for 25-30 minutes.
 Let them cool overnight for them to completely set. I couldn't wait that long and they were still delicious but the crust and filling didn't stay attached to each other. Once I let them completely cool then the crust and filling stayed as one piece. To end up with bars that have clean edges, make sure to wipe the knife after each cut you make. This will prevent the crust from depositing on the filling. Small detail but then maybe you can trick people into thinking that you bought these delicious desserts!

As soon as I came across this recipe I knew I had to make it! Lemonade is the definition of spring and summer, so why not add some raspberry and turn it into a delicious dessert? This would be the perfect ending to a summer meal because it is bright, tart, with just a little sweetness; but not too much. The crust is very similar to a shortbread cookie and it literally melts in your mouth. If you love lemonade you need to try these bars!
Raspberry Lemonade Bars
Crust
1/2 cup butter, softened
1/4 cup sugar (if you want it less tart add more sugar)
1t vanilla
pinch salt
Filling
2 cups (heaping) frozen raspberries, thawed
3/4 cup sugar
2/3 cup lemon juice (approx. 3 lemons)
2T lemon zest (approx. 2 lemons)
3 egg whites
1 egg
2/3 cup flour
pinch salt
Line 8x8 baking dish with parchment paper. To make for an easier fit, run the parchment paper under water and shake off before putting it into the pan. This will make the parchment more pliable and make it stay in the dish.
To make the crust, cream the butter, sugar and vanilla. Add flour and mix until just incorporated. Press into the parchment lined pan and bake at 400° for 20-25 minutes.
Mix together raspberries, sugar, egg, egg whites, lemon juice & zest, flour and salt. *NOTE: If you don't want to have raspberry seeds in your finished dessert you can press the berries through a fine sieve before mixing them with the other ingredients. I actually enjoy the seeds so I kept them. Plus it was once less step Roman had to wait through before he could mix it all together. Pour the filling into the rust and bake at 400° for 25-30 minutes.
Click here to see a full list of all the recipes included in my Spring Baking Series.
Monday, May 11, 2015
Spring Baking Series 2015
Welcome to my Spring Baking series!! I've had the urge to bake lately so I headed to the Internet to see if there was a weekly baking challenge that existed that I could recreate. I couldn't find one so I thought I would just create my own. I was making a list of recipes I've always wanted to try when an advertisement came on the Food Network for their Spring Baking Contest. In the advertisement they mention that all the recipes would be related to weddings, birthdays, picnics and all things spring and summer. So I decided I would take this idea and spin it into my own weekly baking challenge.
Every Tuesday for 9 weeks starting on May 12th I will post a new recipe that I've tried out. Each recipe will be easily portioned and transportable to your picnic, BBQ or family get together. I've never made any of these recipes before so all the posts will be my first go at them, meaning you will get to see them whether they turn out exactly like they should, or if they become a Pinterest fail meme.
Below is a list of the recipes that I will be making. As I post the recipes I will link them back to this post so that all the recipes are easily accessible.
Raspberry Cheesecake Bites
Lemon Meringue Pie Bites
Funnel Cakes
No Bake Strawberry Lemonade Bites
Classic Greek Baklava
Homemade Cream Puffs
Classic Èclair
If you decide to take on this Spring Baking Challenge I would love to see how your dishes turn out! Be sure to post pictures in the comments of your creations!
Thursday, May 7, 2015
Spring Yard Work
Well it's that time of year already; time to make the grass grown! If you've read my post about our lawn last year you know that it wasn't in the greatest shape when we purchased the house in 2013. While we did make some improvement last year we still have a way to go. We also built a garden last year so that has to be cleaned up for spring, along with my front flower bed. Oh the pleasures of home ownership that we all seem to forget about during the long winter...
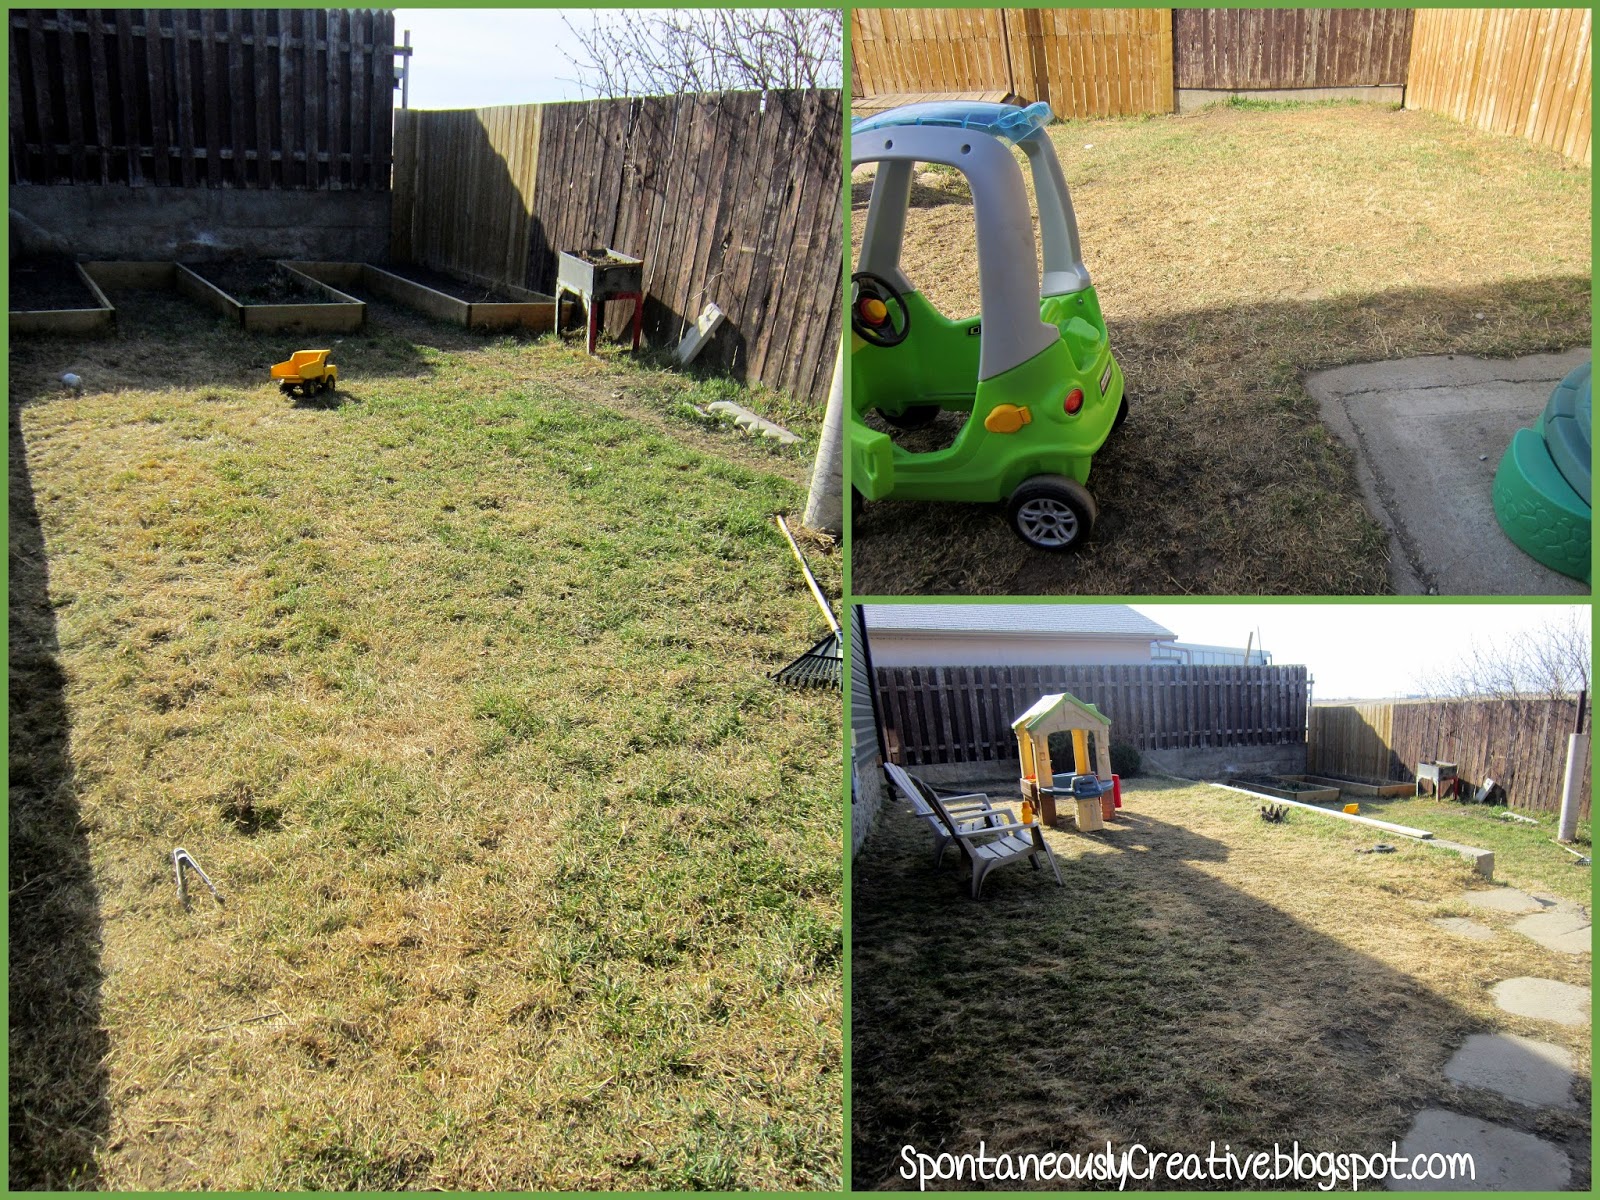
With Roman spending more and more time in the yard it's that much more incentive to get the grass in the back yard into good shape. We had a major problem with thistles last year and I'm sure we'll continue to wage that war this year. How major can thistles be you might wonder? I kid you not we had thistles that were at least a foot across. Obviously no amount of poison was going to kill those monsters, nor did we want to use it around the dogs and Roman, so we ended up having to dig them out. This left a few good size holes in the lawn that will need to be filled and seeded this year.
To kick off grass growing season I raked the entire yard really well to remove all the dead grass and to rough up the ground so that the grass seed and fertilizer would penetrate more easily. With that done I applied a good layer of Scotts Turf Builder Coated High Traffic Grass Seed to the entire lawn, focusing on the bald or destroyed areas. Bronx is murder on our lawn so I think this seeding business might be a yearly event for our lawn. I followed the seed up with a nice thick layer of CIL Golfgreen Gold lawn fertilizer. We went with this fertilizer because it was on sale, and because it is safe for use around kids and pets. Now it's a matter of keeping it well watered so that the seed can germinate and hopefully grow into a beautiful, lush lawn!

Now on to the job I've been dreading all winter; cleaning up the garden. When we did the final harvest last fall we basically pulled the tomato plants and walked away from the rest because it was so darn rainy and cold. Well I'm paying for that now. The garden was full of weeds and quack grass which was nice enough to stick around to visit me this spring. The only perennials in the garden are the chives, dill and rosemary and asparagus. The chives have already started growing again but there is no sign of the dill (which I'm sure will pop up later) or asparagus, and the rosemary isn't looking so hot. I'm pretty sure when the zombie apocalypse descends upon us the only thing that will survive will be chives.

Luckily the weather cooperated with us and Roman and I got to rock our tank tops and shorts! You didn't think I had to work alone did you? Roman had a blast digging around with the shovel and rake while I did all the heavy lifting. Bronx is already back to his old tricks of hunting birds, which is extremely irritating when you have to listen to him bark all the time but it keeps him busy. If you are our neighbor, I'm sorry!

Of course all work and no play is never fun, so Roman was sure to inject so fun into our work. This is now one of his favorite hiding spots in the yard. I can't imagine it's comfortable to crawl up into a raspberry bush but he seems to thinks it's great!

Once the garden was dug up and weeded I sprinkled in a good layer of CIL Gro Organic garden fertilizer since I had some left over from last year. This stuff worked extremely well last year so I wanted to use it to restore the nutrient content of the soil before we plant this year's garden. Roman loves water and jumped at the chance to be able to water the garden. Unfortunately it appears he is now strong enough to squeeze the handle himself, which is sure to make for some interesting moments this summer...

So this is the plan for the garden this year. I've cut down on the number of tomato plants this year because we had more tomatoes last year than any family in the world could possibly consume. Watch, now that I've said that the tomatoes won't grow at all this year. I've also cut back on the number of parsley and basil plants because I still have a freezer full of fresh herbs from last year. The butternut squash, brussel sprouts and watermelon are all going to be experimental for me this year, but I've heard other people in town have had luck with squash and sprouts so here's hoping! The large empty section on the left side I still haven't quite decided on. I might plant potatoes there this year but I'm not sure. Maybe I'll cruise the vegetable isle in the greenhouse and see what pops out at me.

I must admit I'm a little embarrassed to even post this set of photos. This poor flower bed was horribly neglected last year and the quack grass took over a good portion of it. Since we were already out digging up the garden I figured we might as well tackle the flower bed. Unfortunately the flower bed was worse than I thought and I actually had to look back at my flower bed post from last year to see where the perennials were located. Insert face palm here.
I was having trouble keeping Roman out of the neighbor's sprinklers so I decided to fill the water table for him. No, it wasn't warm enough to play in the water but I figured this was better than standing in the middle of a sprinkler. Of course before I knew it he had half the table filled with mud so I guess that will be a project for another day. I always need projects anyway I suppose...

This is much better! It's actually a little shocking to look at the before and after photos and to see how much the grass had invaded the bed. I'm pretty sure I lost a couple perennials in the process of digging out the grass but it's nothing that can't be replaced. My favorite lily is still in tact and that's all that matters!
Now that we have the base line established I'm excited to see what these areas will look like in a few months!!
With Roman spending more and more time in the yard it's that much more incentive to get the grass in the back yard into good shape. We had a major problem with thistles last year and I'm sure we'll continue to wage that war this year. How major can thistles be you might wonder? I kid you not we had thistles that were at least a foot across. Obviously no amount of poison was going to kill those monsters, nor did we want to use it around the dogs and Roman, so we ended up having to dig them out. This left a few good size holes in the lawn that will need to be filled and seeded this year.
To kick off grass growing season I raked the entire yard really well to remove all the dead grass and to rough up the ground so that the grass seed and fertilizer would penetrate more easily. With that done I applied a good layer of Scotts Turf Builder Coated High Traffic Grass Seed to the entire lawn, focusing on the bald or destroyed areas. Bronx is murder on our lawn so I think this seeding business might be a yearly event for our lawn. I followed the seed up with a nice thick layer of CIL Golfgreen Gold lawn fertilizer. We went with this fertilizer because it was on sale, and because it is safe for use around kids and pets. Now it's a matter of keeping it well watered so that the seed can germinate and hopefully grow into a beautiful, lush lawn!
Now on to the job I've been dreading all winter; cleaning up the garden. When we did the final harvest last fall we basically pulled the tomato plants and walked away from the rest because it was so darn rainy and cold. Well I'm paying for that now. The garden was full of weeds and quack grass which was nice enough to stick around to visit me this spring. The only perennials in the garden are the chives, dill and rosemary and asparagus. The chives have already started growing again but there is no sign of the dill (which I'm sure will pop up later) or asparagus, and the rosemary isn't looking so hot. I'm pretty sure when the zombie apocalypse descends upon us the only thing that will survive will be chives.
Luckily the weather cooperated with us and Roman and I got to rock our tank tops and shorts! You didn't think I had to work alone did you? Roman had a blast digging around with the shovel and rake while I did all the heavy lifting. Bronx is already back to his old tricks of hunting birds, which is extremely irritating when you have to listen to him bark all the time but it keeps him busy. If you are our neighbor, I'm sorry!
Of course all work and no play is never fun, so Roman was sure to inject so fun into our work. This is now one of his favorite hiding spots in the yard. I can't imagine it's comfortable to crawl up into a raspberry bush but he seems to thinks it's great!
Once the garden was dug up and weeded I sprinkled in a good layer of CIL Gro Organic garden fertilizer since I had some left over from last year. This stuff worked extremely well last year so I wanted to use it to restore the nutrient content of the soil before we plant this year's garden. Roman loves water and jumped at the chance to be able to water the garden. Unfortunately it appears he is now strong enough to squeeze the handle himself, which is sure to make for some interesting moments this summer...
So this is the plan for the garden this year. I've cut down on the number of tomato plants this year because we had more tomatoes last year than any family in the world could possibly consume. Watch, now that I've said that the tomatoes won't grow at all this year. I've also cut back on the number of parsley and basil plants because I still have a freezer full of fresh herbs from last year. The butternut squash, brussel sprouts and watermelon are all going to be experimental for me this year, but I've heard other people in town have had luck with squash and sprouts so here's hoping! The large empty section on the left side I still haven't quite decided on. I might plant potatoes there this year but I'm not sure. Maybe I'll cruise the vegetable isle in the greenhouse and see what pops out at me.
I must admit I'm a little embarrassed to even post this set of photos. This poor flower bed was horribly neglected last year and the quack grass took over a good portion of it. Since we were already out digging up the garden I figured we might as well tackle the flower bed. Unfortunately the flower bed was worse than I thought and I actually had to look back at my flower bed post from last year to see where the perennials were located. Insert face palm here.
I was having trouble keeping Roman out of the neighbor's sprinklers so I decided to fill the water table for him. No, it wasn't warm enough to play in the water but I figured this was better than standing in the middle of a sprinkler. Of course before I knew it he had half the table filled with mud so I guess that will be a project for another day. I always need projects anyway I suppose...
This is much better! It's actually a little shocking to look at the before and after photos and to see how much the grass had invaded the bed. I'm pretty sure I lost a couple perennials in the process of digging out the grass but it's nothing that can't be replaced. My favorite lily is still in tact and that's all that matters!
Now that we have the base line established I'm excited to see what these areas will look like in a few months!!
Tuesday, May 5, 2015
Sausage Mac & Cheese
In our house, cheese makes everything better! If we want to guarantee that Roman will eat his meal, the first thing we do is top it with a little cheese. I wish I could take total credit for this recipe, but I actually came across the idea of mixing these ingredients together on a local mommy Facebook page. Another mom had posted a picture of what her house was having for supper and I thought it might be an interesting dish to add to our circulation. From the minute John and Roman bit into this meal I knew I would be making this again. In no time flat Roman devoured the entire bowl and John was going back for seconds.
I will be the first to admit this isn't exactly the most calorie friendly recipe but sometimes you just need a thick, gooey cheese sauce to make you happy. If you wanted to lighten the recipe up you could substitute the traditional cheese sauce for the sauce used in the Smart Mac & Cheese recipe I posted a while back.

Sausage Mac & Cheese
1 pkg. (5 links) sausage, removed from casings
1 bell pepper, chopped
1 cup macaroni, cooked as per package
Cheese Sauce
2T butter
2T flour
1 1/4 cup milk
1 1/2 cup shredded cheese
Melt butter in a sauce pan over medium heat. Whisk in flour and cook, stirring constantly, for 1 minute. Slowly whisk in milk to prevent lumps. Stir in cheese and whisk until cheese is completely melted. If you find the sauce is a little on the thick side you can add more milk.
Fry the sausage in a pan over medium-high heat, breaking it into small pieces. Add chopped pepper and cook until sausage is cooked through. Reduce heat and add macaroni to the pan, along with the cheese sauce. Stir until everything is well coated with cheese and warmed through. Serve with chopped fresh parsley or grated parmesan cheese.
I will be the first to admit this isn't exactly the most calorie friendly recipe but sometimes you just need a thick, gooey cheese sauce to make you happy. If you wanted to lighten the recipe up you could substitute the traditional cheese sauce for the sauce used in the Smart Mac & Cheese recipe I posted a while back.
Sausage Mac & Cheese
1 pkg. (5 links) sausage, removed from casings
1 bell pepper, chopped
1 cup macaroni, cooked as per package
Cheese Sauce
2T butter
2T flour
1 1/4 cup milk
1 1/2 cup shredded cheese
Melt butter in a sauce pan over medium heat. Whisk in flour and cook, stirring constantly, for 1 minute. Slowly whisk in milk to prevent lumps. Stir in cheese and whisk until cheese is completely melted. If you find the sauce is a little on the thick side you can add more milk.
Fry the sausage in a pan over medium-high heat, breaking it into small pieces. Add chopped pepper and cook until sausage is cooked through. Reduce heat and add macaroni to the pan, along with the cheese sauce. Stir until everything is well coated with cheese and warmed through. Serve with chopped fresh parsley or grated parmesan cheese.
Friday, May 1, 2015
Mini Follow Us Friday - A day in the city!
Roman and I had a fabulous day today! Since I was taking my camera along with my anyway I figured we'd turn it into a mini Follow Us Friday!

This morning we were out of the house early; making the trip to Regina to check out the Royal Saskatchewan Museum with some of our favorite people; Trellyn, Leila & Chloe! We've been lucky enough to be able to spend some time with them while they've been staying in the area. Unfortunately today is their last day in the area, but we are super excited for them to move into their new home, and we can't wait to go visit!!!
This morning when I asked Roman if he wanted to go to the museum he immediately replied "choo-choo!". Can you tell he loves the WDM here in Moose Jaw? Unfortunately the RSM doesn't have trains but they did have a ton of displays of native wildlife in their natural habitat. It has been years, probably decades, since I've been to this museum so I was just as excited to see it as Roman!
We started out the tour by checking out good ole' Mega Munch. This T-Rex is older than me and is a bit of a Regina legend. All us kids had the crap scared out of us as our parents led us into this dark room and hit the "on" button on the giant animatronic dinosaur. Roman realized something was up as soon as we walked into the dark room. I've never actually seen him scared but he was definitely nervous about what was about to happen because he wouldn't leave my side, which is why I don't have a picture of dear Mega Munch. Poor Mega Munch had laryngitis today so he wasn't up to roaring for us; probably for the best anyway.
From here we headed up to the animal exhibits on the second floor. Roman actually really enjoyed the exhibits! He was particularly fond of the acrylic water and really wanted to climb into it. I'm sure security thought we were trying to destroy the place because we kept setting on the motion sensors. We didn't get kicked out so we couldn't have been that bad!

I think I learnt an important lesson while at the museum with Roman; if he ever says "puppy" or "kitty" when we're close to the woods, we need to immediately leave the area since that is how he referred to the wolves and mountain lion.

Of course you have to check out the gift store when you go to the museum! This is one of those things that I think is fun with Roman now, but I'm sure in a few years I'll be trying to distract him so we can leave before he sees if. Since the museum doesn't charge admission, that's right it's FREE!, I decided to get Roman a little something from the gift shop. They had this super cool electronic ride on triceratops that I'm sure cost more than our monthly mortgage payment (there was no price on it, clearly a sign to stay away), but honestly it was the coolest thing I've ever seen. It made noise, blinked, moved its head and mouth and even wagged it's tail! Roman, if we even win the lottery you will have that triceratops! In the meantime Roman picked out a tub of dinosaurs which actually weren't as over priced as I figured they would be! Always a win!
Sine we were already in Regina I decided to run a few errands before we headed home. I have an order of cupcakes to make so I had to grab some supplies at Bulk Barn and Wal Mart. Unfortunately Roman and I spotted mini eggs at Bulk Barn so we picked up a scoop of them. Ssshhh don't tell John! After that we headed over to Lowes so I could pick up a sample pot of the paint color I'm considering for our master bedroom. Of course we couldn't go to Lowes without checking out all the lawn mowers. Roman would have been quite happy to spend the rest of the day here but I had other plans.

Like a picnic lunch in the Lowes parking lot! I knew Roman was going to fall asleep on the drive home so I wanted to get some food in him before we hit the road. I packed us a lunch which consisted of a two chicken and cheese sandwiches (with mustard for Roman), strawberries and iced cosmopolitan tea from Steeped Tea. I tossed an ice pack in the lunch bag before we left home this morning and everything stayed nice and cold even sitting in the car for most of the morning. Roman had been snacking on toddler cheesies while we were in Lowes, plus he had a few mini eggs, so he only ate about half his sandwich. Once we were done eating Roman had some fun crawling all over the car while I finished my lunch.
 Lunch done and back on the road and Roman was asleep in no time. I'm pretty lucky in that he transfers from the car to his crib super easy and he was still sleeping an hour and a half after we got home. Once he woke up and watched his usual few videos of Blippi we headed outside to enjoy the weather! It was a little cool for the water table but he really wanted to play so I filled it up for him. He had a blast filling bowls, dumping bowls, and drinking from bowls with his best buddy. It was the perfect ending to a fabulous day!

I hope you enjoyed this mini Follow Us Friday!!!
This morning we were out of the house early; making the trip to Regina to check out the Royal Saskatchewan Museum with some of our favorite people; Trellyn, Leila & Chloe! We've been lucky enough to be able to spend some time with them while they've been staying in the area. Unfortunately today is their last day in the area, but we are super excited for them to move into their new home, and we can't wait to go visit!!!
This morning when I asked Roman if he wanted to go to the museum he immediately replied "choo-choo!". Can you tell he loves the WDM here in Moose Jaw? Unfortunately the RSM doesn't have trains but they did have a ton of displays of native wildlife in their natural habitat. It has been years, probably decades, since I've been to this museum so I was just as excited to see it as Roman!
We started out the tour by checking out good ole' Mega Munch. This T-Rex is older than me and is a bit of a Regina legend. All us kids had the crap scared out of us as our parents led us into this dark room and hit the "on" button on the giant animatronic dinosaur. Roman realized something was up as soon as we walked into the dark room. I've never actually seen him scared but he was definitely nervous about what was about to happen because he wouldn't leave my side, which is why I don't have a picture of dear Mega Munch. Poor Mega Munch had laryngitis today so he wasn't up to roaring for us; probably for the best anyway.
From here we headed up to the animal exhibits on the second floor. Roman actually really enjoyed the exhibits! He was particularly fond of the acrylic water and really wanted to climb into it. I'm sure security thought we were trying to destroy the place because we kept setting on the motion sensors. We didn't get kicked out so we couldn't have been that bad!
I think I learnt an important lesson while at the museum with Roman; if he ever says "puppy" or "kitty" when we're close to the woods, we need to immediately leave the area since that is how he referred to the wolves and mountain lion.
Of course you have to check out the gift store when you go to the museum! This is one of those things that I think is fun with Roman now, but I'm sure in a few years I'll be trying to distract him so we can leave before he sees if. Since the museum doesn't charge admission, that's right it's FREE!, I decided to get Roman a little something from the gift shop. They had this super cool electronic ride on triceratops that I'm sure cost more than our monthly mortgage payment (there was no price on it, clearly a sign to stay away), but honestly it was the coolest thing I've ever seen. It made noise, blinked, moved its head and mouth and even wagged it's tail! Roman, if we even win the lottery you will have that triceratops! In the meantime Roman picked out a tub of dinosaurs which actually weren't as over priced as I figured they would be! Always a win!
Sine we were already in Regina I decided to run a few errands before we headed home. I have an order of cupcakes to make so I had to grab some supplies at Bulk Barn and Wal Mart. Unfortunately Roman and I spotted mini eggs at Bulk Barn so we picked up a scoop of them. Ssshhh don't tell John! After that we headed over to Lowes so I could pick up a sample pot of the paint color I'm considering for our master bedroom. Of course we couldn't go to Lowes without checking out all the lawn mowers. Roman would have been quite happy to spend the rest of the day here but I had other plans.
Like a picnic lunch in the Lowes parking lot! I knew Roman was going to fall asleep on the drive home so I wanted to get some food in him before we hit the road. I packed us a lunch which consisted of a two chicken and cheese sandwiches (with mustard for Roman), strawberries and iced cosmopolitan tea from Steeped Tea. I tossed an ice pack in the lunch bag before we left home this morning and everything stayed nice and cold even sitting in the car for most of the morning. Roman had been snacking on toddler cheesies while we were in Lowes, plus he had a few mini eggs, so he only ate about half his sandwich. Once we were done eating Roman had some fun crawling all over the car while I finished my lunch.
I hope you enjoyed this mini Follow Us Friday!!!
Thursday, April 30, 2015
Plan With Me - May 2015
April showers bring May flowers and they are all over my planner for May! The more I decorate my planner pages the more I get into the grove and get a feel for how I like to decorate them. In April I was just kind of throwing things together and hoping that it turned out well. I also didn't have the massive collection of stickers and washi tape that I have now amassed. Between the supplies I picked up in Bismarck and the things I picked up at Michael's recently (if you want to see a post on that let me know!), I now have what I feel is a decent collection of things to make some well coordinated pages.

Each month in the Plum Paper Planner is color coordinated, so to keep things looking harmonious I try to work with that color pallet for the monthly view. I really wanted to use this super fun gold washi tape I found at Dollar Tree so I decided to go with a purple and gold theme this month. I also inserted this journaling card into the monthly view so I can add little notes or "To Do" items for the month that don't necessarily have to be done on a specific day. Or maybe it'll just sit there empty and look pretty, who knows.
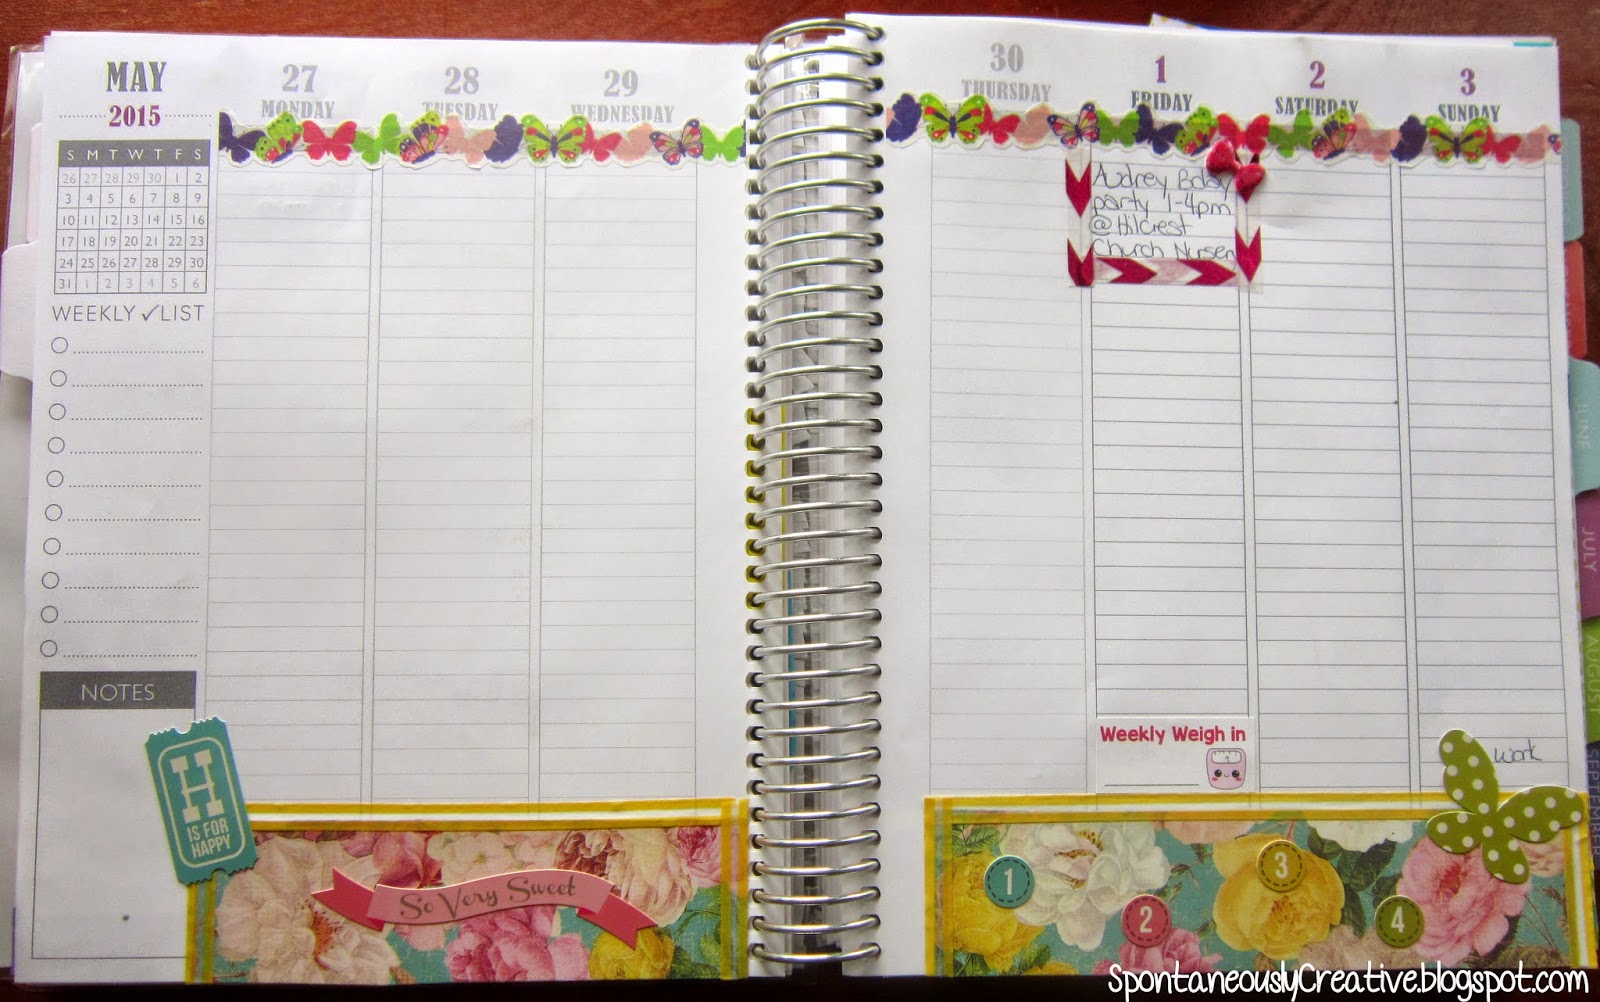

"Shine bright like a diamond!". This is what happens when you decorate your planner while listening to the radio. I'm pretty happy with the way this page turned out and was excited to get to use a cute cupcake and party hat sticker for Mother's Day. I probably could have been a little more creative with the lettering but it serves it's purpose.


Each month in the Plum Paper Planner is color coordinated, so to keep things looking harmonious I try to work with that color pallet for the monthly view. I really wanted to use this super fun gold washi tape I found at Dollar Tree so I decided to go with a purple and gold theme this month. I also inserted this journaling card into the monthly view so I can add little notes or "To Do" items for the month that don't necessarily have to be done on a specific day. Or maybe it'll just sit there empty and look pretty, who knows.
This week is honestly my least favorite week in May as far as decorating goes. I was still experimenting when I decorated this page and I think it shows. I love all the elements individually, but it didn't quite turn out the way I wanted it too. Oh well, live and learn!
"Shine bright like a diamond!". This is what happens when you decorate your planner while listening to the radio. I'm pretty happy with the way this page turned out and was excited to get to use a cute cupcake and party hat sticker for Mother's Day. I probably could have been a little more creative with the lettering but it serves it's purpose.
This is where it starts to get interesting! Hello color!! Most of the supplies from this page came from a recent shopping trip to Michael's. I went a little hog wild because all the stickers were 60% off! How could I not really?! I decorated this page on a bright sunny day which transferred o the page. It's amazing how the weather can affect you without you even noticing. I also ordered some stickers from Sweet Kawaii Design which is where the money stack sticker and "Weekly Weigh In" stickers came from. This was the first time I didn't use scrap book paper at the bottom of the page and I'm quite happy with the way it turned out. Layering on washi allows me to customize the look and it doesn't add as much thickness to the pages.
For this week I was inspired by some hydrangea stickers I came across in my craft room. It also happens to go well with the purple theme of the planner for this month. Hydrangeas are one of my favorite, if not my favorite, flower so it was fun to be able to incorporate them into this weekly spread.
This last spread was completely inspired by the alligator washi tape I picked up at Dollar Tree. Before I knew it these pages had exploded into a tropical oasis. The stickers are also from Dollar Tree and while the foam stickers do add some bulk to the planner itself, I think it's worth it because they are so much fun! The pink checklist on the bottom left on the page is what I'm now using to keep track of my monthly cleaning tasks like cleaning the vacuum filter and other large cleaning jobs that only happen once a month.
So that is what my planner looks like for the month of May. June is a blue color scheme and I'm super excited about it because I already have a few pages planned out in my mind. I can't wait! Happy planning!!
Tuesday, April 28, 2015
Choolate Cupcakes from Scratch
The best part of any party is the cake, especially when it comes to a birthday! So when a friend of mine (and Roman's girlfriend) recently had a birthday I decided I wanted to give her a dozen cupcakes. Of course they had to be chocolate because who doesn't want chocolate on their "29th & holding" birthday?
I quickly ran into a problem when I realized all my gooey chocolate cupcake recipes required ingredients I didn't have at home. I didn't have time to run out to the store, so I headed to Pinterest. After hunting through the recipes I finally decided on this one. Unfortunately I didn't pin it so I can't even give credit to the baking genius that came up with it! This scratch made recipe produces a moist, fudgey cupcake that will please every chocolate lover!

Chocolate Cupcakes from Scratch
1/2 cup cocoa powder
3/4 cup flour
1/2t baking soda
3/4t baking powder
1/4t salt
2 eggs
1/2 cup sugar
1/2 cup brown sugar
1/3 cup oil
2t vanilla
1/2 cup buttermilk*
*If you don't have buttermilk simply add 1/2T of vinegar to 1/2 cup milk and let it stand for 5 minutes; until it starts to thicken a bit.
Preheat oven to 350°. In a large bowl stir together, cocoa powder, flour, baking soda, baking powder and salt. In a separate bowl beat eggs and mix in sugar, brown sugar, oil and vanilla until well combined. Stir half of the wet ingredients into the dry then mix in half the buttermilk. Add the second half of the wet ingredients and then the remaining buttermilk; mixing until just combined. Fill the muffin tins 1/2 full with batter and bake at 350° for 18-19 minutes.

I topped the cupcakes with my go to buttercream frosting and some silver nonpareils that I found in my baking cupboard. Roman was very excited to deliver the cupcakes to one of his favorite people in the whole world. Unfortunately he got a little too excited and smashed one of the cupcakes, or maybe he was just trying to put his own special touch on them? Also, please don't judge me on the re-purposed delivery box...
I quickly ran into a problem when I realized all my gooey chocolate cupcake recipes required ingredients I didn't have at home. I didn't have time to run out to the store, so I headed to Pinterest. After hunting through the recipes I finally decided on this one. Unfortunately I didn't pin it so I can't even give credit to the baking genius that came up with it! This scratch made recipe produces a moist, fudgey cupcake that will please every chocolate lover!
Chocolate Cupcakes from Scratch
1/2 cup cocoa powder
3/4 cup flour
1/2t baking soda
3/4t baking powder
1/4t salt
2 eggs
1/2 cup sugar
1/2 cup brown sugar
1/3 cup oil
2t vanilla
1/2 cup buttermilk*
*If you don't have buttermilk simply add 1/2T of vinegar to 1/2 cup milk and let it stand for 5 minutes; until it starts to thicken a bit.
Preheat oven to 350°. In a large bowl stir together, cocoa powder, flour, baking soda, baking powder and salt. In a separate bowl beat eggs and mix in sugar, brown sugar, oil and vanilla until well combined. Stir half of the wet ingredients into the dry then mix in half the buttermilk. Add the second half of the wet ingredients and then the remaining buttermilk; mixing until just combined. Fill the muffin tins 1/2 full with batter and bake at 350° for 18-19 minutes.
I topped the cupcakes with my go to buttercream frosting and some silver nonpareils that I found in my baking cupboard. Roman was very excited to deliver the cupcakes to one of his favorite people in the whole world. Unfortunately he got a little too excited and smashed one of the cupcakes, or maybe he was just trying to put his own special touch on them? Also, please don't judge me on the re-purposed delivery box...
Subscribe to:
Comments (Atom)