The question I get the most is "How do you find time to do everything you do?" Well that's as easy question to answer. I have a time machine, obviously! Blog post over. If it was only that simple!
I feel like I need to start this post with a little information about me as a person because I think it also explains how I get things done. Ever since I can remember I've been a busy person. Even before I can remember, because my mom often tells me I was an extremely busy baby. I also come from an equally busy mom. I have never seen my mom sit and watch TV without knitting, quilting or reading. Being a single mom,she was also just busy in general; work, her school, our school, our activities, cooking, generally keeping us alive. I guess I just always thought that everyone was always this busy. Now in present day, I also can't watch TV without blogging, crafting, or planning. In fact, right now I'm writing this post while watching TV.
I heard a quote on a podcast I was listening to recently that really stuck with me, and it was "You have the same 24 hours in a day as Beyoncé". Really you could substitute Beyoncé with anyone that you see as super successful, but the meaning stays the same. It's not a matter of how much time you have but how utilize it. These are a few tools and tricks that I use to get as much done in one day as I possibly can.
Get rid of your smart phone!!!
I know, this is a hard one for everyone. But if you do nothing else on this list, use this tip! It's shocking how much time we spend in a day "quickly" checking Facebook or Instagram. Hear a "bing" from your phone? Yeah, that's the sound of 10 minutes going down the drain. Not a big deal. Until that "bing" happens 10 times a day and you've lost an HOUR AND A HALF!!! Think of all the things you could get done in an hour and a half. Can't resist the urge of the "bing"? Turn off your ringer, stop all notifications, turn off the phone, stash it in a box (just don't forget where). Give yourself intervals to check your phone. For example, I won't let myself check my phone until the entire kitchen is clean. Nothing earth shattering is going to happen in the next hour that I need to have my phone stuck in my hand. So save yourself some time, and put down the phone.
Make a list
I am a HUGE fan of lists! I constantly have lists on the go, and I have a spot reserved on my calendar every week just to post a list of things that need to get done during the week. These things are different from the every day tasks and usually involve getting things ready for birthdays, cutting the dogs' nails and hair, all that kind of fun stuff. I also have a few dry erase boards stuck to the fridge that I use to jot down notes while I'm cooking. I'm blaming this on baby brain, but if I don't write something down as soon as I think of it, I likely won't remember it by the time I sit down to plan at the end of the day.
Each morning after breakfast, while the kids are busy playing by themselves, I take a few minutes to jot down a list of things I want to get done that day on one of my many sticky note pads. I get an extreme amount of joy from crossing things off a list. I actually might have a bit of an addiction...
Use a calendar
I LOVE my calendar! I'm a planner, so I like to know what is going on when, weeks in advance. I mark down all the different programs the library is putting on, when we are going to playgroup or the park, when all our bills are due, and anything else you can think of. I love using stickers to distinguish the different events since it can become pretty cluttered after awhile. I get most of my stickers from Sweet Kawai Design on Etsy. Plus the stickers make it fun, and if something isn't enjoyable you aren't going to keep it up.
Plan your free time BEFORE you have it
This is by far my best tip! You likely know when you will have a few minutes or even an hour of free time each day. For me, I know that I usually get an hour in the afternoon while the kids nap, and at least an hour at night after they go to bed. These are my prime time to get things done that I just can't do with the kids around. I like to set aside certain nap times and evenings to work on specific things. For example, on Monday I might work on my blog while the kids nap and that night I will sit and do nothing (and by that I mean chase Roman back into his room 50 times). The next day I might clean the kitchen during nap time and meal plan at night. I like having these times decided ahead of time so that when I finally get the time I can jump right into whatever I'm working on, rather than sitting trying to figure out what to do and wasting precious kid-free time.
Think MONTHS ahead
Obviously you don't need to plan out each and every day months in advance, but there are some things that are much easier when you think about them early. I always have a ton of thing that I want to do with the kids during the fall and holiday seasons; crafts, recipes, outings. I think I have a ton of time to figure it all out until, WHAM, an entire month flies by and it's a week before Halloween and we haven't made those cute Halloween rice treats or the cute ghost craft I wanted to make. To avoid this all together, start thinking about these events 3 months before. It might seen like a long time, but we all know how quickly time can slip through our hands. If there is a craft you want to make, make a list of everything you need and get those items together in a bin or box. Write the craft down on your calendar of your weekly/monthly checklist. That way, when you see it on the calendar, all you have to do is grab that bin and you have everything you need for that craft. This will save you a ton of time running around the house, or out to the store, trying to track down all your materials. Meanwhile, the kids are annoyed and over it before you even pull out the glue. Not that I have an experience with that...
Like I said before, I love planning and being organized so this comes fairly easy to me. If you aren't the planning type it might take a bit of time to get into the routine. Don't try to overly plan your life right from the get go if you aren't used to it. Try implementing one step at a time and slowly adjusting. There isn't one correct way to organize your day so tweak these tips to make them work for you!
Some of the most beautiful, delicious, and useful things can be discovered while being spontaneously creative!
Wednesday, September 28, 2016
Wednesday, September 21, 2016
Ham & Pepperoni Pizza Pockets
Bringing back some nostalgia for you aren't I? In elementary school I loved having pizza pops for lunch. Hot, cheesy, meaty, and fast. All the requirements for a great school lunch. A few years ago I saw that friendly box in the grocery freezer section and decided I needed to experience the joy one more time. The unfortunate part is that those pizza pops didn't taste the same as they did all those years ago. That, combined with what I now know as an adult about healthy eating, made them a huge failure.
After I came across the recipe for the Creamy Chicken Pockets, I finally came up with a way to have my delicious pizza pops from the past in a more grow up, and slightly better for you, way! The trick to making these amazing is obviously the filling. Building flavour by allowing each ingredient to caramelize a bit before adding the next ingredient, really sets this filling apart from other fillings. The tender crescent rolls are delicious but the crumb topping provides some texture and takes it right over the top. Well, now that I'm drooling and kinda wish I was making these for supper, on with the recipe!
Ham & Pepperoni Pizza Pockets (Makes 4)
1T olive oil
3/4 cup diced onion
1 green pepper, diced
2t garlic
1/2 cup diced, cooked ham
1/2 cup diced pepperoni
28oz crushed tomatoes
1/2 cup shredded mozzarella cheese #1
2 pkg. Pilsbury crescent rolls
1/2 cup shredded mozzarella cheese #2
1/4 cup panko
1/4 cup parmesan cheese
Preheat oven to 375°. Mix together panko and parmesan cheese in a small bowl and set aside.
Heat oil in a pan over medium high heat and saute onions, green pepper and garlic until the onions start to brown ever so slightly. Add the ham and pepperoni and continue to cook until the meat begins to brown. Remember, brown is flavour! If you notice bit starting to stick to the bottom of the pan that's fantastic! So the next time someone says "Hey! You're burning supper" your response should be "No, I'm developing flavour". Stir the crushed tomatoes into the pan and heat until it starts to bubble up. Remove the pan from the heat and stir in cheese#1 until it is completely melted. Set the filling aside to cool completely.
You want the filling to be completely cool because if it's still warm it will start to melt the butter in the crescent rolls, and then you'll have a heck of a time trying to roll them up. Trust me. You also want to keep the crescent rolls in the fridge right up until you are ready to use them, or you risk softening them too much and it will make using them very difficult. Again, trust me. Aren't you glad I make mistakes so you don't have to?
Separate the crescent rolls into 4 rectangles and slightly spread them out using your hands. Place a good size mound of filling in the centre of the rectangle, about 3-4 tablespoons, and top it with a good sized pinch of cheese #2. To close up your pocket, bring the corners of the rectangle into the centre, opposing corners at a time, then bring up the side to meet in the middle. Very gently pickup your pocket and place it seam side down on a parchment lined baking sheet. If your centre seam splits, don't panic! You can try and pinch it back together, but if that doesn't work don't worry about it. It will bake up just fine, it will just be slightly open faced. Sprinkle the panko and parmesan mixture over each of the pockets and baking at 375° for 11-13 minutes. I like to turn on the broiler for a few minutes too just to crisp up the top, but keep an eye on it or you'll have black pockets.
To freeze: Bake as directed and allow to cool completely. Flash freeze pizza pockets on a parchment lined baking sheet, then transfer them to a freezer bag once frozen.
To serve: Place pizza pockets on a parchment lined baking sheet and bake at 375° for 30 minutes.
After I came across the recipe for the Creamy Chicken Pockets, I finally came up with a way to have my delicious pizza pops from the past in a more grow up, and slightly better for you, way! The trick to making these amazing is obviously the filling. Building flavour by allowing each ingredient to caramelize a bit before adding the next ingredient, really sets this filling apart from other fillings. The tender crescent rolls are delicious but the crumb topping provides some texture and takes it right over the top. Well, now that I'm drooling and kinda wish I was making these for supper, on with the recipe!
Ham & Pepperoni Pizza Pockets (Makes 4)
1T olive oil
3/4 cup diced onion
1 green pepper, diced
2t garlic
1/2 cup diced, cooked ham
1/2 cup diced pepperoni
28oz crushed tomatoes
1/2 cup shredded mozzarella cheese #1
2 pkg. Pilsbury crescent rolls
1/2 cup shredded mozzarella cheese #2
1/4 cup panko
1/4 cup parmesan cheese
Preheat oven to 375°. Mix together panko and parmesan cheese in a small bowl and set aside.
Heat oil in a pan over medium high heat and saute onions, green pepper and garlic until the onions start to brown ever so slightly. Add the ham and pepperoni and continue to cook until the meat begins to brown. Remember, brown is flavour! If you notice bit starting to stick to the bottom of the pan that's fantastic! So the next time someone says "Hey! You're burning supper" your response should be "No, I'm developing flavour". Stir the crushed tomatoes into the pan and heat until it starts to bubble up. Remove the pan from the heat and stir in cheese#1 until it is completely melted. Set the filling aside to cool completely.
You want the filling to be completely cool because if it's still warm it will start to melt the butter in the crescent rolls, and then you'll have a heck of a time trying to roll them up. Trust me. You also want to keep the crescent rolls in the fridge right up until you are ready to use them, or you risk softening them too much and it will make using them very difficult. Again, trust me. Aren't you glad I make mistakes so you don't have to?
Separate the crescent rolls into 4 rectangles and slightly spread them out using your hands. Place a good size mound of filling in the centre of the rectangle, about 3-4 tablespoons, and top it with a good sized pinch of cheese #2. To close up your pocket, bring the corners of the rectangle into the centre, opposing corners at a time, then bring up the side to meet in the middle. Very gently pickup your pocket and place it seam side down on a parchment lined baking sheet. If your centre seam splits, don't panic! You can try and pinch it back together, but if that doesn't work don't worry about it. It will bake up just fine, it will just be slightly open faced. Sprinkle the panko and parmesan mixture over each of the pockets and baking at 375° for 11-13 minutes. I like to turn on the broiler for a few minutes too just to crisp up the top, but keep an eye on it or you'll have black pockets.
To freeze: Bake as directed and allow to cool completely. Flash freeze pizza pockets on a parchment lined baking sheet, then transfer them to a freezer bag once frozen.
To serve: Place pizza pockets on a parchment lined baking sheet and bake at 375° for 30 minutes.
Wednesday, September 14, 2016
How to decorate a Pokemon cake
The last of the summer babies in our family has now had their birthday. My brother Selby recently celebrated his birthday which means, cake! If you ask Roman any question about birthdays the first thing he says is; cake? Now that's my boy! This wasn't a huge party, just cake with the family so my mom was going to pick up a cake for him at the grocery store. FOR SHAME!! I may be busy, but I will always find time to make a birthday cake! In light of the recent Pokémon hunting adventure mom, Selby, Bianca and I went on after Roman's family cake day, I decided to make Selby a Pokeball cake!
For this cake I used my "chocolate cupcakes from scratch" recipe. I don't know if I would necessarily recommend this recipe for cakes, because it's so fluffy it sinks a bit in the middle, but it's so good who really cares. Plus you can just fill the dip in with more icing! Mmmmmm buttercream icing...
First step, cover the entire cake with icing. Start by dropping a good sized blob of icing in the middle-ish of your cake. Using a small icing spatula, push the icing over the edge of the cake. Holding your spatula vertically, slide your spatula back and forth to spread out the icing. Clear as mud right? That's why I recorded this part because I had a feeling it wouldn't be very easy to explain in just words, and taking photos while icing isn't exactly easy. Once the sides are coated, use an offset spatula to cover the top with icing. The goal for this step is to get just enough icing on the cake to cover the cake itself. Don't worry if you get a few tiny crumbs in the icing, we'll take care of that soon. If you do get some larger ones, just scoop them off with something other than your icing spatula. You don't want them getting back into the icing. Once your first layer of icing is on, pop your cake in the freezer for 2-3 minutes, just to set the icing.
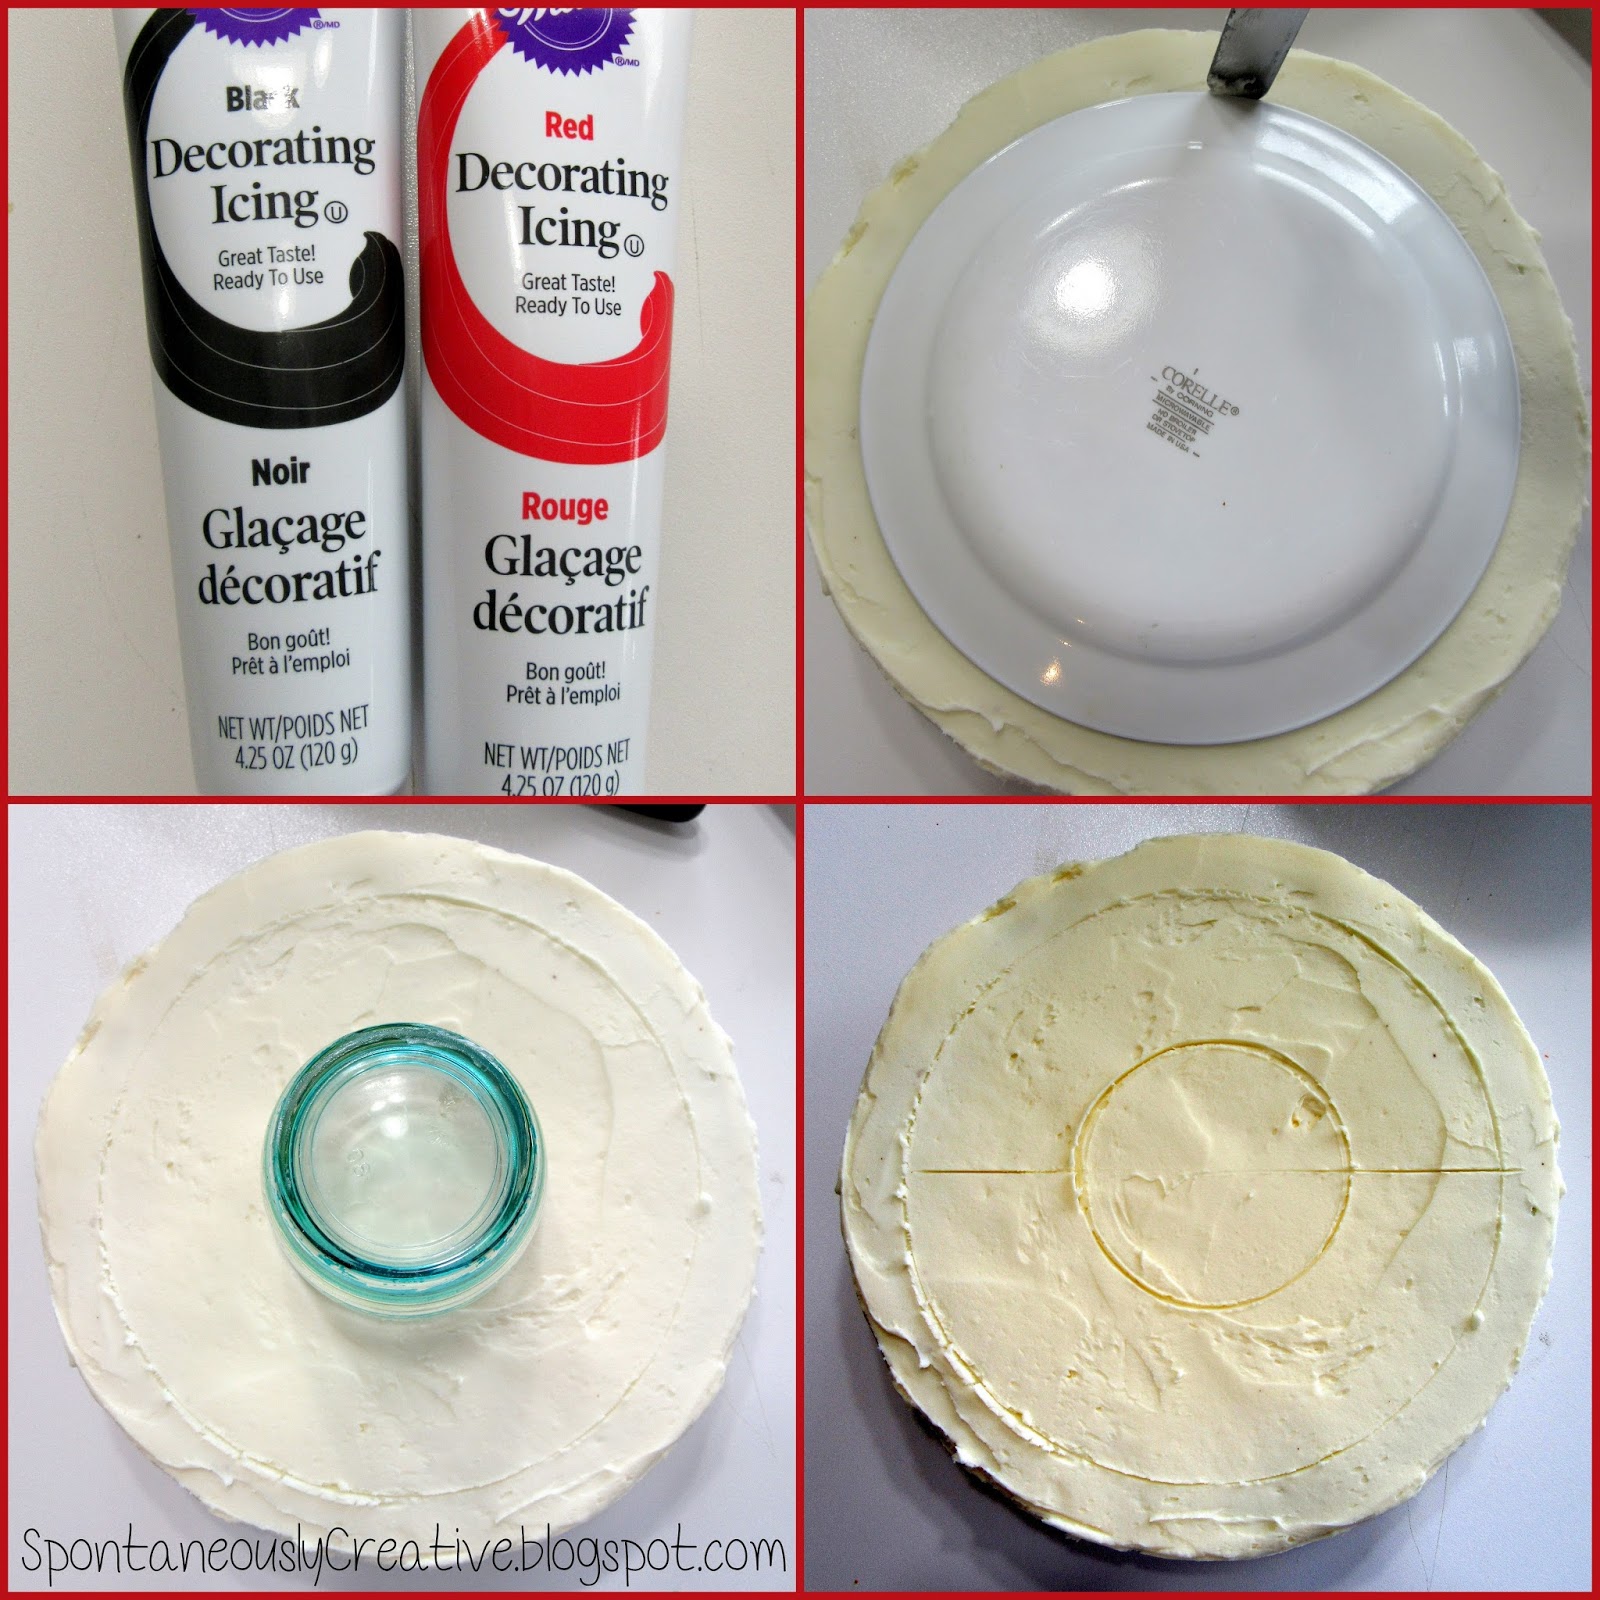
Because the icing is made with butter, it will firm up a bit, which means you can put on a second layer of icing without dragging up crumbs. Once the second coat is on, pop it back into the freezer for another 2-3 minutes. Now for the tricky part, piping a perfect circle. I am completely incapable of such feats, so instead I found an object (a small plate) that was the right size and traced around it with the small spatula. I did the same thing with a small glass and a cap for the inside of the pokeball. Finally, I drew the line through the centre of the pokeball with the offset spatula.
Normally I would tint my own buttercream for the decorating, but this time I decided to give the Wilton prepackaged icing a shot. I screwed on a Wilton 8 tip and went to town. It was actually super easy to use and gave me a decently smooth line, once I got the hang of it. Once the black was all done, I cleaned out the tip and switched it onto the red icing. I piped rows around one side of the Pokeball, then I spread out the icing with the small spatula to make it a solid, smooth color. Cleaning the tip once again, I attached it to a piping bag and filled it with some of the buttercream. I used the same technique with the white as I did with the red. To finish off the cake, I piped balls around the base of the cake to finish off the edge.
Considering I banged the cake out in an hour while Bianca slept and Roman was at camp, I'm pretty pleased with how it turned out. I made this cake the day before we were having the birthday and I was a little disappointed by the way it looked the next morning. The black icing bled into the white icing a lot. I didn't treat this cake any different than I've treated any other cake I've made, so I think it had something to do with the premade icing being made with oil. So if you aren't planning on eating this cake the same day you decorate it, I would recommend taking the time to tint your own icing so you don't wake up to a mess. Luckily, nobody around here cares, particularly not Roman, who was just exited that we were having cake!
For this cake I used my "chocolate cupcakes from scratch" recipe. I don't know if I would necessarily recommend this recipe for cakes, because it's so fluffy it sinks a bit in the middle, but it's so good who really cares. Plus you can just fill the dip in with more icing! Mmmmmm buttercream icing...
First step, cover the entire cake with icing. Start by dropping a good sized blob of icing in the middle-ish of your cake. Using a small icing spatula, push the icing over the edge of the cake. Holding your spatula vertically, slide your spatula back and forth to spread out the icing. Clear as mud right? That's why I recorded this part because I had a feeling it wouldn't be very easy to explain in just words, and taking photos while icing isn't exactly easy. Once the sides are coated, use an offset spatula to cover the top with icing. The goal for this step is to get just enough icing on the cake to cover the cake itself. Don't worry if you get a few tiny crumbs in the icing, we'll take care of that soon. If you do get some larger ones, just scoop them off with something other than your icing spatula. You don't want them getting back into the icing. Once your first layer of icing is on, pop your cake in the freezer for 2-3 minutes, just to set the icing.
Because the icing is made with butter, it will firm up a bit, which means you can put on a second layer of icing without dragging up crumbs. Once the second coat is on, pop it back into the freezer for another 2-3 minutes. Now for the tricky part, piping a perfect circle. I am completely incapable of such feats, so instead I found an object (a small plate) that was the right size and traced around it with the small spatula. I did the same thing with a small glass and a cap for the inside of the pokeball. Finally, I drew the line through the centre of the pokeball with the offset spatula.
Normally I would tint my own buttercream for the decorating, but this time I decided to give the Wilton prepackaged icing a shot. I screwed on a Wilton 8 tip and went to town. It was actually super easy to use and gave me a decently smooth line, once I got the hang of it. Once the black was all done, I cleaned out the tip and switched it onto the red icing. I piped rows around one side of the Pokeball, then I spread out the icing with the small spatula to make it a solid, smooth color. Cleaning the tip once again, I attached it to a piping bag and filled it with some of the buttercream. I used the same technique with the white as I did with the red. To finish off the cake, I piped balls around the base of the cake to finish off the edge.
Considering I banged the cake out in an hour while Bianca slept and Roman was at camp, I'm pretty pleased with how it turned out. I made this cake the day before we were having the birthday and I was a little disappointed by the way it looked the next morning. The black icing bled into the white icing a lot. I didn't treat this cake any different than I've treated any other cake I've made, so I think it had something to do with the premade icing being made with oil. So if you aren't planning on eating this cake the same day you decorate it, I would recommend taking the time to tint your own icing so you don't wake up to a mess. Luckily, nobody around here cares, particularly not Roman, who was just exited that we were having cake!
Wednesday, September 7, 2016
How to can tomatoes without a canner
Tomato season is in full swing in our garden, and as per usual, I planted WAY too many tomato plants. Well, actually I only planted 6, but those six have each grown to the size of a shopping cart. No joke. Last year we planted all cherry tomatoes (by mistake) and when they started to ripen I just could keep up them to even get them into jars. It's a good thing I planted half the amount of plants I usually do because we have a ton of tomatoes. Just this morning Roman and I suited up and picked two gallons of tomatoes, to add to the one gallon I already have waiting for me in the garage, and the two jars I have already canned.
You can can (can can, can you do the can can?) any kind of tomatoes, but Roma tomatoes work really well because they are mainly flesh and less of the juicy/seedy stuff in the middle. I have been picking ours only they start to show a bit of orange and letting them ripen in the garage in a cardboard box. I find this helpful because I don't have to trudge into the mosquito infested garden to check the state of the tomatoes. I just catch a quick glace on the way out the door and then I don't have to worry about them rotting on the vine.
Since we use a lot of crushed tomatoes during the year, whether it be for pasta or tacos, I like to can our tomatoes this way. I made salsa a few years back and it was delicious if your family isn't into crushed tomatoes. Canners are super expensive and frankly the whole process seems scary to me since I know squat about canning. The first year we planted our garden my mom came out and showed me how to can tomatoes without one. This method is super easy, requires minimal equipment, and takes no time at all. Let's get started!
Prep the sealers
Choose the size of sealer that works best for you. I found these pretty green sealers at Superstore and they are big enough to hold enough sauce for the whole family for a meal. Fill your sink and a smaller bowl with hot water. Submerge the jars in the sink and the collar and lid in the smaller bowl. The hot water will sterilize the jars, and I'm sure there are other reasons you do this but this is what mom told me to do so that's what I do.
Chop up the tomatoes
This doesn't have to be a really precise chopping job. I cut my tomatoes into 6 pieces, but even quarters would be fine. Toss all of the tomatoes in a very large pot.
Cook the tomatoes
Bring the tomatoes in a boil over medium-high heat. Cook, stirring occasionally, until they start to break down and the excess moisture is cooked away. The time will vary depending on the kind of tomatoes you are using. Remove the pot from the heat.
Blend
They easiest way to do this is with a boat motor. Most people call it an immersion blender, but I like boat motor better. If you don't have a boat motor, or yours has sprouted legs and moved out like mine, a blender will work just find. Be extremely careful though because the tomatoes are very hot and if the lid isn't on tight enough it might blow up in your face. Once all the tomatoes are blended, pour them back into the pot and bring to a boil again. You want them piping hot when they go into the sealers.
Seal
I like to keep the pot on the stove on low just so the tomatoes don't lose their heat. Ladle the tomatoes into the jars until it reaches the bottom of the threads. If you have small mouthed jars, use a funnel to make the filling process easier. Once the jar is filled, wipe the rim (you don't want any sauce on it before you seal it), top with the lid and twist on the collar. You'll want to use a towel to hang onto the jar because it's going to be smokin' hot. I borrowed John to make sure the collar was on super tight.
Sit your jars aside and wait to hear the "pop" of the lid sealing. You may not hear it from all the jars but you can see if they are sealed by pressing on the centre on the lid. If it pops up and down it isn't sealed, if it doesn't move you're good to go!
You can can (can can, can you do the can can?) any kind of tomatoes, but Roma tomatoes work really well because they are mainly flesh and less of the juicy/seedy stuff in the middle. I have been picking ours only they start to show a bit of orange and letting them ripen in the garage in a cardboard box. I find this helpful because I don't have to trudge into the mosquito infested garden to check the state of the tomatoes. I just catch a quick glace on the way out the door and then I don't have to worry about them rotting on the vine.
Since we use a lot of crushed tomatoes during the year, whether it be for pasta or tacos, I like to can our tomatoes this way. I made salsa a few years back and it was delicious if your family isn't into crushed tomatoes. Canners are super expensive and frankly the whole process seems scary to me since I know squat about canning. The first year we planted our garden my mom came out and showed me how to can tomatoes without one. This method is super easy, requires minimal equipment, and takes no time at all. Let's get started!
Prep the sealers
Choose the size of sealer that works best for you. I found these pretty green sealers at Superstore and they are big enough to hold enough sauce for the whole family for a meal. Fill your sink and a smaller bowl with hot water. Submerge the jars in the sink and the collar and lid in the smaller bowl. The hot water will sterilize the jars, and I'm sure there are other reasons you do this but this is what mom told me to do so that's what I do.
Chop up the tomatoes
This doesn't have to be a really precise chopping job. I cut my tomatoes into 6 pieces, but even quarters would be fine. Toss all of the tomatoes in a very large pot.
Cook the tomatoes
Bring the tomatoes in a boil over medium-high heat. Cook, stirring occasionally, until they start to break down and the excess moisture is cooked away. The time will vary depending on the kind of tomatoes you are using. Remove the pot from the heat.
Blend
They easiest way to do this is with a boat motor. Most people call it an immersion blender, but I like boat motor better. If you don't have a boat motor, or yours has sprouted legs and moved out like mine, a blender will work just find. Be extremely careful though because the tomatoes are very hot and if the lid isn't on tight enough it might blow up in your face. Once all the tomatoes are blended, pour them back into the pot and bring to a boil again. You want them piping hot when they go into the sealers.
Seal
I like to keep the pot on the stove on low just so the tomatoes don't lose their heat. Ladle the tomatoes into the jars until it reaches the bottom of the threads. If you have small mouthed jars, use a funnel to make the filling process easier. Once the jar is filled, wipe the rim (you don't want any sauce on it before you seal it), top with the lid and twist on the collar. You'll want to use a towel to hang onto the jar because it's going to be smokin' hot. I borrowed John to make sure the collar was on super tight.
Sit your jars aside and wait to hear the "pop" of the lid sealing. You may not hear it from all the jars but you can see if they are sealed by pressing on the centre on the lid. If it pops up and down it isn't sealed, if it doesn't move you're good to go!
Wednesday, August 31, 2016
Home Preschool
Now that Roman is 3, I've been thinking about preschool. Around here kids can start pre-kindergarten at 3, but I've always been a little leery about it. In my experience, boys usually don't enjoy school as much as girls or the novelty of it wears off quicker. Case in point, my brother proudly proclaimed to my mom in grade 3 that he was all done school. Nothing like the harsh reality of being told you have another 9 years to go... I'm hoping to get Roman to at least grade 5 before he tells me he's done. I'm also not sure Roman is ready to be sitting and focusing in a structured environment for an extended period of time just yet. I mean, he did just turn 3 a month ago.
After talking it over with John, my mom, Trellyn, Roxy (who also happened to be Roman's camp counsellor this year), I decided to hold off on pre-K for this year. I do however feel like he would benefit from learning certain things, like his alphabet, and I'm always looking for activities to keep him busy and engaged. So, I decided to make my own preschool. Obviously I'm not a teacher so this likely doesn't meet or follow the school systems curriculum, but it will help Roman learn different skills that will benefit him farther down the road.
I found a binder and some loose leaf in the basement, picked up a few dividers at Wal Mart and set down to plan a preschool program for Roman. I made a section for each month, and divided the months out one week at a time. A simple search online yielded an endless supply of ideas. I wrote out the materials, directions and learning objectives for each activity out and allocated the activities throughout the weeks. I wanted a pouch to hold some of the smaller items, so being the resourceful person that I am, I decided to punch some holes in a freezer bags and add it into the binder. Works like a dream!
My plan is to have the lessons planned and prepped one month at a time. I'm almost done with September's prep, I only have a few items left to pick up, so I wanted to share what I have planned for September.
September 1-10: Spelling our name - dinos & Alphabet sensory play
September 11-17: Exploding paint bags & Spelling our name - sentence strip
September 18-24: Alphabet fishing & Dramatic play Spaghetti shop
September 25-30: Ziplock quilt alphabet & Wash the dog - pet sensory activity
I've also added in some alphabet recognition sheets to most of the weeks. I decided to only have 2-3 activities per week since we will still be attending play group on a fairly regular basis, and I'm also planning on registering Roman for the preschool story time at the library.
I LOVE planning lessons like this. I know all my teacher friends are probably cringing because I know planning can be a daunting process. but sometimes I feel like I could do this all day. Maybe I should have gone to school for education in stead of business administration. Maybe that'll be my second career!
After talking it over with John, my mom, Trellyn, Roxy (who also happened to be Roman's camp counsellor this year), I decided to hold off on pre-K for this year. I do however feel like he would benefit from learning certain things, like his alphabet, and I'm always looking for activities to keep him busy and engaged. So, I decided to make my own preschool. Obviously I'm not a teacher so this likely doesn't meet or follow the school systems curriculum, but it will help Roman learn different skills that will benefit him farther down the road.
I found a binder and some loose leaf in the basement, picked up a few dividers at Wal Mart and set down to plan a preschool program for Roman. I made a section for each month, and divided the months out one week at a time. A simple search online yielded an endless supply of ideas. I wrote out the materials, directions and learning objectives for each activity out and allocated the activities throughout the weeks. I wanted a pouch to hold some of the smaller items, so being the resourceful person that I am, I decided to punch some holes in a freezer bags and add it into the binder. Works like a dream!
My plan is to have the lessons planned and prepped one month at a time. I'm almost done with September's prep, I only have a few items left to pick up, so I wanted to share what I have planned for September.
September 1-10: Spelling our name - dinos & Alphabet sensory play
September 11-17: Exploding paint bags & Spelling our name - sentence strip
September 18-24: Alphabet fishing & Dramatic play Spaghetti shop
September 25-30: Ziplock quilt alphabet & Wash the dog - pet sensory activity
I've also added in some alphabet recognition sheets to most of the weeks. I decided to only have 2-3 activities per week since we will still be attending play group on a fairly regular basis, and I'm also planning on registering Roman for the preschool story time at the library.
I LOVE planning lessons like this. I know all my teacher friends are probably cringing because I know planning can be a daunting process. but sometimes I feel like I could do this all day. Maybe I should have gone to school for education in stead of business administration. Maybe that'll be my second career!
Wednesday, August 24, 2016
5 Days of Preschool Snacks
Roman experienced another first this summer; day camp!! I remember attending the YMCA day camps when I was little and they were so much fun! So when I found out that Roman was old enough this year, I immediately signed him up. Unfortunately he didn't turn 3 until camp was almost done so he was only able to participate in one week, but it was awesome! Not only did I get a break to get some things accomplished around the house, but Roman got to experience life away from me. The best part about this camp was that Roxy (who facilitates playgroup and is good friend of mine) runs the camp, and it takes place at playgroup! This made the transition of being without me seamless because he loves Roxy, and he's obviously familiar with the building. So seamless in fact, that when I stuck around for a few minutes to talk to Roxy, Roman came over and loudly proclaimed "Mom, go!". Alrighty then....
My favorite part of camp, other than the free time, was packing Roman's snacks! Maybe it's because I'm new to the world of lunch packing, but I loved it!! I picked up this bento style lunch box by Starfrit at Wal Mart for $6 and it worked perfectly. The sections allow you to separate foods and they come out for easy cleaning. I also used some silicone muffin wrappers to further divide the compartments. All of these snacks are nut free as required by the YMCA, but I feel like that's pretty standard these days. Oh, how could I forget! I also added a sticker into the snack box each day! I really wanted to send little notes in his snack, but the fact that Roman can't read kinda put a damper on that parade.
Day 1
Banana bran muffin, graham crackers, sliced peaches, Babybel cheese, fruit snacks, water.
Roman is usually a very predictable creature, and this time he didn't disappoint. He ate all the fruit snacks and cheese, one graham cracker, one peach slice, and took one bite from the muffin.
Day 2
WOW Butter roll-up, chocolate chips, carrots, tomatoes, Babybel cheese, watermelon, juice box.
Tortilla roll-up are always hit and miss with Roman, and this time he only ate one. Obviously all the chocolate chips and cheese were gone, as well as a few carrots. I wasn't surprised that the tomatoes were left, but if you don't try there is no chance they'll eat it!
Day 3
Bread, deli chicken meat, cheddar cheese, apple slices, fruit snacks, water.
Deconstructed sandwich day! Roman loves deconstructed sandwiches. What I should say is he has been deconstructing his sandwiches since he started solids, so now I just serve them that way. The only thing that came back from this snack was a few apple slices.
Day 4
Hard boiled egg, crackers, Babybel cheese, avocado, garden carrots, chocolate dipped granola bar, water.
This was by far Roman's most loved snack of the week. Even Roxy laughed that he was very excited about the egg. He gobbled everything up except the garden carrots, which I promptly ate.
Day 5
WOW Butter banana sushi, hard boiled egg, orange, Babybel cheese, grapes, water.
So by now you've probably noticed that Roman has a thing for Babybel cheese. I always made sure to send at least one thing I know he'd eat for sure so the poor guy didn't get hungry. They were on their way to the park this day so he didn't eat very much of anything, likely because he was excited to get going. I also mom failed and forgot his sticker this day! Luckily he didn't notice or I would have felt like a bum.
Hopefully these snacks will give you some inspiration for upcoming school or daycare snacks/lunches! I had a blast making these snacks. I should have registered Roman for preschool this year just so I could make lunches every day! I think I'm going to have to keep this up for playgroup because we saved a ton of money from the typical snacks that he normally eats. Plus these are so much better for him that the pre-packaged stuff.
I'd love to hear your ideas for snacks/lunches as well! What is your kid's favorite food to find in their lunch box?
My favorite part of camp, other than the free time, was packing Roman's snacks! Maybe it's because I'm new to the world of lunch packing, but I loved it!! I picked up this bento style lunch box by Starfrit at Wal Mart for $6 and it worked perfectly. The sections allow you to separate foods and they come out for easy cleaning. I also used some silicone muffin wrappers to further divide the compartments. All of these snacks are nut free as required by the YMCA, but I feel like that's pretty standard these days. Oh, how could I forget! I also added a sticker into the snack box each day! I really wanted to send little notes in his snack, but the fact that Roman can't read kinda put a damper on that parade.
Day 1
Banana bran muffin, graham crackers, sliced peaches, Babybel cheese, fruit snacks, water.
Roman is usually a very predictable creature, and this time he didn't disappoint. He ate all the fruit snacks and cheese, one graham cracker, one peach slice, and took one bite from the muffin.
Day 2
WOW Butter roll-up, chocolate chips, carrots, tomatoes, Babybel cheese, watermelon, juice box.
Tortilla roll-up are always hit and miss with Roman, and this time he only ate one. Obviously all the chocolate chips and cheese were gone, as well as a few carrots. I wasn't surprised that the tomatoes were left, but if you don't try there is no chance they'll eat it!
Day 3
Bread, deli chicken meat, cheddar cheese, apple slices, fruit snacks, water.
Deconstructed sandwich day! Roman loves deconstructed sandwiches. What I should say is he has been deconstructing his sandwiches since he started solids, so now I just serve them that way. The only thing that came back from this snack was a few apple slices.
Day 4
Hard boiled egg, crackers, Babybel cheese, avocado, garden carrots, chocolate dipped granola bar, water.
This was by far Roman's most loved snack of the week. Even Roxy laughed that he was very excited about the egg. He gobbled everything up except the garden carrots, which I promptly ate.
Day 5
WOW Butter banana sushi, hard boiled egg, orange, Babybel cheese, grapes, water.
So by now you've probably noticed that Roman has a thing for Babybel cheese. I always made sure to send at least one thing I know he'd eat for sure so the poor guy didn't get hungry. They were on their way to the park this day so he didn't eat very much of anything, likely because he was excited to get going. I also mom failed and forgot his sticker this day! Luckily he didn't notice or I would have felt like a bum.
Hopefully these snacks will give you some inspiration for upcoming school or daycare snacks/lunches! I had a blast making these snacks. I should have registered Roman for preschool this year just so I could make lunches every day! I think I'm going to have to keep this up for playgroup because we saved a ton of money from the typical snacks that he normally eats. Plus these are so much better for him that the pre-packaged stuff.
I'd love to hear your ideas for snacks/lunches as well! What is your kid's favorite food to find in their lunch box?
Wednesday, August 17, 2016
Construction Birthday Cake
This cake was so much fun to make! Originally I was just going to make an average square cake with a construction site on top of it, but I decided to up the cool factor a bit. I'm not going to lie, I was a little concerned about making this cake when I first started, but it actually turned out to be easier than I thought! By far the best part of this cake is that it's supposed to look like a construction site so the icing doesn't have to be perfectly smooth!
I start out by baking a 9" round vanilla cake. I thought for sure that Roman would want a chocolate cake, but apparently not. Once the cake was completely cool I turned it out onto a cutting board to start making it look like a 3. I started by cutting the came in half with a bread knife, which seemed to work fairly well. I'm not one to free hand much when it comes to cakes, and heaven knows I wouldn't be able to cut a smooth half circle, so I found a cup to use to trace for the centre of the 3. I then used those inside pieces to cut pieces to fill in the centre of the 3 and to give the ends a bit of curve.
Now the delicious and fun part; icing and decorating!! The chocolate buttercream I used for this cake is literally the best icing I have ever had in my life! It tastes very similar to the premade frosting you get at the grocery store but without that oily/fake taste the premade stuff has. I actually froze the leftovers to use later on because it's THAT good!
I start by putting a good sized blog of icing on the pieces I had cut out and sticking them to the body of the cake. Then I slathered the entire cake in a generous layer of chocolate frosting. I found that the cut pieces were crumbling on me a bit, so I popped the cake into the freezer to set up a bit. Just a few minutes was enough for the cake to become firm enough that it didn't crumbled when I was spreading the icing.
I found the small plastic construction equipment at Dollar Tree and they were the perfect size for the cake. I filled the cement mixer with icing and left a bit hanging out the top. I then filled the back of the dump truck with icing and chocolate rocks that I found at Bulk Barn. I decided to use the same technique with the loader bucket so it looked like the loader was filling the truck. A bit of icing on the wheels of the truck was enough to hold it in place. I crushed up chocolate cookie wafers and sprinkled them onto the cake to make a bumpy road of sorts and had the roller "smoothing them out" while another dump truck looking thing dumped the crumbs onto the cake. The chocolate covered caramel balls between the candles was a bit of a throw on because I had them, and felt like I should use them. This is why you should never buy you decorating materials until you know what you're doing. Now I have an entire bag of these balls that I'm going to have to eat. Oh the horror! I finished off the cake by lining the base with chocolate rocks. I really liked the way it love the way it looks, and it saved me from having to bust out the piping bag at 9pm!
Roman was PUMPED when he saw his cake in the morning. He pointed out all the equipment and was really excited that he could eat the rocks. I love making cakes like this for Roman (and soon to be Bianca) because I love the reaction I get from him. There is nothing better than seeing his eyes light up at the cake I've spent so much time on.
Do you make your kid's cakes? What was your kid's favorite cake and what was their reaction?
I start out by baking a 9" round vanilla cake. I thought for sure that Roman would want a chocolate cake, but apparently not. Once the cake was completely cool I turned it out onto a cutting board to start making it look like a 3. I started by cutting the came in half with a bread knife, which seemed to work fairly well. I'm not one to free hand much when it comes to cakes, and heaven knows I wouldn't be able to cut a smooth half circle, so I found a cup to use to trace for the centre of the 3. I then used those inside pieces to cut pieces to fill in the centre of the 3 and to give the ends a bit of curve.
Now the delicious and fun part; icing and decorating!! The chocolate buttercream I used for this cake is literally the best icing I have ever had in my life! It tastes very similar to the premade frosting you get at the grocery store but without that oily/fake taste the premade stuff has. I actually froze the leftovers to use later on because it's THAT good!
I start by putting a good sized blog of icing on the pieces I had cut out and sticking them to the body of the cake. Then I slathered the entire cake in a generous layer of chocolate frosting. I found that the cut pieces were crumbling on me a bit, so I popped the cake into the freezer to set up a bit. Just a few minutes was enough for the cake to become firm enough that it didn't crumbled when I was spreading the icing.
I found the small plastic construction equipment at Dollar Tree and they were the perfect size for the cake. I filled the cement mixer with icing and left a bit hanging out the top. I then filled the back of the dump truck with icing and chocolate rocks that I found at Bulk Barn. I decided to use the same technique with the loader bucket so it looked like the loader was filling the truck. A bit of icing on the wheels of the truck was enough to hold it in place. I crushed up chocolate cookie wafers and sprinkled them onto the cake to make a bumpy road of sorts and had the roller "smoothing them out" while another dump truck looking thing dumped the crumbs onto the cake. The chocolate covered caramel balls between the candles was a bit of a throw on because I had them, and felt like I should use them. This is why you should never buy you decorating materials until you know what you're doing. Now I have an entire bag of these balls that I'm going to have to eat. Oh the horror! I finished off the cake by lining the base with chocolate rocks. I really liked the way it love the way it looks, and it saved me from having to bust out the piping bag at 9pm!
Roman was PUMPED when he saw his cake in the morning. He pointed out all the equipment and was really excited that he could eat the rocks. I love making cakes like this for Roman (and soon to be Bianca) because I love the reaction I get from him. There is nothing better than seeing his eyes light up at the cake I've spent so much time on.
Do you make your kid's cakes? What was your kid's favorite cake and what was their reaction?
Subscribe to:
Posts (Atom)